September 30, 2011

Firefox 7 now in repositories with better performance


From Webupd.org  Written by in , ,


A quick update for those of you are using Ubuntu 10.10 Maverick Meerkat or 10.04 Lucid Lynx and want to upgrade to the latest Firefox 7: the new version is now available in the Firefox stable PPA.

Firefox 7 should be available in the official Ubuntu 11.04 Natty Narwhal and 11.10 Oneiric Ocelot repositories very soon.


Firefox 7 is brings improved memory usage and sync, CSS3 text overflow, Azure for improved HTML5 animation, web timing spec - a feature that enables developers to measure page load time and more.

To install the latest Firefox 7 in Ubuntu 10.10 or 10.04, use the commands below:
sudo add-apt-repository ppa:mozillateam/firefox-stable
sudo apt-get update
sudo apt-get install firefox


If you want to test newer Firefox versions, see:

Source: http://www.webupd8.org/2011/09/firefox-7-available-in-its-stable-ppa.html 

Firefox 7 Beta Arrives in Ubuntu 11.10, Scores a Perfect 100 in Acid3 Test - from Techdrivein.com

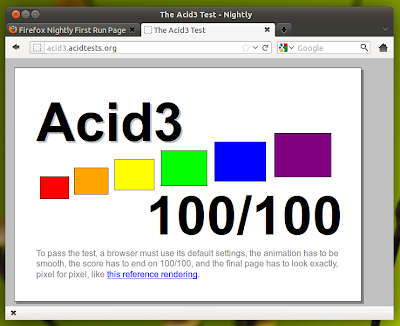
Firefox 7 beta is now the default web browser in Ubuntu 11.10 Onceric Ocelot beta and for the first time ever, Firefox scores a perfect 100 in Acid3 tests. Congratulations Mozilla!

Firefox 7 Beta Firefox 7 Beta Arrives in Ubuntu 11.10, Scores a Perfect 100/100 in Acid3 Test

Acid3 Tests and Web Browsers
Acid3 test is a web test page from the Web Standards Project that checks a web browser's compliance with elements of various web standards, particularly the Document Object Model (DOM) and JavaScript. Acid3 test was launched on 3 March 2008 by Ian Hickson, a Google employee and the tests became popular with the advent of Google Chrome which scored a perfect 100 in Acid3 tests and reignited the browser wars.

When all the other popular browsers like Opera and Safari along with Google Chrome soared in terms of performance, Firefox and IE consistently under performed. But that's changing now. Firefox has recently decided to shift to a rapid release cycle mode(like Google Chrome) and the move is already starting to give results.

Firefox nightly builds ubuntu

The first screenshot shows the results of Acid3 tests in Firefox 7.0 beta, which is the default web browser in upcoming Ubuntu 11.10 Oneric Ocelot. This one above shows the results of Acid3 tests in Firefox 9 Alpha running in Ubuntu 11.04 Natty Narwhal. Yes, both score a perfect 100. Learn how to install Firefox 9.0 Alpha in Ubuntu 11.04 Natty Nawhal.

Firefox 9 Alpha 1 Ubuntu 11.04

From what I have experienced, latest releases of Firefox has significant performance gains over its previous iterations. These improvements coupled with overheating issues of Chromium and Google Chrome were good enough reasons for me to switch back to Firefox. One thing is sure, even though Google Chrome has started eating into Firefox's and IE's market share big time, browser wars are far from over. Firefox is not ready to give up just yet.

Source: http://www.techdrivein.com/2011/09/firefox-7-beta-arrives-in-ubuntu-1110.html?utm_source=feedburner&utm_medium=feed&utm_campaign=Feed%3A+techdrivein+%28Tech+Drive-in%29

September 29, 2011

Things to tweak after installing Ubuntu 11.04

Another great article from the folks at Webupd.org
A note before reading this post: before giving up on Unity without giving it a try... don't. Try Unity for a few days - yes, it's not a finished product but it's actually quite interesting - and if you don't like it then switch.

If you've just upgraded to Ubuntu 11.04 Natty Narwhal, there are probably a few things you'll miss, so here is how to get them back as well as some other things you may find useful.


Install CompizConfig Settings Manager and Tweak Unity to better suit your needs:

CompizConfig Settings Manager


sudo apt-get install compizconfig-settings-manager

Then search for CompizConfig Settings Manager in Dash and you'll find the Unity-related options under the "Unity" Compiz plugin. Some other options are under other plugins so check those out too.

Using CCSM, you'll be able to tweak the Unity launcher reveal mode, hide behavior, change some Unity-specific keyboard shortcuts, change the Unity launcher icon size, the top panel opacity, tweak various animations and more.


Another tool for configuring some hidden Unity settings is Dconf-editor.

Dconf-editor

To be able to use it you must firstly install dconf-tools:
sudo apt-get install dconf-tools

Then press ALT + F2, enter "dconf-editor" and look under desktop > unity.


Using an AMD (ATI) graphics card with the latest Catalyst 11.04 and experience bad performance / lag?

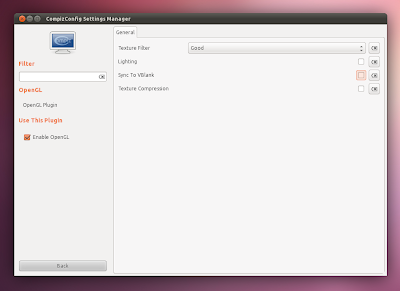
CCSM

To get better performance, install CompizConfig Settings Manager (see the first tip in the post for installing it), then open it from Dash and go to the "OpenGL" plugin and uncheck the "Sync to VBlank" option.

(fix thanks to SarfzStrife)


Is Dash displaying your hidden / private files or your porn?

Zeitgeist Activity Log Manager


Install Activity Log Manager for Zeitgeist and on the "Files" tab blacklist the folders where you keep your private files (porn). You can also completely disable Zeitgeist by clicking the "Logging active" button at the bottom but no files will show up in Dash after doing this so its better to only backlist certain folders (or applications). You can also use this to clear the Zeitgeist history (and thus the Dash history).


Want to monitor the RAM / CPU usage?

Ubuntu 11.04 system monitor indicator

Yes, the Unity top panel doesn't support any kind of applets, just AppIndicators. Luckily, there's an AppIndicator that displays the RAM and CPU usage. Install it using the commands below:
sudo add-apt-repository ppa:alexeftimie/ppa
sudo apt-get update
sudo apt-get install indicator-sysmonitor

Then, launch System Monitor Indicator from Dash.


Want the regular Firefox 4 menu like on Windows?

Firefox 4 menu

In Firefox, go to the Addons Manager and disable the Global Menu Bar Integration extension, restart Firefox, then right click the menu and deselect the Menu Bar.


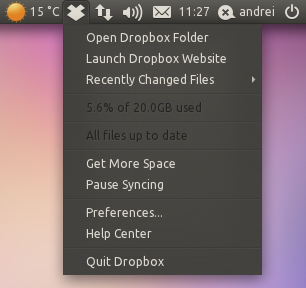
Do you use Dropbox and the AppIndicator doesn't show up on the Unity panel?

Dropbox AppIndicator

Fix it using the following commands:
cd
wget http://webupd8.googlecode.com/files/fixdropbox
chmod +x fixdropbox
./fixdropbox

Dropbox will now start with a 20 seconds delay! That's so it always starts, without this most of the time it won't show up!


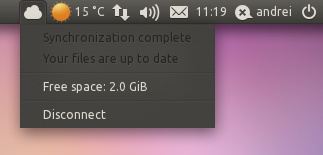
Ubuntu One is displayed on the Unity launcher and the Messaging Menu (why the...?) yet both entries are totally useless - none displays the current sync status.

UbuntuOne Indicator

If you use Ubuntu One, make it usable by installing the Ubuntu One AppIndicator:
sudo add-apt-repository ppa:rye/ubuntuone-extras
sudo apt-get update
sudo apt-get install ubuntuone-indicator

Then launch it from the Dash.


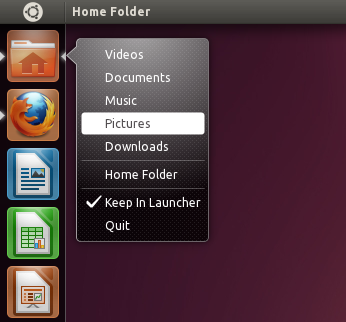
Missing a quick way to access your Downloads / Pictures / Documents / Videos folders?

Home folder quicklists

Sure, you can access them via Dash but for a quicker solution, add quicklists to the Nautilus Home folder launcher (which is displayed by default on top of the Unity launcher) by running the following command (copy all the text as a single command!) in a terminal:

echo "[Desktop Entry]

Name=Home Folder
Comment=Open your personal folder
TryExec=nautilus
Exec=nautilus --no-desktop
Icon=user-home
Terminal=false
StartupNotify=true
Type=Application
Categories=GNOME;GTK;Core;
OnlyShowIn=GNOME;Unity;
X-GNOME-Bugzilla-Bugzilla=GNOME
X-GNOME-Bugzilla-Product=nautilus
X-GNOME-Bugzilla-Component=general
X-Ubuntu-Gettext-Domain=nautilus

X-Ayatana-Desktop-Shortcuts=Videos;Documents;Music;Pictures;Downloads
[Videos Shortcut Group]
Name=Videos
Exec=nautilus Videos
TargetEnvironment=Unity


[Documents Shortcut Group]
Name=Documents
Exec=nautilus Documents
TargetEnvironment=Unity

[Music Shortcut Group]
Name=Music
Exec=nautilus Music
TargetEnvironment=Unity

[Pictures Shortcut Group]
Name=Pictures
Exec=nautilus Pictures
TargetEnvironment=Unity

[Downloads Shortcut Group]
Name=Downloads
Exec=nautilus Downloads
TargetEnvironment=Unity" | sudo tee /usr/share/applications/nautilus-home.desktop

If the quicklists don't show up, you may need to log out or restart Unity.

(tip via AskUbuntu)


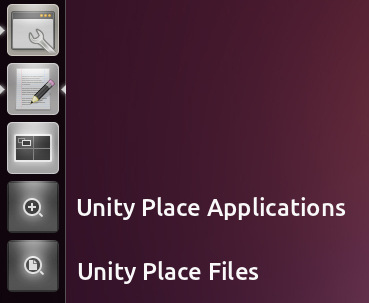
Want to remove Unity Places Files / Applications shortcuts from the Unity Launcher?

Unity launcher

Clicking the Ubuntu logo in the top left corner of the screen and then "More Apps" or "Find in Files" will let you access the Unity Places Files / Applications. You can also directly search in Dash for an application name. However, 2 more shortcuts are placed on the launcher that serve the same purpose: Unity Place Files / Applications:

Unity place files applications


Since vertical space is important even on a large monitor, if you can find your way without these 2 Unity places, you'll probably want to remove them. Here's how to do it:

- firstly make a backup of the original files (the following commands will back them up in the "backups" folder in your home directory):
mkdir ~/backups
cp /usr/share/unity/places/applications.place ~/backups/
cp /usr/share/unity/places/files.place ~/backups/

Now, to hide Unity Place Files icon, run this command:
sudo sed -i '14i ShowEntry=false' /usr/share/unity/places/files.place

And to hide the Unity Place Applications icon, run this:
sudo sed -i '12i ShowEntry=false' /usr/share/unity/places/applications.place

Only run the above 2 commands once! Then log out and log back in or run "unity --replace".

If you want to restore the icons, remove the first "ShowEntry=false" entry in these two files:
  • /usr/share/unity/places/applications.place
  • /usr/share/unity/places/files.place

Or restore your backup:
sudo cp $HOME/backups/*.place /usr/share/unity/places/

(tip thanks to Richard Arkless; via Ubuntuforums)


By default, LibreOffice doesn't uses the AppMenu (Global Menu) which makes it inconsistent with the rest of the desktop.

LibreOffice appmenu

But you can manually install AppMenu support for LibreOffice:
sudo apt-get install lo-menubar

Note: it seems the LibreOffice AppMenu doesn't always work ok so if you're experiencing any issues with it, simply uninstall it (use "remove" instead of "install" in the above command).


Can't get the time indicator to display the weather?

Weather Indicator

That's because it doesn't support it. But you can get the weather in your panel by installing Weather Indicator which is available in the official Ubuntu 11.04 repositories:
sudo apt-get install indicator-weather

Once installed, run it from Dash.


Ubuntu Software Center doesn't let you install some application you really like, displaying the following error: "The package is of bad quality"? Install the .deb using DPKG, like so:
sudo dpkg -i PACKAGENAME.deb

Gdebi

Or use Gdebi to install .deb files instead of Ubuntu Software Center.


Dash takes the whole screen size? This happens for some smaller screen laptops or netbooks.

Ubuntu 11.04 Dash

This won't work for any computer (like 10'' netbooks) but if you have a big enough resolution (like 1366x768), you can make Dash smaller (like in the screenshot above) by running the following command:
gsettings set com.canonical.Unity form-factor "Desktop"

In case you want to revert this change, use:
gsettings set com.canonical.Unity form-factor "Automatic"


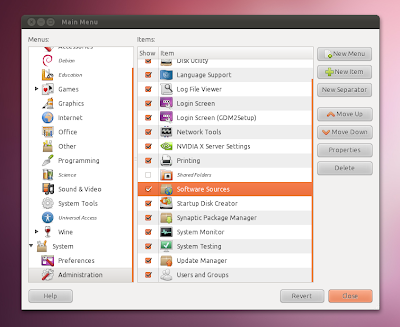
By default, to access the Software Sources (where you can see and add repositories and PPAs) you must open Ubuntu Software Center and only then access Software Sources.

Software Sources

Fix this by searching for "Main Menu" in Dash, then enable "Software Sources" under System > Administration.


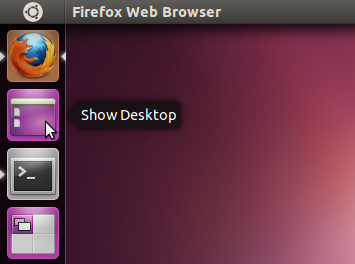
Do you miss an "show desktop" icon on the Unity Launcher?

Show desktop Unity

Run the following commands in a terminal:
sudo apt-get install wmctrl
cd
wget http://webupd8.googlecode.com/files/showdesktop.tar.gz
tar -xvf showdesktop.tar.gz && rm showdesktop.tar.gz
sudo mv showdesktop /usr/local/bin/

Then navigate to your home folder and drag and drop the "showdesktop.desktop file on your Unity launcher. Or use SUPER + D keyboard shortcut to show/hide the desktop.


Want the systray (notification area) back?

Unity Systray

Enable it for all applications using the following command:
gsettings set com.canonical.Unity.Panel systray-whitelist "['all']"

Then log out and log back in.

Important: if AppIndicators stop working or you can't enable the systray using the above command (it seems that sometimes changing this via command line fails), see: How To Re-Enable The Notification Area (Systray) In Ubuntu 11.04, For All Applications and try to only whitelist a few applications.


Don't like the AppMenu (GlobalMenu)?

Disabled AppMenu

Uninstall it:
sudo apt-get remove appmenu-gtk indicator-applet-appmenu indicator-appmenu

Then log out and log back in.

But this will probably remove the ubuntu-desktop meta package. If you want, you can also disable it, either for all applications or only some: Disable The AppMenu (Global Menu) In Ubuntu 11.04.


Are the external devices / mounted partitions cluttering your Unity launcher?

Mounted drives Unity launcher
Hide them:
gsettings set com.canonical.Unity.Devices devices-option "Never"


Hate the new overlay scrollbars?

Ubuntu regular scrollbars

Remove them:
sudo apt-get remove overlay-scrollbar liboverlay-scrollbar-0.1-0

Just like with AppMenu, this may remove the ubuntu-desktop meta package. If that's the case, disable the overlay scrollbars instead of removing them: How To Disable The Overlay Scrollbars In Ubuntu 11.04 [Quick Tip]


Missing your favourite applet? Try finding an AppIndicator equivalent: there's a huge list on AskUbuntu and we've also posted more in-depth posts on most of them.


And of course, the "ultimate fix": don't like Unity but want to use Ubuntu 11.04? Unity doesn't work with your computer's hardware? You have 3 options:

Classic Ubuntu 11.04

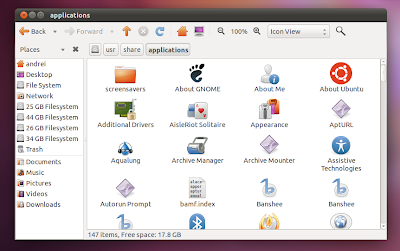
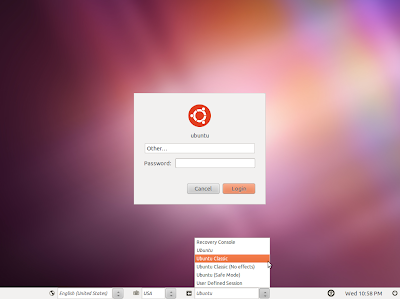
- in the login screen, select the "Ubuntu Classic" session and everything will look like in Ubuntu 10.10 (except for updated packages and overlay scrollbars).


Unity 2D

- use Unity 2D:
sudo apt-get install unity-2d

Then in the login screen, select Unity 2D instead of "Ubuntu" session.


GNOME Shell

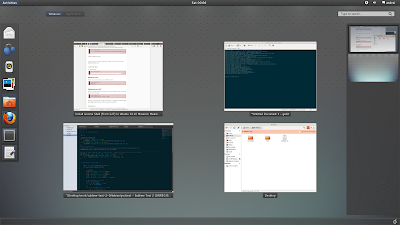
- install GNOME 3 with GNOME Shell via GNOME 3 PPA (warning: you won't be able to use Unity after using this PPA) or if you want to use both Unity and GNOME Shell, compile it yourself (this will allow you to easily switch back to Unity if you want).


Do you know something else that needs tweaking / fixing in Ubuntu 11.04 Natty Narwhal? Let us know in the comments!


You might also like:


http://www.webupd8.org/2011/04/things-to-tweak-fix-after-installing.html

September 24, 2011

Fuduntu is a refined and recommended Linux Distro

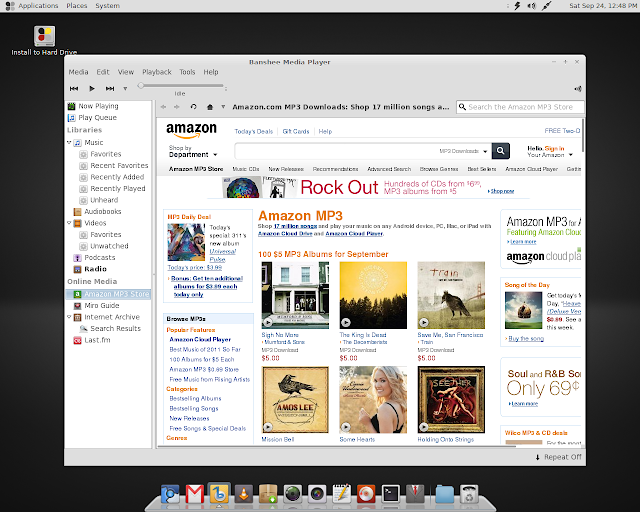
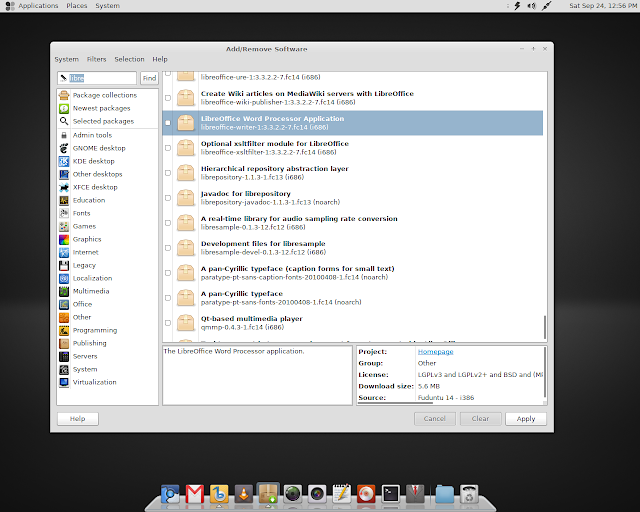
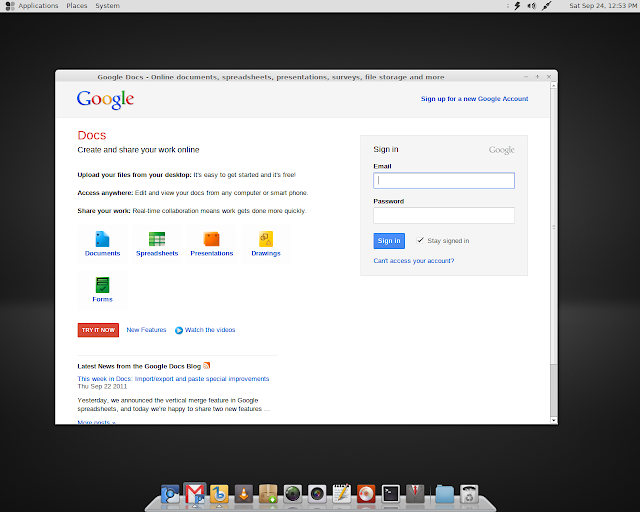
I gave Fuduntu 14.11 a try today and have been very impressed with the level of refinement and performance of this new distro. Fuduntu is a project based on Fedora and with inspiration from Ubuntu sprinkled in. It is a live DVD. It uses the classic Gnome 2.x desktop which is a much appreciated over other unity-like efforts. Everything is where it should be and comes with the Chromium browser, Banshee music player, Nautilus file manager, Gedit, and others. The office application is just the web version of Google Docs. But you can add Libre Office from the Software Library. I added Firefox 6.0 and Pidgin from the Software Library and it was a very easy install. It also comes with a nice Elementary mac-like theme (shown), the Avant launcher, Shotwell photo manager, Brasero disc burner, and the VLC video player. The distro is a DVD and seems big for what is included, but this is not an issue. Below is another review, my screenshots, and a link where to download it. Very nice job Fuduntu !!





Fuduntu 14.10 Review

Back when I first tested and REVIEWED Fuduntu (14.7), I found it a bit lacking in certain areas, most of which were somehow linked to its Fedora inheritance. In fact, one of my main issues back then was that the influence of the distro it derived from was still way too evident. My review goes in detail into what my experience was like, so I recommend reading it to better understand how far release 14.10 has got.

Having talked with Fuduntu's lead developer Andrew Wyatt for some time now, I knew he wanted to keep pushing Fuduntu towards becoming a distro that could stand on its own, with a unique character. I kept checking back on it every now and after skipping a few releases that sounded interesting (but were perhaps too close to my first review), 14.10 felt like a great opportunity to find out what was happening at Fuduntu camp.

SO... WHAT'S NEW?

In the Official Fuduntu 14.10 ANNOUNCEMENT there is plenty of information around new features, packages and tweaks. Here's a brief summary including some highlights:

Features

-Linux kernel 2.6.39.1
-Adobe Flash 10.3
-Chromium 12
-Shotwell 0.10.1
-EXT4 is now our default filesystem during installation
-Support for nVidia (akmod-nvidia), and ATI** (akmod-catalyst) proprietary drivers
-A tool to help simplify customizing your installation
-A Theme refresh, correcting several bugs and streamlining the look and feel.
-New background choices
-New tweaks to improve Flash playback
-Bug fixes
-As always, the quarterly patch rollup

Default Applications (for new installations only)

-Chromium 12
-Google Mail
-Empathy
-Google Docs
-Banshee
-VLC

As you can see, there are lots of interesting things listed here. Let's see if Fuduntu 14.10 lives up to its expectations.

FIRST IMPRESSIONS

After an interestingly looking boot up Plymouth theme, anything from the GDM theme to the default wallpaper and GTK theme, including a highly customized application catalog and a nice AWN menu at the bottom, screams uniqueness. Fuduntu 14.10 feels a lot more like an entity of its own, not so much a slightly customized Fedora desktop anymore.


Click on image to enlarge.

The set of default wallpapers incorporates a few new custom Fuduntu ones along with some GNOME classics. I personally like the Fuduntu creations, even if I find them too dark at times myself (probably better for battery life but perhaps not the best choice aesthetically given how laptops spend lots of hours in screen saving mode).


Click on image to enlarge.

Many of the Look&Feel elements that were part of previous versions return almost unchanged, like the custom GTK+ theme, Faenza Cuppertino icon theme, fonts, etc.


Click on image to enlarge.

Being the customization freak I am, it didn't take long before I changed things my way. Equinox GTK engine, Droid Fonts, standard Faenza and Conky Lunatico came together for quite a make up. Looking sexy, huh?


Click on image to enlarge.

APPLICATIONS

The application catalog also gained a character of its own, and I must admit I love where it's heading. Some of the choices that captured my interest the most have to do with leaning towards cloud applications, particularly Google related products. Chromium 12 is now the default browser, which is a great choice (I would have chosen Firefox 5, though, given its superior integration within the Linux desktop).


Click on image to enlarge.

When it comes to desktop Gmail and Google Docs, I wonder if this choice was somehow influenced by Peppermint OS. Any way you look at it, though, saving the space an Office suite (honestly, how many people really use OpenOffice or LibreOffice, let alone get the most out of them?) and an email client would take is a good idea.


Click on image to enlarge.

It could be argued that users are limited in what they can do offline (in fact, that's another argument to not use Chromium, as it does not support Gmail offline functionality), but with 3G and Wireless devices flying all over the place, chances are offline time shall be minimal.


Click on image to enlarge.

Other perhaps more common application choices include Shutter, Shotwell, VLC, Banshee, Cheese Webcam Booth, GIMP and Nautilus Elementary, to name about a few. I personally love these choices, as they are mostly what I use myself, but things got even better when I found Dropbox preinstalled as well!


Click on image to enlarge.

IT'S IN THE DETAILS

After using Fuduntu 14.10 quite regularly for a few days, I started to really notice how good a release it was. In the past, I have always found Fedora releases quite slow in terms of performance (not Fedora 15, though), at least when compared with Ubuntu and derivatives. It was hard to explain, but day to day activities always seemed to take longer in Fedora and, consequently, and the same applied in my Fuduntu 14.7 testing.

This time around, though, I noticed a big difference. Fuduntu 14.10 provides a snappy response, maybe just lacking when it comes to install/update packages, but I think that's the downside of using RPM packages (it has other advantages, though). Other than that, from booting up to logging in and opening applications, it feels fast and responsive. These performance improvements probably owe a lot to the enhancements introduced by Andrew and his team, some of which he discusses in the INTERVIEW I recently published.

Jupiter also provides an improvement in energy management. When I first tested Fuduntu, I must admit I didn't really notice much of an improvement, but my informal tests this time around show longer battery life.

One thing I miss in Jupiter, though, is the ability to manually tweak it to my liking. In that regard, KDE does a really good job providing several energy management profiles, all of them customizable. It does not stop there, for users can also decide when each profile kicks in. To provide a quick example, high performance profiles usually turn screen brightness all the way up, which may not be necessary with newer devices that already incorporate very bright screens. Therefore, what if I want to configure screen brightness for the high performance profile to be at 85%? Similarly, what if I want to trigger power saver profile when battery life is at 45%? I think those are parameters that most users with portable devices would like to be able to customize. Moreover, this approach is not necessarily intrusive, it wouldn't really require any extra effort from users. They would still be able to use default profiles if they so choose, but if they want to customize them, then the option is there. I would love to see something like this come to Jupiter moving forward.

So far I haven't been somewhat negative about the Fuduntu Fedora inheritance, but that's unfair, there are certainly many great things coming from it. One thing that I found pretty cool from a user stand point came about when I was trying to download a torrent file. I double clicked on the torrent file and the system detected that there was no default torrent downloader. I was then presented with a list of options to install. I chose Transmission, went ahead with the installation and that was it, I was set! Very neat and tidy!

HARDWARE

In terms of hardware support, Fuduntu 14.10 partially passed my HP 2740p test. Having Kernel 2.39 series onboard, I was confident it would recognize its Intel HD video card, which it did, but it failed to do the same with its infamous Broadcom wireless card. Most distros I have tried have failed at this very same trial, but Zorin OS 5 did not, so there is room for improvement here. Similarly, Ubuntu and its derivatives do a great job noticing that the firmware is not available on the machine but can be downloaded, offering the end user the option to do so at will. Fedora, and consequently Fuduntu, are not there yet.

Other hardware recognition tests I ran involved printers and photo cameras, all of which were successful. Bluetooth worked smoothly as well, but I must admit I didn't test any Webcams.

GETTING THERE QUICKLY

Fuduntu is a fork of Fedora, but it is also inspired in Ubuntu, which shows. Its goal of providing a great Linux distro for tablets and laptops while offering a smooth user experience and overall ease of use is certainly closer now than it was just six months ago. This is nothing short of amazing, for Fedora requires much more polishing than Ubuntu if the goal is to create an easy to use laptop/desktop distro. During the few days I have been using Fuduntu, it somewhat reminded me of Moon OS, a great Ubuntu fork, which is quite an achievement considering where each of them starts from.

All in all, Fuduntu 14.10 is a great release which I recommend to anybody, even users who have historically used Ubuntu. Fedora fans will surely enjoy the smoother user experience, but even Linux novices will find lots to enjoy.

Congratulations to the Fuduntu team for a fine piece of work, can't wait to see how it continues to evolve, specially now that GNOME3 is available.

Source: http://cristalinux.blogspot.com/2011/07/fuduntu-1410-review.html

You can get Fuduntu here: http://www.fuduntu.org/


September 22, 2011

How to Create Samba Shared Directories


How to Create Samba (Windows) Shares in Linux the Easy Way

banner
When you’re using Linux, a popular way to share files with Windows is via Samba. For beginners, it can be a real pain to configure it manually, but with the right tool, it’s as easy as pie.
Way back in 2007, we showed you how to install Samba on Ubuntu. Things haven’t changed much, except that there are more ways to configure it. If you don’t have Samba installed and you aren’t afraid of the command-line, just follow the first step in that article and rejoin us here for the rest. If that’s a bit too intimidating, just scroll down.

Installing the Samba Config Tool

Since this guide is for beginners, why don’t we go through the Ubuntu Software Center? Open that up, and search for “samba” in the upper-right corner.
Ubuntu Software Center_007
(Click screenshot for larger view.)
You’ll see a few different packages come up. The first one in our screenshot is the actual Samba package (above the highlighted one), called “SMB/CIFS file, print, and login server for Unix”. If you haven’t installed it yet, now is the time to do so. Just click on it and then click the Install button on the right that comes up.
For our tool, however, we want “Samba,” which is the highlighted software. Click on More Info to check it out.
Ubuntu Software Center_008
(Click screenshot for larger view.)
You can see that the package name is “system-config-samba” and that means we’ve got the right one. Just click the Install button. I’ve already got it installed, so I have a “Remove” button in its place.
If you want to skip all of that and just use the command-line, here’s what you need to run:
sudo apt-get install system-config-samba
Once you’re all set up, you can add users and shares!

Adding Users

While Samba can work without user accounts (using a “guest” account), it’s best to be safe and enforce password-based use. Each Samba user will need a local account first. We’ve highlighted how to do this using the GUI in a previous article, How To Create a Family-Friendly Ubuntu Setup. You should also be able to do this quickly on the command-line, as outlined in Create a New User on Ubuntu Server 9.10 – don’t worry about the older version number, it still works the same way in Natty.
Once you’ve got local user accounts all set up, open up the Samba configuration tool from System > Administration > Samba and entering your root password when prompted.
Samba Server Configuration_009
Go to Preferences > Samba Users.
Samba Users_022
Here, you can add and delete users by clicking on the appropriate buttons. You can also manually change users’ passwords by clicking Edit User. It’s that easy!

Server Settings

Next, let’s change some server settings to suit our needs. Back at the main screen for our utility, click Preferences > Server Settings.
Server Settings_010
In the Basic tab, you can add your WIndows Workgroup name and a description for the Samba server.
Server Settings_011
In the Security tab, we strongly recommend you use User Authentication Mode, as this will allow or disallow shares based on your configured Samba users. We also strongly recommend you encrypt your passwords and disable the guest account. When you’re done, click OK.

Adding Shares

To add a share, just click the green plus sign on the tool’s main window, or go to File > Add Share.
Create Samba Share_019
Type in the directory you want to share, or click Browse to navigate to it with the mouse. Enter the shared folder’s name and a description. You can leave the share as read-only, or click the check-box to make it writable. You’ll probably also want to make it visible, so you can navigate to it properly on Windows machines from your network.
Create Samba Share_020
Under the Access tab, you can manually specify users who have access to this share, or you can allow everyone to access it. If you choose “Allow access to everyone” but you specified that user authentication was required from Server Settings, users will still need a valid account and password on this system to access those shares. To add more shared locations, lather, rinse and repeat!

Setting up Samba on a home Linux server is an ideal way to let everyone share files quickly, easily, and securely inside your home network. Macs won’t be left out, either, as a matter of fact, and everyone can rest easy knowing that it’s simple to manage.
Do you have a preferred setup for Samba? Do you user something else instead? Share your thoughts below!

http://www.howtogeek.com/74459/how-to-create-samba-windows-shares-in-linux-the-easy-way/
Source: