A great article from http://www.linuxbsdos.com
One tool that has seen very little or no change over the past several releases in Ubuntu Desktop is the installation program. So it is somewhat surprising that some users are having problems dual-booting Windows 7 and Ubuntu 12.04 using a tutorial written for Ubuntu 11.04.
Stemming from comments in that article, and email from readers, I
decided to revisit that tutorial using Ubuntu 12.04. So the purpose of
this article, is to show how to dual-boot Windows 7 and Ubuntu 12.04 on a
computer with one hard drive. And it will be on a computer with an
existing installation of Windows 7. If there is a need to, you may
reinstall you copy of Windows 7.One tool that has seen very little or no change over the past several releases in Ubuntu Desktop is the installation program. So it is somewhat surprising that some users are having problems dual-booting Windows 7 and Ubuntu 12.04 using a tutorial written for Ubuntu 11.04.
First things first. Download a copy of Ubuntu 12.04 installation image from here. Depending on your platform, you may download the 32- or 64-bit installation image. Images used for this tutorial were taken from test installations using a 32-bit installation image in both a virtual environment using VirtualBox, and on real hardware. In either case, I did not encounter any errors that others have reported, so I am certain that if you follow this guide, you should have a computer with both Windows 7 and Ubuntu 12.04 installed in a dual-boot configuration.
So that anytime you reboot the computer, you should see Windows 7′s boot menu with two entires listed – Windows 7 and Ubuntu 12.04 (LTS). Then you may choose to boot into Windows 7 or Ubuntu 12.04.

Now that you know what the overall goal is, how do you get from here to there? First, understand that if you have a computer running Windows 7, that Windows 7′s boot manager is responsible for making sure that the system boots. Installing Ubuntu on the same hard drive throws another boot manager into the mix, so the most important decision you are going to make about this, is which boot manager (Windows 7′s boot manager or Ubuntu’s) do you want to be responsible for primary boot operations?
When dual-booting Windows 7 and a Linux distribution on a computer with one hard drive, the best option is to have Windows 7′s boot manager be the primary boot manager. Why? Because whenever you reinstall or update Windows 7, its installer will overwrite anything it finds in the portion of the hard drive where critical boot-related programs are installed. That portion of the hard drive is known as the Master Boot Record (MBR). Also, certain anti-virus programs have been known to mess with the contents of the MBR, so installing GRUB in another location will ease the maintenance headache associated with your system. This point determines where GRUB will be installed.
If you are not familiar with disk partitioning (in Linux) and dual-booting, it is highly recommended that you read guide to disks and disk partitions in Linux and tips for dual-booting Windows and Linux.
By default, a new installation of Ubuntu 12.04 is installed on two partitions – a main partition, and Swap. The main partition is usually a primary partition and the Swap, a logical partition. And if Ubuntu is the only operating system on the hard drive, you will see both partitions labeled /dev/sda1 and /dev/sda5. Because you are going to install it on a computer with another operating system on it, the partitioning scheme will have to change.
The recommended partition scheme that will work better with the system you are about to install, will consist of at least three partitions. They are the:
- Boot partition – This is where GRUB will be installed, instead of in the MBR. Installing GRUB in the boot partition is where users have encountered errors, so pay particular attention to what you do with this partition
- Root partition – This is where all the programs will be installed
- Home partition – This is optional, but it helps to have your files and folders on a separate partition
- Swap space
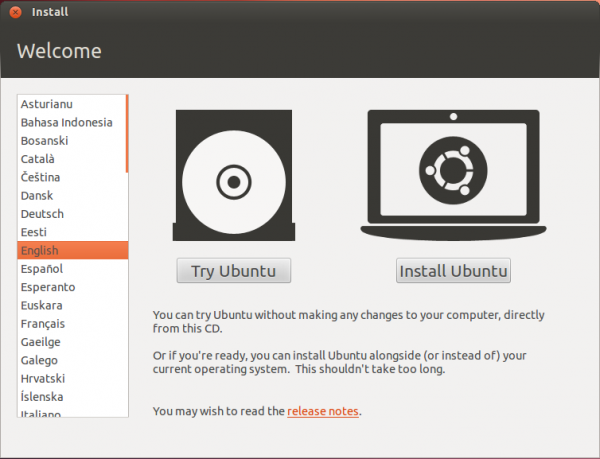
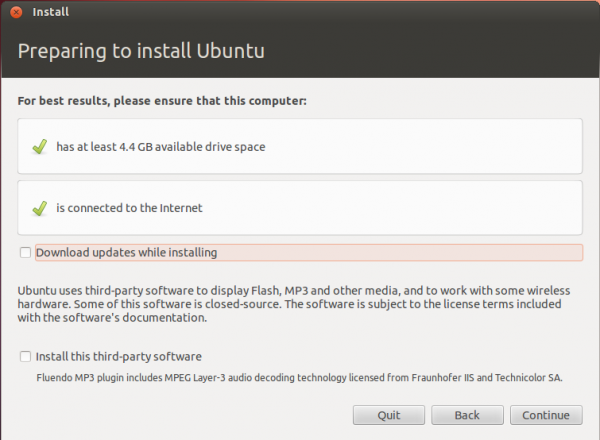
Whether the installation process is started from the Live Desktop or not, clicking through the installer gets you to the step shown in the image below. The most important information here is the minimum disk space (4.4 GB) recommended for a successful installation of Ubuntu 12.04. That piece of information will help you determine how much disk space to allocate to the root partition.
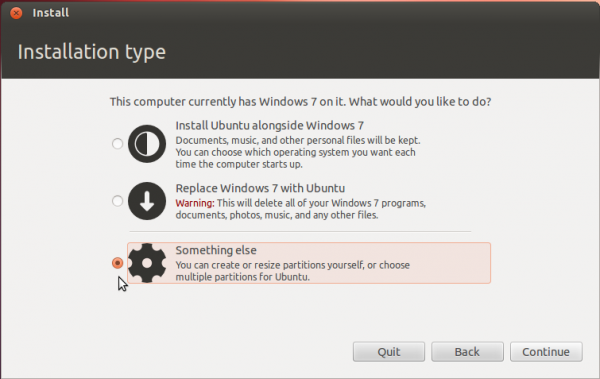
Clicking Continue from the previous step will land you here. If, as in this example, you have Windows 7 installed on the target hard drive, you should see the same three options shown here. Because you will be creating partitions manually, the option you want to select is Something else.
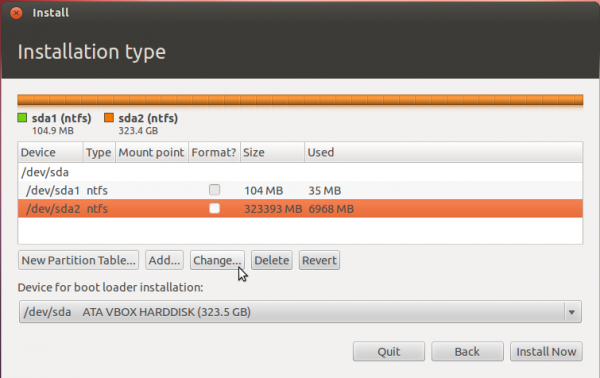
That should bring you to the Advanced disk partitioning tool. Again, if we are operating from the same point, that is, if you have a default installation of Windows 7 on the target hard drive, you should see two ntfs partitions (/dev/sda1 and /dev/sda2) listed. The main Windows 7 partitions, also popularly known as the C drive, is your sda2. To install Ubuntu, you will have to resize that partition. Note: If have free unallocated space on the hard drive, you do not have to go through this partition resizing process. To resize the partition, select it and click the Change button.
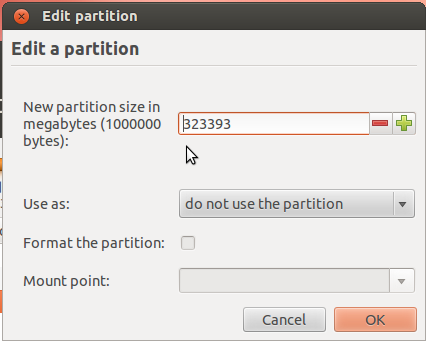
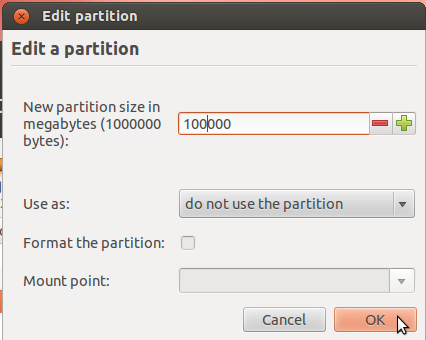
That should open this window. The only thing to do here, is tell the installer how much disk space you want to keep for Windows 7. The rest will be used for Ubuntu. The system used for this tutorial has about 324 GB of disk space. I chose to keep 100 GB for Windows.
So the window now looks like this. Click OK.
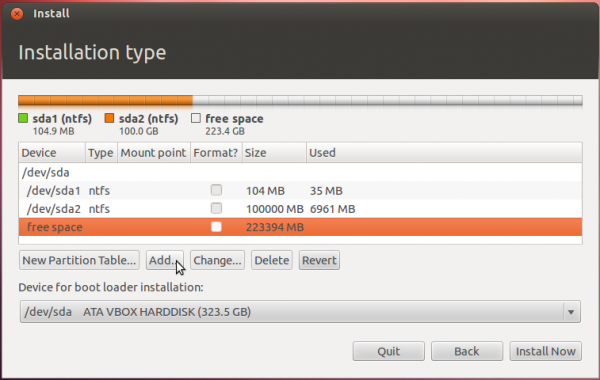
After the partition has been resized successfully, you should see the freed space marked as free space. Select it and click Add to start creating partitions for Ubuntu 12.04.
Though you need to create at least three partitions for installing Ubuntu, I will create four just to show how it should be done if you want to have the home directory on a separate partition.
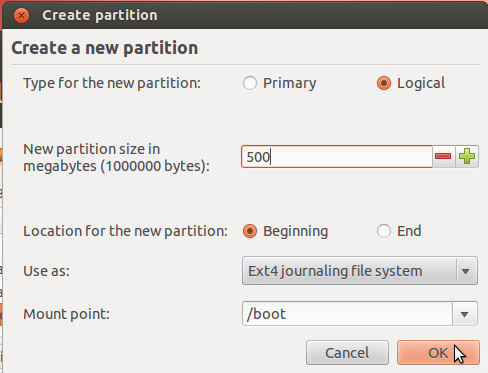
The boot partition is the first partition you want to create. The recommended size for it, is 500 MB. That is way too much for the actual disk space that will be used initially, but if you expect to use the system for a long time, spanning several updates, you need the extra space. The mount point should be /boot. And you want to keep the default file system – ext4. This is important because errors have been reported when using ext2 for the boot partition. OK.
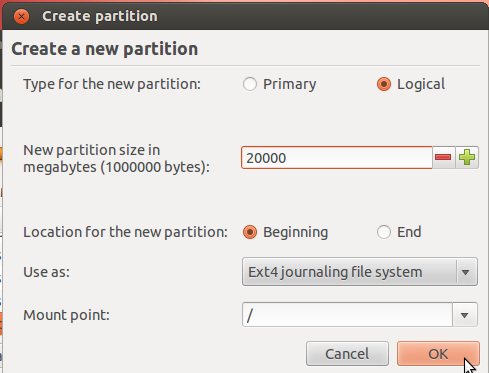
The second partition will be the root partition. For this tutorial, I assigned 20 GB to it. Anything that is at least more than 75% above the recommended minimum of 4.4 GB should be good. The mount point should be /. Keep the default file system. OK.
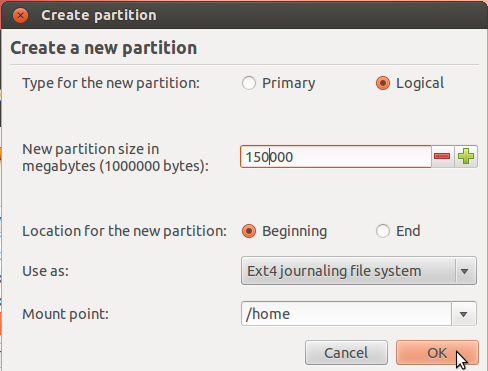
The third partition is for the home partition. Since this where any file you download or generate is stored, it should be assigned the bulk of the available disk space. Use /home as the mount point, and keep the default file system. OK.
The fourth and last partition will be for Swap. This is disk space made available for the system to use as virtual memory whenever the need arises. Give it an appropriate size (4 GB or 4000 MB should be more than enough on any system). Select swap area from the Use as dropdown menu. OK.

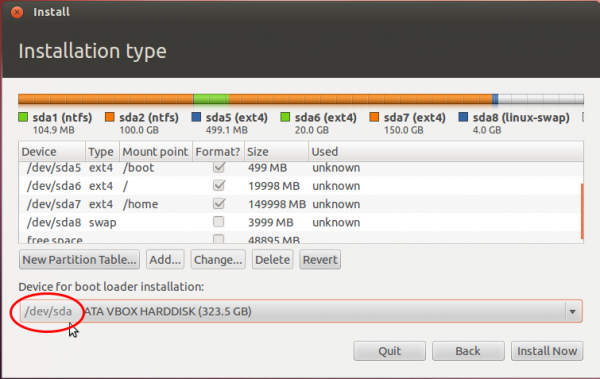
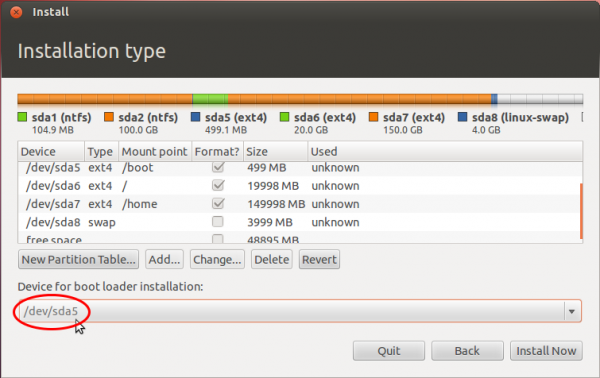
Back to the main Advanced disk partitioning tool window, you should see the partitions you just created, besides the existing ntfs (Windows 7) partitions. Because the first Ubuntu partition was created as a logical partition (the installer does that by default), it is listed as sda5. This is the boot partition and it is where the boot files for Ubuntu will be installed, not in the MBR, which is the default. Note that installing GRUB in the MBR is the same as installing it in sda. This is what you see in the Device for boot loader installation dropdown menu. So what you want to do here, is select sda5 (our boot partition) from that menu.
When you are done selecting it, the window should look like this. click Install Now to continue with the rest of the installation process.
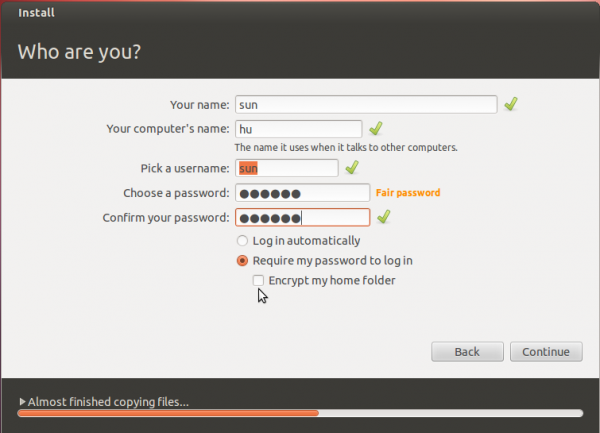
At the user account setup step, you might want to enable encryption of your home folder by enabling Encrypt my home folder. This does not afford you the same level of physical security as full disk encryption, but it is better than no encryption.
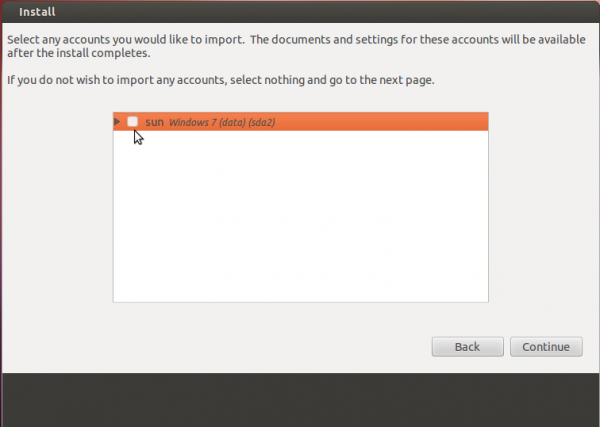
And you have the option of importing your settings from the Windows side to Ubuntu.
After installation has completed successfully, reboot the computer. It should reboot into Windows. This is expected. At this point, Windows does not know that it is now sharing the computer with another operating system. The next step is to tell it, and modify its boot menu to reflect that fact.
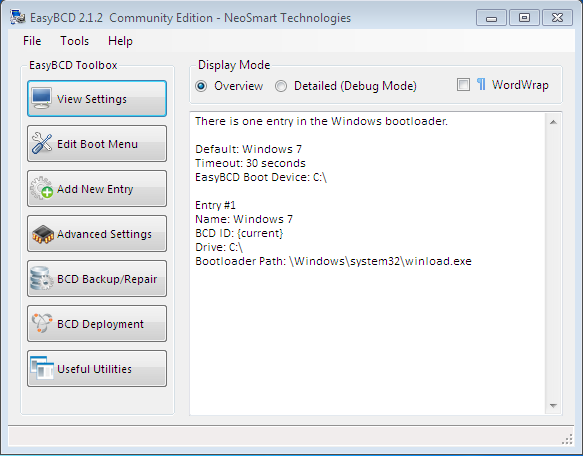
The easiest program to use for this task, is EasyBCD, a free program by NeoSmart Technologies. There is a paid version, but for personal and non-commercial use, it is free. You may download it from here. Install it as you would any Windows 7 application. Start it. The main interface is shown in the image below. To begin the process of adding an entry for Ubuntu 12.04 in Windows 7′s boot menu, click on the Add New Entry tab.
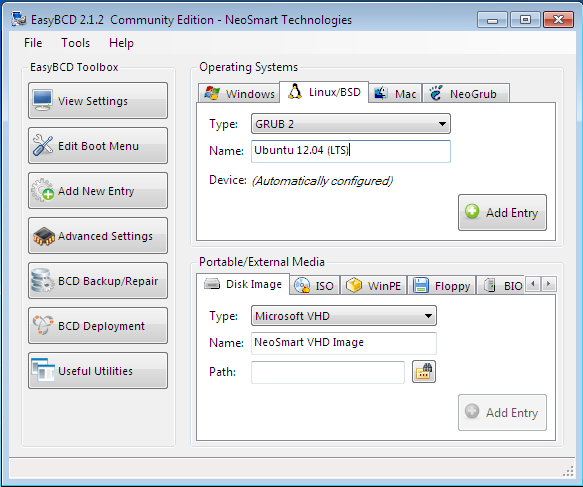
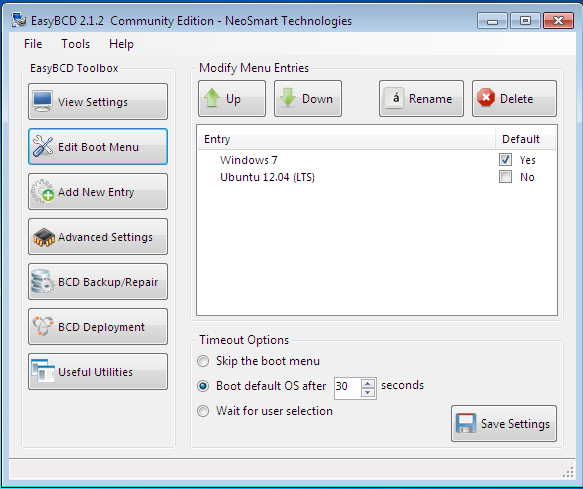
Then on the Linux/BSD tab. From the Type dropdown menu, select GRUB 2, the version of GRUB used by Ubuntu 12.04. Click on the Add Entry button. Click on Edit Boot Menu tab to view the new configuration.
These are the two entries you will see every time you (re)boot the computer. The default is Window 7, but you can change it to Ubuntu 12.04 if you like. Exit EasyBCD and reboot.
That is it. Like I wrote earlier, this was done on real hardware and in a virtual environment on first try, so I do not think that you will encounter any issues if you follow this tutorial step-by-step.
Source: http://www.linuxbsdos.com/2012/05/17/how-to-dual-boot-ubuntu-12-04-and-windows-7/


