March 8, 2019

How to Install and Use Microsoft Office on Linux

The most widely used office productivity suite in the world is Microsoft Office. It doesn’t matter if your PC runs Windows 10 or macOS, it’s likely that you’re using Microsoft Office. If you’re not, you have a colleague who is.

But your PC runs Linux. How on earth are you going to install Microsoft Office, and use it without running into problems?
You have three straightforward options, which we’ll look at in turn.

How to Install Microsoft Office on Linux

You have three ways to run Microsoft’s industry-defining office software on a Linux computer:
  1. Use Office Online in a browser.
  2. Install Microsoft Office using PlayOnLinux.
  3. Use Microsoft Office in a Windows virtual machine.
Each option has its own advantages and disadvantages. Let’s look at each in turn.

Option 1: Use Microsoft Office Online in a Browser

It might not be the full Microsoft Office, but what is made available via your browser is certainly good enough for a big chunk of office-based tasks. It’s an easy way to get started without paying for the full Microsoft Office suite.
Word, Excel, PowerPoint, and Outlook can all be accessed via your browser and Microsoft account.


Use Office Online in your Linux browser


Is your copy of Microsoft Office via monthly subscription to Office 365? If so, you’ll also have access to the browser-based tools. This is an easy option that delivers some good productivity benefits to rival Google Docs or Sheets.
As the suite is browser based, it’s not going to be available offline. However, you can make things smoother by setting office.live.com as a desktop shortcut.
As useful as it is, this isn’t the full Microsoft Office. It’s just a browser-based alternative with a stripped-back collection of features. Though it’s useful in a pinch, it doesn’t do everything you expect.

Option 2: Install Microsoft Office Using PlayOnLinux

You can install Microsoft Office using Wine and PlayOnLinux. The following instructions are for Ubuntu, but you’ll be able to customize this for distros that use different package managers.

Installing Wine and PlayOnLinux

Begin by opening a terminal window and entering:
sudo apt install wine
Next, add a public key for the PlayOnLinux software that runs alongside Wine:
wget -q "http://deb.playonlinux.com/public.gpg" -O- | sudo apt-key add -
Follow this by adding PPA information to the package manager:
sudo wget http://deb.playonlinux.com/playonlinux_precise.list -O /etc/apt/sources.list.d/playonlinux.list
Next, update and then install PlayOnLinux:
sudo apt update
sudo apt install playonlinux


Note: If you want full fat “easy”, you can install Wine and PlayOnLinux via the software center.
Now, all you need to do is launch PlayOnLinux from Menu > Applications. Here, click on the Office tab, then select the appropriate Microsoft Office option.
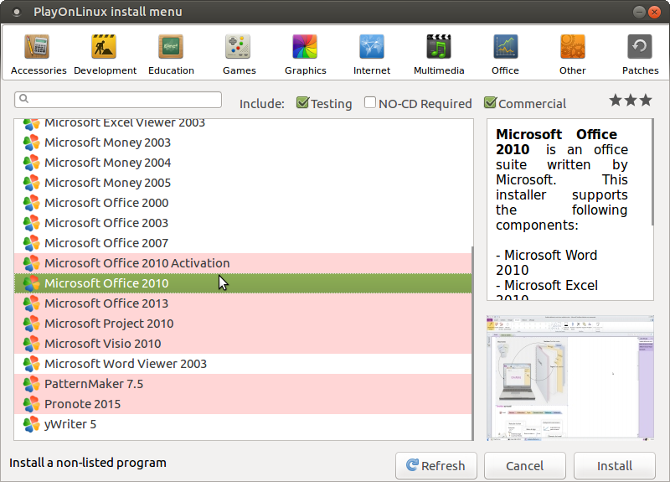

Install Microsoft Office with PlayOnLinux


However, with PlayOnLinux, you’re limited to Microsoft Office 2013 as the latest version (the 32-bit version, at best). For the best, most stable results, use Microsoft Office 2010. For this, you’ll need the disc (or ISO file) and a genuine key.
You’ll find the official download at microsoft.com/en-gb/software-download/office, where you’ll need to enter the product key before you can download the suite.

Installing Microsoft Office on Ubuntu With PlayOnLinux

So, PlayOnLinux is ready. You have the right version of Microsoft Office. All that is needed now is to install Microsoft Office.
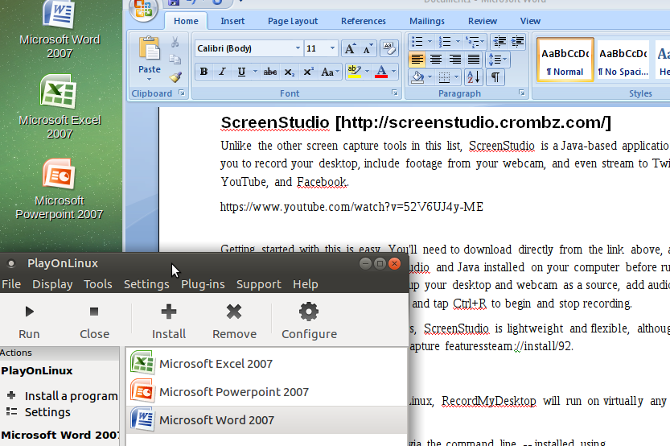


Run Microsoft Office 2007 on Linux


PlayOnLinux will prompt you to select a DVD-ROM or a setup file. Choose the appropriate option, then Next. If you’re using a setup file, you’ll need to browse to this.
Clicking Next will proceed with the installation, and once this is done, you’ll be ready to use Microsoft Office 2010. This is the latest version that can be installed without running into issues, although there are beta scripts for Microsoft Office 2013 and 2016.
Microsoft Office will run from the desktop without separately loading PlayOnLinux (although that will be running in the background).

If for some reason PlayOnLinux doesn’t work for you, you might also consider CrossOver. This is a paid tool with a free trial and can run later versions of Microsoft Office. At the time of writing Office 2016 is not fully supported by PlayOnLinux/Wine but runs in CrossOver.
Installation of CrossOver is more straightforward than PlayOnLinux, while installation of Office is along similar lines (there is a developmental connection between the two tools.
And yes, having Windows software running effortlessly on your Linux PC really is amazing, isn’t it? You’ll find that PlayOnLinux can support several other applications, as well as many Windows games.

It all makes for a seamless transition for any switchers looking to put Microsoft’s operating system behind them, but who are anxious about losing access to their favorite games, utilities and applications.
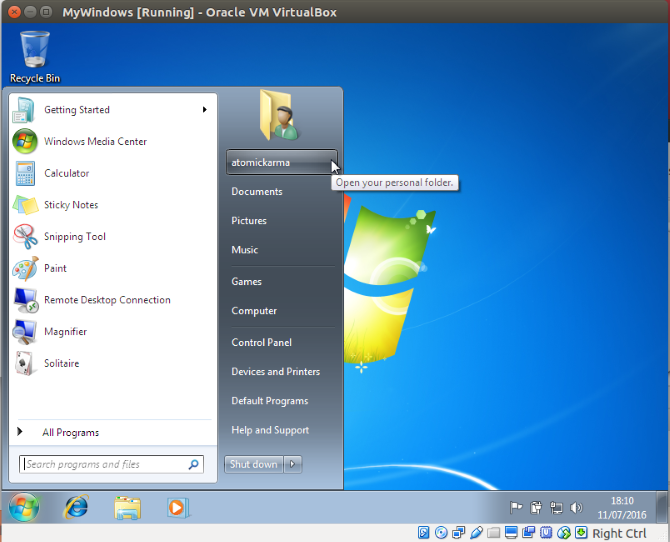
Option 3: Install Microsoft Office 365 in a VM
Install Microsoft Office in a Windows virtual machine on Linux

There is another option for anyone wishing to install Microsoft Office on their Linux computer. This isn’t as easy as the others, however, unless you’re already running a Windows virtual machine.
In this case, all you need to do is boot your virtual machine, sign into Windows, and install Microsoft Office. This will prove particularly useful if you wish to install Office 365, as this cannot be installed on Linux.

Get Microsoft Office on Linux Today!

Microsoft Office is not the most ideal option for running office tasks on Linux systems. However, if it’s what you need to get the job done, you have three good options for using it.
Yes, open source alternatives are best for most Linux office productivity tasks but installing Microsoft Office overcomes document compatibility problems. This can prove vital in meeting deadlines or accessing complex spreadsheets and databases.
But if you’re not keen on messing about with virtual machines or Wine, there is an alternative. LibreOffice ships with most Linux distributions, and there are many office alternatives for Linux.

Source: https://www.makeuseof.com/tag/install-use-microsoft-office-linux/


February 2, 2019

LibreOffice 6.2 Slated for Release on February 7, Will Introduce a New Tabbed UI

The awesome folks over at The Document Foundation have informed us today about the worldwide availability of their highly anticipated LibreOffice 6.2 release of the popular open-source and cross-platform office suite.

So the big news we want to share with you today is the LibreOffice 6.2 office suite will be officially released in about a week from the moment of writing this article, on Thursday, February 7, 2019. It will be available for all supported platforms, including Linux, Mac, and Windows.

As expected, we'll have a detailed story prepared on the LibreOffice 6.2 launch day to tell you all about its new features and improves, but, as a sneak peek, we'd like to inform you now that the upcoming release brings a new tabbed UI called Notebookbar, which you can see in action in the video and screenshot gallery below.

The Notebookbar UI isn't something totally new for LibreOffice users, but it's finally ready for mass deployment and no longer an experimental feature. The new tabbed UI will be available for Writer, Calc, Draw, and Impress components, along with a new Groupedbar compact UI, which you can also see below.

"While the NotebookBar is the biggest update, there have been many other changes, such as improvements to the Karasa Jaga and Elementary icon themes," says The Document Foundation's Mike Saunders. "There are many new features in this release, thanks to our volunteers and certified developers."
LibreOffice 6.1.5 to be released next week too

While LibreOffice 6.2 promises lots of enhancements and new features, unfortunately, it will only be supported until November 30, 2019, when it reaches end of life, but we promise it'll be a worthy upgrade for all users. Until then, stay tuned for the official launch next week on February 7.

The Document Foundation also plans to release the LibreOffice 6.1.5 maintenance update next week. This will be a bugfix release for the LibreOffice 6.1 series, which is supported until May 29, 2019. You can always download the latest LibreOffice release from our free software portal for Linux, Mac, and Windows platforms.


New Groupedbar Compact UI
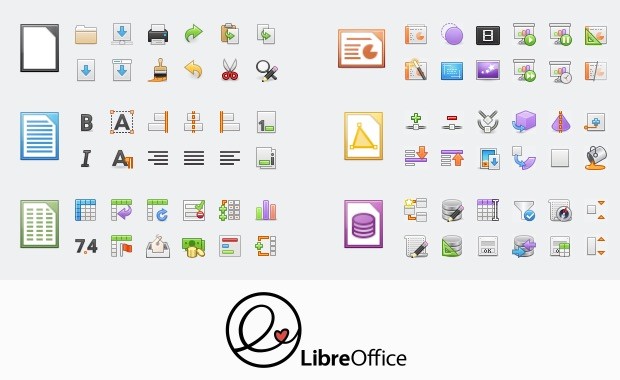
LibreOffice elementary icon theme

Source: https://news.softpedia.com/news/libreoffice-6-2-slated-for-release-on-february-7-will-introduce-a-new-tabbed-ui-524743.shtml

January 9, 2019

How to Install HandBrake 1.2.0 on Ubuntu 18.10 and Ubuntu 18.04

For those who don’t know, HandBrake is an open-source multiplatform multithreaded video transcoder. It is used for converting DVD or Bluray discs to formats like MP4, MKV, H.264, MPEG-4 or other formats. You can also encode audio files like AAC, MP3, Flac, AC3 etc


The latest version available is HandBrake 1.2.0, which has been recently released, bringing changes, including:
General:
  • Switched core decoding library from Libav to FFmpeg
  • Fixes numerous sources previously unreadable or otherwise broken
  • Facilitates a number of the improvements and features in this release and planned for the future
  • Removed deprecated Legacy presets
  • See the list of compatible replacements on GitHub
  • Updated official presets to use stereo instead of DPL2 mixdown
  • Avoids potential spatial positioning issues with the current DPL2 algorithm and wide pans in source material
  • Limited in impact since DPL2 decoding has not been in widespread use for years
  • Updated official presets descriptions to revise compatibility and mention recently released devices
  • Updated official presets to rename Fire TV to Amazon Fire
  • Added Amazon Fire 720p30 and Chromecast 1080p60 presets
  • Added {creation-date} and {creation-time} to automatic file naming
Video
  • Fixed an issue decoding Blu-ray titles where the aspect ratio is unknown (assume 16:9)
  • Fixed an issue encoding video with very short frame durations (less than 0.00285s or greater than 350 FPS)
  • Improved extradata handling to accommodate all codecs
  • Added support for decoding TIFF/LZMA video
Audio:
  • Fixed potential decoding issue for audio lacking an explicit channel layout (intelligently guess the layout)
  • Fixed a potential crash during audio probe
  • Improved resampling to allow dithering for all codecs (only where necessary)
  • Improved quality of the default AAC encoder on non-Mac platforms (FFmpeg AAC), no longer experimental
  • Improved bit rate constraints to allow Opus as low as 6 kbit/s per channel
  • Added support for up to 7.1 channel AAC encoding (note that FDK AAC/HE-AAC do not support 6.1)
  • Added support for E-AC3 audio in MP4 container
  • Added Speex audio decoder
Subtitles
  • Fixed a potential crash where an SRT file cannot be opened
  • Added support for SRT files using periods instead of commas to delineate fractions
    Command Line Interface
  • Fixed inability to override preset subtitles burn setting (native and none are now valid values for –subtitle-burned)
    Build system
  • Fixed Linux packaging with an out-of-tree build directory
  • Fixed Windows graphical interface build script signing tool location
  • Removed –enable-local-* and associated contrib libraries; please see the documentationfor dependencies help
  • Updated to mingw-w64-build 4.1.0 with gcc 7.3.0, continuous output (keep alive), and miscellaneous improvements
  • Improved support for building with Xcode 10
  • Improved support for building on FreeBSD 11, 12, and 13
  • Improved Flatpak packaging for Linux (numerous fixes and improvements, no longer experimental)
  • Improved configure.py to always use the Python executable found by configure
  • Added script for creating Flatpak manifests
  • Added support for selecting a compiler via the CC environment variable
  • Miscellaneous bug fixes and improvements
Linux
  • Fixed Blu-ray title name being set to device name (e.g. sr0) when scanning raw devices
  • Fixed Blu-ray default destination file names to no longer include MPLS number
  • Fixed an issue with queue state not being updated properly on reload
  • Fixed various issues importing presets
  • Updated most translations
  • Added initial support for GTK 4
  • Added ability to customize activity window font size and increased default from 7 to 8
  • Added destination overwrite protection (append number to file name on conflict)
  • Added {source-path} to automatic path setting
  • Miscellaneous bug fixes and improvements
For more information, see the release announcement.

Installation instructions:

Install the software via PPA:
Up to date packages are available via some third party PPA, so installing the software on Ubuntu 18.10 Cosmic Cuttlefish, Ubuntu 18.04 Bionic Beaver, Linux Mint 19.x, Elementary OS 0.5 Juno should not cause too many problems.

All you need to do is add the PPA to your system, update the local repository index and install the handbrake-gtk and handbrake-cli packages:

$ sudo add-apt-repository ppa:stebbins/handbrake-releases
$ sudo apt-get update
$ sudo apt-get install handbrake-cli handbrake-gtk


Optional, to remove handbrake, do:
$ sudo apt-get remove handbrake*

Install the software via snap:
If you want to install handbrake via the snap packages, you need to install snapd and to use snap to install the package:


$ sudo apt-get install snapd
$ sudo snap install handbrake-jz


Optional, to remove snap, do:
$ sudo snap remove handbrake-jz

December 30, 2018

Systemback make a bootable .iso of your current system configuration

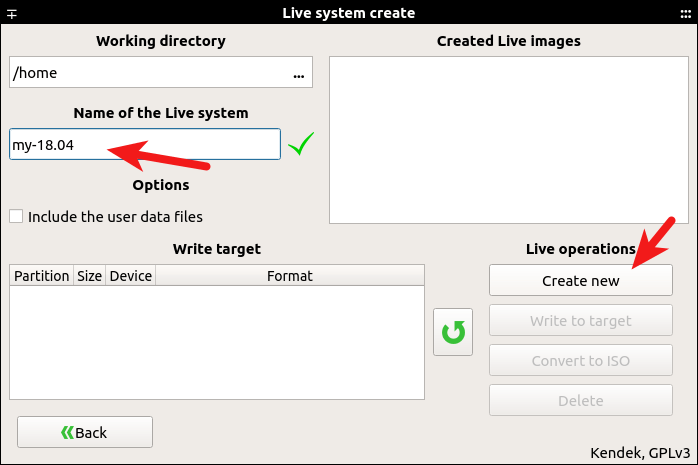
Systemback is a great utility for making backups of your system to USB drives, and ISO files to install on other computers. Below is a tutorial how to backup to a USB drive.  To create an ISO, select Live System Create, Create New, select the live created image from the window, select Convert to ISO, then burn the ISO to a DVD.


How to Install Systemback on Ubuntu 18.04 and Ubuntu 18.10

This tutorial will be showing you how to install Systemback on Ubuntu 18.04 and Ubuntu 18.10. Systemback is a simple system backup
and restore application, released under the terms of GPLv3 license. Features of Systemback includes:
  • Create backups of the system and the users configuration files
  • Restore the system to a previous state, just like the snapshot function of Virtualbox
  • Create bootable ISO file from existing installation
  • Copy the system from one partition to another partition.
  • Upgrade software

Install Systemback on Ubuntu 18.04 and Ubuntu 18.10

Ubuntu 16.04 and 14.04 users can install Systemback from PPA by running the following commands in terminal.
sudo add-apt-repository ppa:nemh/systemback

sudo apt update

sudo apt install systemback
The author of Systemback stopped its development in 2016, so Ubuntu 18.04 and 18.10 are not in the supported list. If you run the above command
on Ubuntu 18.04, you will see the following error,
E: The repository 'http://ppa.launchpad.net/nemh/systemback/ubuntu bionic Release' does not have a Release 
file.
or
E: Unable to locate package systemback
To install systemback on Ubuntu 18.04/18.10, first remove the PPA.
sudo add-apt-repository --remove ppa:nemh/systemback
The Systemback binary for Ubuntu 16.04 is compatible with Ubuntu 18.04/18.10, so we can add the Ubuntu 16.04 PPA on 18.04/18.10 with the following command:
sudo add-apt-repository "deb http://ppa.launchpad.net/nemh/systemback/ubuntu xenial main"
systemback ubuntu 18.04 ppa
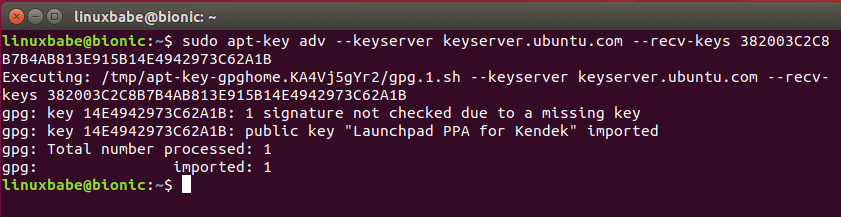
Then import the GPG signing key of this PPA so that the package manager can verify signature. The signing key can be found on launchpad.net.
sudo apt-key adv --keyserver keyserver.ubuntu.com --recv-keys 382003C2C8B7B4AB813E915B14E4942973C62A1B
Unable to locate package systemback
Update package list and install Systemback
sudo apt update

sudo apt install systemback
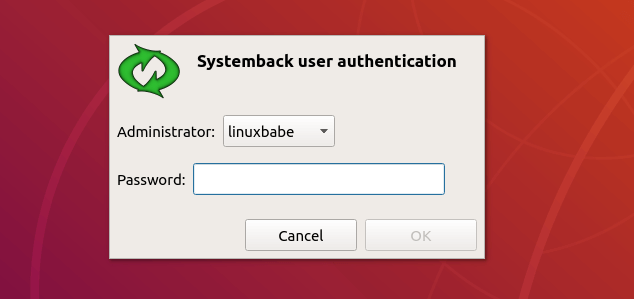
Then you can start Systemback from your application menu. You need to enter your password to use this software. After you enter the password,
click OK button.
systemback for bionic
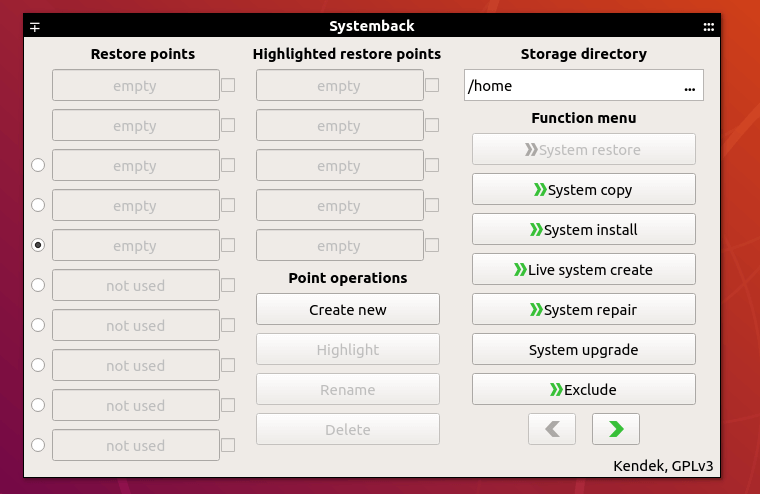
As you can see, you can create restore points of your system, restore to a point, copy the system to another partition,
install the system to a new partition, create live system (bootable ISO image), repair the system and upgrade software on the system.
systemback create iso

How to Create a Bootable ISO Image From Your Current System

Systemback can create a customized ISO image file from your current system. Every program and file can be included in the ISO.
Click the Live System Create button, then give a name to your ISO file. You have the option to include the user data files. Click the
Create Newbutton to create live system.
systemback create live iso
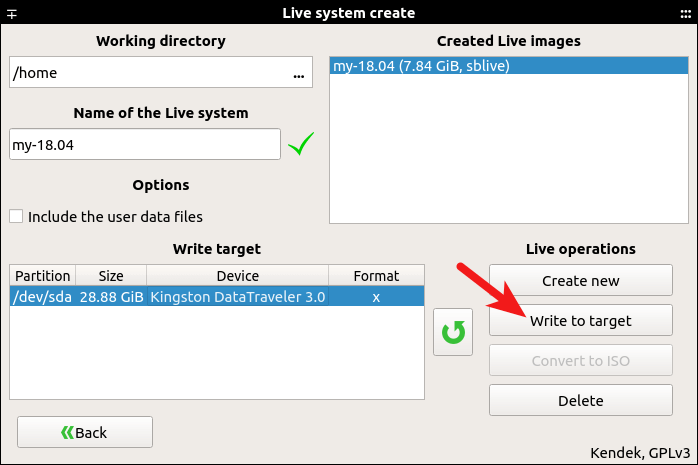
After the live system is created, you can convert the sblive file to ISO file. Note that if the sblive file is too big, you can’t convert it to ISO file.
The sblive and ISO file are stored under your home directory by default, but they are not visible.
You can also insert your pen drive to your computer and write the sblive file to pen drive. (Click the reload button to detect USB drives.)
systemback bootable USB
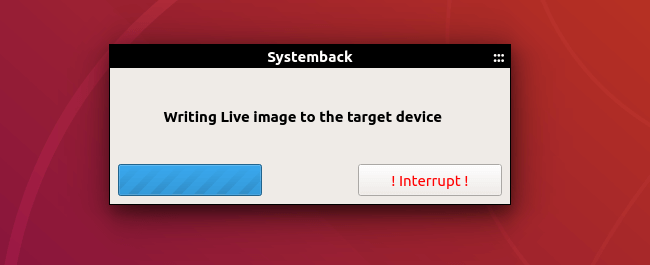
Because my system has many programs and files, this process can take some time.
write live system to usb drive
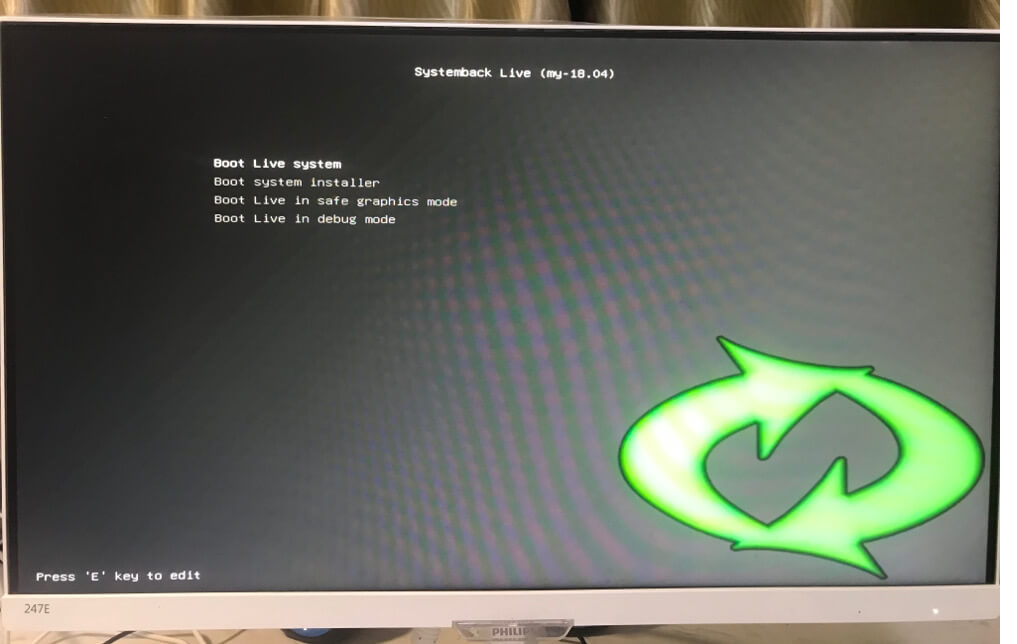
Once it’s done, you can use the bootable USB to install your customized Ubuntu system on other computers.
all systemback ubuntu 18.10
I hope this tutorial helped you install Systemback on Ubuntu 18.04 and 18.10. As always, if you found this post useful, then subscribe to our free newsletter to get more tips and tricks. Take care 🙂

Source: https://www.linuxbabe.com/ubuntu/install-systemback-ubuntu-18-04-bionic-18-10

Timeshift A System Restore Utility Tool Review

TimeShift is a system restore tool for Linux. It provides functionality that is quite similar to the System Restore feature in Windows or the Time Machine tool in MacOS. TimeShift protects your system by making incremental snapshots of the file system manually or at regular automated intervals. 
These snapshots can then be restored at a later point to undo all changes to the system and restore it to the previous state. Snapshots are made using rsync and hard-links and the tool shares common files amongst snapshots in order to save disk space. Now that we have an idea about what Timeshift is, let us take take a detail look at setting up and using this tool. ​​

How to install Timeshift in Linux?

For Ubuntu and Ubuntu based distros such as Mint

Packages are available in my Launchpad PPA for supported Ubuntu releases. Run the following commands in a terminal window:
sudo apt-add-repository ppa:teejee2008/ppa
sudo apt-get update
sudo apt-get install timeshift
add timeshift repository
update local repositories in linux mint
install timeshift in linux mint

Interface and Usage

​Timeshift is available as GUI but it can also be used from the terminal. Timeshift will require root or administrative permissions on startup as it allows you to modify essential parts of your system. With TimeShift, you can make snapshots automatically or manually. You can configure it for an automatic snapshot on an hourly, daily, weekly, or monthly basis. Or you can schedule snapshots to be made on every bootup. You can also configure how often snapshots should be removed.
enter password to open timeshift

Setup Wizard allows you to create Automated Snapshots

Select Snapshot Type

Timeshift supports 2 snapshot formats. The first is by using Rsync and the second is by using the in-built features of BTRFS file system that allows snapshots to be created. So you can select the BTRFS format if you are using that particular filesystem. Other than that, you have to choose the Rsync format.
select snapshot type in timeshift
select timeshift snapshot type

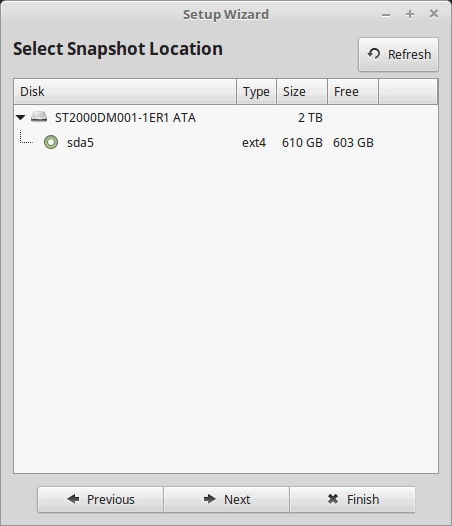
Select Snapshot Location

​The next thing you do is select your snapshot location. You can choose to have your snapshots on your local disk or on an external storage device.
select snapshot location in timeshift

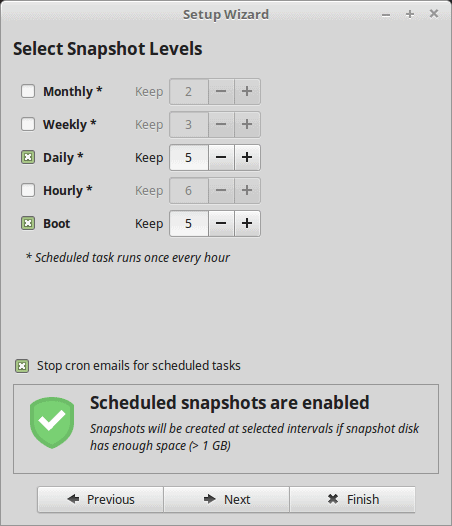
Select Snapshot Levels

​As I mentioned earlier, Timeshift allows you to create snapshots on hourly, daily, weekly, monthly or on boot basis. So you can select the frequencies you want and the number of snapshots to keep.
select snapshot levels
​And then foward to the next screen to complete your setup.
complete timeshift setup

Main Screen

​Timeshift presents a very simple main screen. From here, you can create, restore or delete your snapshots.
timeshift main screen

Creating a Snapshot

Creating a snapshot is simple. Just click on the Create button and then a snaphot will thus be creaated. Depending on what should be included or excluded from the snapshots, it will take a couple of minutes for the process to be completed.
create a snapshot
You can add comments to your snapshots so you can have a description of the snapshot.
all recent timeshift snapshots

Timeshift Settings

​Timeshift allows users to customize how snapshots are made, what is included or not. Same as with the setup wizard, you can choose whether or not to use the Rsync or the BTRFS format.
timeshift settings
You can also specify the location and then the schedule for automatic backups.
timeshift automatic backups

Filters

​You can also specify filters to include or exclude files or directories from the snapshots. TimeShift is designed to protect system files and settings. User data such as documents, pictures and music are excluded by default. This prevents you from overwriting your documents when you restore a snapshot or using all of your storage to backup media (pictures, music, and video) files. But you can change this using the Filters option in Settings.
timeshift filters
Clicking on the summary option under Filters will give you a fair indication of what is included or not.
filter timeshift snapshot

Restoring Backup

​Restoring a Backup is as simple as selecting the snapshot you wish to restore and clicking on the Restore button.
restore timeshift backups

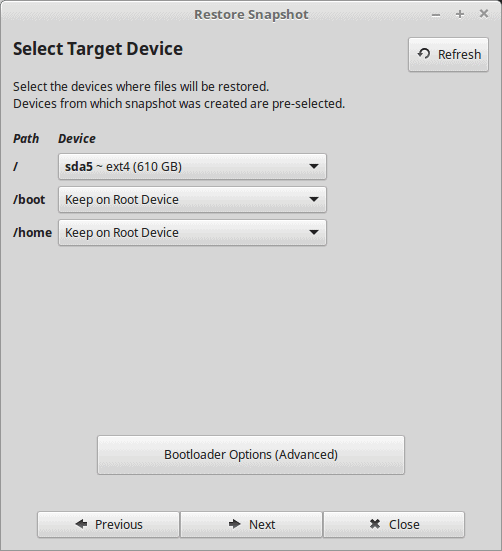
Target Device

​And then you will select your target device where files will be restored. You will have to specify your root device and whether or not to keep the boot and home files on the root device or on another partiton.
select target device to be restored

Bootloader options

​You then specify the bootloader options as to whether or not to reinstall GRUB2, to update or not intramfs and the Grub Menu.
bootloader options

Exclude Application Settings

​You can select to exclude some applications especially Web browsers and Torrent clients or others from the restore process.
exclude applications from restoration

Complete Process

Finally, you accept a disclaimer about things going wrong and then applying the restore.
complete restore process

Snapshot Restore

​The snapshot will be applied and then your computer will restart to complete the process.
snapshot restore

Conclusion

Timeshift is an awesome software around. It allows you to restore your PC to a previous state without any devastating consequences especially when something breaks or is not working well. I hope you find this tool useful. Thanks for reading and kindly share your thoughts with us in the comments section below.

Source: http://www.linuxandubuntu.com/home/timeshift-a-system-restore-utility-tool-review

Installing Timeshift into Linux Mint 18.2 non-BTRFS

In a previous article it was stated that the next version of Linux Mint would include a piece of software called Timeshift, a very popular and powerful backup utility. However, currently Timeshift is not included with Linux Mint, and so an article about how to install it, and use it, is in order.

What is Timeshift?

Timeshift


Timeshift is a system backup and restore utility similar to Windows System Restore, or Mac OSX Time Machine. Essentially, Timeshift will allow you to make routine backups of your system, and restore them at any time, as well as the option of making manual backups if needed.

Installing Timeshift

Timeshift can easily be installed on any Ubuntu based system by use of a PPA:
  • sudo apt-add-repository -y ppa:teejee2008/ppa
  • sudo apt update
  • sudo apt install timeshift

Setting up Timeshift at first run

Timeshift is very straightforward with no confusing setup, thankfully. When first run, a short set of questions are asked.


Timeshift Setup1


The first box asks if you want to use RSYNC or BTRFS, unless you are running a BTRFS system (If you even have to ask, you are not running BTRFS), simply select the RSYNC Option.


Timeshift setup2


Next, we are asked for the snapshot location, simply select where you want to store your snapshots, and move on to the next screen.


Timeshift setup3


The next window, asks when snapshots should be taken, and how many should be stored in rotation. The default settings are usually fine for most people, opting to take a new snapshot each hour, storing 5 before they are thrown away. This means that at all times, you will have your last five hours constantly at your disposal, so if you do something you might regret, you can rollback to a previous hour, and not have (hopefully) lost much of your work you did after the snapshot was taken.

Using Timeshift

Once the setup is finished, you’ll be taken to the main Timeshift window, which again is very simple to use. For the purpose of this tutorial, let’s make a snapshot, and then restore it (Please don’t be doing anything super important at this time, as restoring the snapshot will cause your machine to reboot!)
Click the ‘Create’ button, and voila, a snapshot is automatically created with no mucking around. It took my system around 30 seconds to make a snapshot of my entire 600GB Linux partition on my new Desktop.
Now, at the main Timeshift screen you will see your snapshot we just made (and in the future, your other snapshots that were automatically made at the times you specified, such as every hour AND every boot.) To restore the snapshot we just took, simply click the snapshot you wish to restore and then click ‘Restore’ to be taken to the next screen.


Timeshift Restore Snapshots


On this screen you’ll be given the option to select where files will be restored (usually default is fine) as well as whether you want to keep the /boot and /home folders on the Root Device. If you have your /home folder in a separate partition or device, then change this accordingly, but if your system is not customized so heavily and it’s all stored in the same place; simply leave the defaults and click next.
Next, select any applications you wish to exclude, such as web browsers, torrent clients etc.
The next screen will notify you about what is about to happen, and give the typical “If your computer blows up, or takes over the world, we can’t be held responsible,” type disclaimer. Scan it over to make sure you’re all set, and then click next. You will then be given a black screen with scrolling text as Timeshift does it’s thing, before your machine is rebooted automatically. Upon logging back in, you are now loaded back into that snapshot of how your system was!

Last words

Timeshift is incredibly easy to use, and I for one am glad that it’s making its way into the upcoming Linux Mint by default, as I think everyone should be using it personally, as it’s simply invaluable to keep backups of your system.
What about you? Do you use a different utility? If so, will you be using Timeshift in the future on your Mint system, or will you stick with your current way of doing things?


Source: https://www.ghacks.net/2017/10/04/installing-timeshift-into-linux-mint-18-2-non-btrfs/
December 22, 2018

Foobar Music Player available on Linux

The popular Foobar Music Player is available for Linux. It uses Wine to run. It is also a Snap application, so it easy to install .
For fans of this small yet powerful and flexible music player, this is music to our ears!


foobar2000 v1.4.1 - Main features
Supported audio formats: MP3, MP4, AAC, CD Audio, WMA, Vorbis, Opus, FLAC, WavPack, WAV, AIFF, Musepack, Speex, AU, SND... and more with additional components.
Gapless playback.
Easily customizable user interface layout.
Advanced tagging capabilities.
Support for ripping Audio CDs as well as transcoding all supported audio formats using the Converter component.
Full ReplayGain support.
Customizable keyboard shortcuts.
Open component architecture allowing third-party developers to extend functionality of the player.

How to install it: From a terminal:

sudo snap install foobar2000

How To Test or Install Linux Distro's On A USB Drive


Linux includes the Startup Disk Creator. Burning DVDs can be time consuming and get expensive if you routinely try various Linux distributions and new releases (like I do). I found the boot up process works much faster than DVDs also. And if you have an aging PC that has a slow DVD drive, using a USB stick is a great option.

1- Start Startup Disc Creator
2- Insert a USB storage stick (use a 4 GB or greater capacity drive)
3- Select the Linux Distro ISO file from your hard drive
4- Select Make Startup Disk


If you need to install it, you can open a Terminal and install it:

sudo apt-get install usb-creator-gtk

December 11, 2018

13 Best Ubuntu Web Browsers: Which One is Right for You?

Who doesn’t know about web browsers in this advanced modern technology? I know all of you are aware of it but let me inform you in brief about that. Here we are going to give focus to a list of Best Ubuntu web browsers that allowed you help to choose the fastest and lightest one for the Ubuntu system.
Generally, web browsers allow you to visit a wide range of information by accessing the online web.  As there is plenty of browsing software available for Linux, undoubtedly it will puzzle you to choose the best one for your Ubuntu system.
To make your task more comfortable, we have narrowed down the list of it. In this article, we will describe the best 13 Ubuntu web browsers to surf the web with comfort. Let’s have a close look at it.

13 Best Ubuntu Web Browsers


Here I will discuss a well-researched comprehensive list of Linux Web Browsers that may appear attractive for you. This Ubuntu Web Browsers list is not any specific order. This article helps you to get known about various web browser that available for Ubuntu Linux.


1. Chromium or Google Chrome


Chromium is a widely used web browser application that you have ever used. It has fantastic features such as a tabbed window, Theora, different WebM codes for the latest audio and video of HTML5 including useful bookmarks.


Google chrome is also a favorite Ubuntu browser that supports both in PC and smartphones. It has nice featuring of wonderful bookmarking and synchronization. Google Chrome is a closed source web browser based on open source Chromium which is also backed by Google Inc.


Both the web browsers come with malware blocking that ultimately ensures personal information security. Moreover, there are lots of plugins in the chrome store which eventually let you increase the functionality of the browser in the Linux system. Users always choose this one than any other web browser in the market. This is one of the best Ubuntu web browsers available in the Linux world.


Install Chromium on Ubuntu Linux
sudo apt install -y chromium-browser
 
 
Run the following command if you need flash support:
sudo apt install -y pepperflashplugin-nonfree
sudo update-pepperflashplugin-nonfree --install
 
Install Google Chrome on Ubuntu Linux
Download Google Chrome
If above link doesn’t work, get the direct link
Direct Download Google Chrome for Ubuntu


2. Firefox


Firefox is another Best Browser For Linux.  This is available for some main operating system such as Linux, Windows, Androids and OS X. 


This
Linux browser features with tabbed browsing, spelling check, private surfing on the internet, etc. Moreover, it widely supports XML, XHTML, and HTML4 etc.

Install Firefox on Ubuntu Linux
sudo apt install firefox
 
 
Install Firefox Quantum on Ubuntu Linux
sudo add-apt-repository ppa:mozillateam/firefox-next
sudo apt update
sudo apt upgrade
sudo apt install firefox


3. Midori


Midori is widely used as a default browser for many Linux distros, especially for lightweight Linux distributions. The key features of it incorporate HTML5, Private browsing, speed dialing, proper management of tabs and sessions as well.


Install Midori on Ubuntu Linux via PPA
sudo apt-add-repository ppa:midori/ppa
sudo apt-get update -qq
sudo apt-get install midori
 
 
Download .deb file and Install
Download Deb File


4. Opera


This established web browser has been written in C++. It supports in Windows, Linux, MacOS, and also in Android phones.


It widely includes maximum tabbed cycling, Speed- dial, Unlimited VPN service and Ad block as well as opera turbo for faster surfing. You can comfortably install this Ubuntu browser for the convenient use.
Download Opera browser for Linux


5. Vivaldi


Vivaldi developers introduced this new browser to the modern world in 2016. The ultimate goal of this Linux web browser is to provide the fastest browsing experience including the contemporary features like quick commands, Nice tab management, etc.


The web developers use HTML5 and node.js in it. Blink layout engine has been used here. It allures you to choose a theme and appear thumbnails for every site you are likely to operate.
Download Vivaldi for Ubuntu Linux


6. Qupzilla


If you are looking for a browser that feels ease with KDE application, then Qupzilla should be the right choice for you. It initiated the Journey as a research project in 2010. The functions which are much needed to present in a modern web browser. This Qt based browser shows a simple interface to the users.


The most attractive feature of it is the user-friendly approach. Also, this best lightweight Linux browser provides bookmark management, speed dial, add blocks, etc.
Install Qupzilla in Ubuntu Linux
sudo apt-get install qupzilla


7. Brave


Mozilla co-founder Brendan Eich made this browser by using JavaScript, C, C++ languages. The primary goal is to concentrate on blocking trackers.


Users can suitably operate it on Linux, Windows, MacOS, and Android. It provides faster websites loading and makes you pleased with ad-less browsing experience.
Download Brave for Ubuntu Linux


8. Pale Moon Browser


If you are tired of using your older browsers, Palemoon should be the excellent recommendation for you. This open-source browser mainly focuses on the efficiency and the compatibility with various Firefox extensions as well.


Again, it offers excellent visual feedback with a robust and manageable configuration.
Download Palemoon for Ubuntu Linux


9. SeaMonkey


SeaMonkey has been created mainly by the Mozilla codebase. In technical growth and performance, it excels in its strategy. High speed and compatibility are to be found here with the updated version as it will use latest Mozilla code.


You will find the user interface is neat and clean. You can use the features with manageable large icons. Tab management and email component are easy to handle for the users.
Download SeaMonkey for Ubuntu Linux


10. Waterfox


This web browser is based on Firefox that supports Linux, Windows, MacOS, and Android. This open-source browser was developed in 2011 following the Mozilla Firefox Code.


It is available in XUL and XPCOM extensions too. It secures the privacy as well. Leading streaming services such as Netflix can be suitably used with the Waterfox.
Download Waterfox for Ubuntu Linux


11. Web (Epiphany)


GNOME community had developed this simple but powerful Ubuntu browser maintaining the standard assent. This lightweight Linux browser manages the extreme simplicity by displaying excellent designing and faster user interface to the people. This Webkit based official web browser is easy to use and offers a large scale of compelling features.


Install Web Epiphany on Ubuntu
sudo add-apt-repository ppa:gnome3-team/gnome3
sudo apt-get update
sudo apt-get install epiphany-browser


12. Yandex browser


Yandex is the most standout Russian web browser. It offers the latest user interface and speedy browsing experience with Blink engine.


This Chromium-based web browser provides extraordinary service about quick page loading even in poor internet connection. This browser is available for Linux, Windows, and iOS.
Download Yandex Browser for Linux


13. Iridium


Iridium is the best privacy-focused web browser for Linux. This simple Ubuntu web browser is one of the best Linux browsers which is very user-friendly and easy to operate. This Chromium-based browser widely handles complicated sites with speediness.


Install Iridium on Ubuntu Linux
wget -qO - https://downloads.iridiumbrowser.de/ubuntu/iridium-release-sign-01.pub | sudo apt-key add -
sudo apt-get update
sudo apt-get install iridium-browser


Final Thought
Here we have come at the last stage of the Ubuntu web browsers list. I sincerely hope and believe that the article will help you a lot to find out the best one for you.
In this list, are you missing your favorite one? Please leave your valuable feedback here in the comment section regarding the article. This will let me know about your experience through your suggestion.

Source: https://www.ubuntupit.com/13-best-ubuntu-web-browsers-which-one-is-right-for-you/