May 30, 2018

Transfer Files from PC to PC Over Your Local Network

Looking for a simple file sharing app to transfer files from PC to PC using Wi-Fi? If so, we’ve got you covered.
LAN Share is a free, open-source and cross-platform tool that enables you to quickly send files between computers that run Windows and/or Ubuntu Linux.
File transfers happens direct, PC to PC, over your local network or Wi-Fi. No complicated set-up or configurations are required, and you won’t need to fuss around with obscure settings and permissions.
But before I show you more there’s a bit of backstory.

Share Files Between Two Computers Over WiFi

I recently needed to transfer an 8GB disc image from my coffee shop laptop to my main Ubuntu PC. The question was: how?
My first instinct was (like most peoples) to reach for the nearest USB drive. So I did. But, for some infuriatingly unknown reason the ISO took forever to copy through the file manager — and worse: the speed got slower as each second passed!
Impatient, I yanked the USB out (not advised) and fired up my browser to find for a faster way to transfer files from PC to PC without any annoying “middle men”.
Now, I am aware of things like Samba, network shares, local workgroups, and ssh file transfer. But I wanted something simple, something free of complex configurations, and something that didn’t involve uploading files to the internet first.
And I found all I wanted and more in LAN Share.

LAN Share is Open Source Network File Transfer Software


LAN Share is an open-source network file transfer client written in C++ and Qt. It can be used to send a file or folder from one computer to another as well as to receive a file or folder from another computer running the app.
Better yet the app works on both Windows and Ubuntu, meaning you can use it to:
  • Transfer files from Windows to Ubuntu
  • Transfer files from Ubuntu to Windows
  • Transfer files from Windows to Windows
  • Transfer files from Ubuntu to Ubuntu
There are no third-party servers, no cloud services, and no complicated protocol arrangements involved.
Simply install the app on each computer you want to use, use the “Send” menu to select the file(s) or folder(s) you want to send, and select the ‘receiver’ computer from the list.
The only hard requirement is that both computers are on the same local network or Wi-Fi connection.
LAN Share:
  • Works directly, PC to PC
  • Lets you send files between different operating systems
  • Has no file size limits
  • Faster than using a cloud service like Dropbox
Part of why I like this app enough to write about it is the simple, straight-forward interface.
The main window is split in half, with the top section dedicated to “sent” files and the lower “received” files. These show real-time progress bars and metadata when files are actually being sent and/or received.
lan share file transfer app screenshot


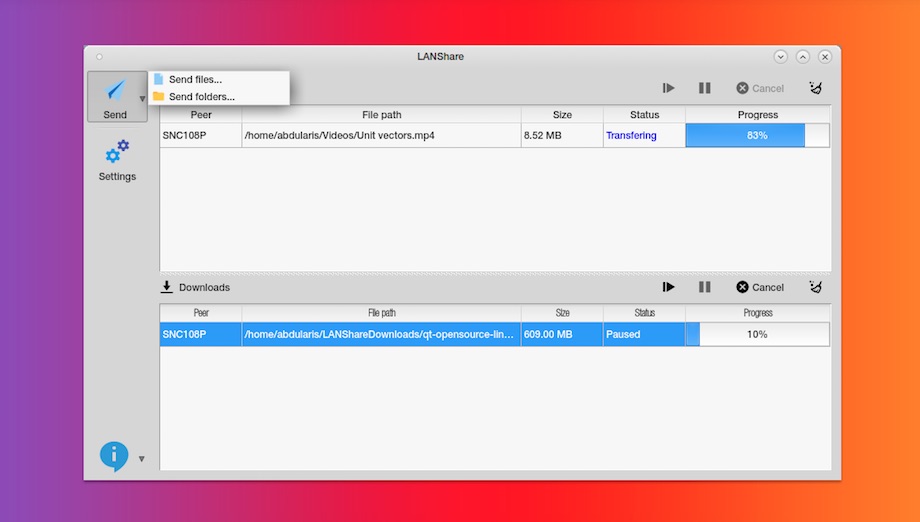
Basic controls to pause, skip, and cancel mean managing tasks is easy, and there’s a button to clear out completed tasks.
The Settings button offers access to options to:
  • Set/change device name
  • Set/change ports
  • Set file buffer size
  • Set download folder

Lacks advanced features

If there’s any catch it that’s the this app lacks advanced features and security settings — but as I’m only going to use it at home, I’m okay with that.
What I really appreciate is that files can be transferred between machines running different operating systems. I no longer have to go through the boring process of transferring files from Windows to a USB, then from USB to my Ubuntu machines; I can simply ferry things across over the network!
And tools like this are especially handy if you don’t have a (large enough) USB thumb drive to hand, or you don’t have a working internet connection (so long as your router works, so will this app).
Is this the fastest way to copy a file from Linux machine to Linux machine over a network?
I don’t know, but I do know that it was a lot faster than the lethargic write speed to my USB stick, and far less effort than setting up a network share (plus files you send are not discoverable by anyone else on your network).

Download LAN Share

Installers for Windows 64-bit and Ubuntu are available on the project’s Github page:

Download LAN Share for Windows & Linux

Teleport, NitroShare & Other Alternatives for Network File Transfers

LAN Share is not the only network filesharing software out there. A slate of apps exist for Windows, macOS and Linux, as well as Android and iOS, both free and paid.
Another open source alternative to LAN Share is NitroShare. It works in a similar way to LAN Share but has a couple of extra bells and whistles available, like optional TSL encryption.
For Linux to Linux transfers there’s Teleport, a GTK file sending app with rich GNOME Shell integration. It’s available to install from Flathub.
There are plenty of other ways to transfer files from PC to PC sans a desktop app, such as network maps, Samba shares, SSH and sFTP.
Just use it when you need it.

Let us know what you use

This post looked at just the tool I used to send files over your network. You can let us know what you use to quickly shunt files between computers in the comments section below.

Source: https://www.omgubuntu.co.uk/2018/05/transfer-files-ubuntu-windows-wifi-network?utm_source=feedburner&utm_medium=email&utm_campaign=Feed%3A+d0od+%28OMG%21+Ubuntu%21%29

May 12, 2018

Cannot access windows partition from Ubuntu?


This seems to be an issue with windows 10. In windows 10 the kernel and the drivers hibernate by default even when you shutdown the system. To disable this, do the following.

    Open control panel.(win key + r. Type control and hit enter)

    While in icons view, click on power options.

    Click on Choose what the power buttons do on the Left hand side.

    Uncheck turn on fast startup. (you may need to press change settings that are currently unavailable before this)


    Click on save changes.


Source: https://askubuntu.com/questions/806570/cannot-access-windows-partition-from-ubuntu

How to Easily Crop and Resize Images in Linux

Many image editors are available for Linux, from the Photoshop-mimicking GIMP to photo editors like F-Spot. But none of these tools will let you easily crop and resize an image, without distracting you with feature-stuffing bells and whistles. The choice of feature packed image editing apps for Linux is impressive, but as with any platform, they can be slow, or have so many features that you don’t know where to start.
GIMP vs Photoshop: Which One is Right for You? GIMP vs Photoshop: Which One is Right for You? Photoshop is the most popular image editing app out there and GIMP is the best free alternative to it. Which should you use? Read More If you’re just looking for some basic cropping and resizing to help with a project or even to make an image easier to upload to your favorite social networks, try these tools.

ImageMagick

Your first stop for a good, efficient image-cropping tool for Linux will probably be ImageMagick.
In short, this has been around for years. You may have already heard of it. ImageMagick has two main options: usage via command line or via the desktop. We’re looking at the latter option as cropping via command line can be hit and miss (although it is often ideal for making those incisive, memorable crops) and certainly isn’t easy.
The ImageMagick app doesn’t have the cleanest UI design, but it is functional and efficient.


How to Easily Crop and Resize Images in Linux muo creative linux croptools imagemagick


Install with:
sudo apt-get install imagemagick

To use ImageMagick to crop, first open the app, or right-click your image and select it from the Open With option. Next, left-click anywhere on the image, and select Transform > Crop. Left-click and drag to create box around the area you wish to crop to, and when you’re happy, click Crop.
Remember to save your changes with File > Save.

Gthumb

Perhaps even simpler to use, and complete with a slick, modern UI, is Gthumb.
Packed with editing tools and image management options (you can view and edit metadata and add tags for easy image search), the crop function is arguably easier to use than the one found in ImageMagick.


How to Easily Crop and Resize Images in Linux muo creative linux croptools gthumb


To get started, install with:
sudo apt-get install gthumb

Once done, launch from the menu, or find the image to crop in your desktop’s file manager and right-click, selecting Gthumb from the Open With option.
In the app, open your image, then select the paintbrush button to begin editing. You’ll see a number of interesting features here that you’ll probably want to try — you’ll find Crop at the bottom, next to Resize and listed under Format.
To crop, click the button and use the overlaid box to drag the boundary of the intended crop until you’re happy. You can also fine-tune the crop using the + and – symbols on the right-hand pane, specifying numerical values for the crop. The aspect ratio of the crop can also be changed, giving you the option of Instagram-style square crops.
When you’re happy with the selection, click Crop. You can Save via the Settings menu.

Phatch

We’ve looked at two good mouse-based cropping options so far, but what if your requirements are little more time-intensive? The solution here would be to employ a batch processing tool to crop many images with a single command.
While useful, this can have imprecise results, so should only be used with images that are very similar require the same area to be cropped.


How to Easily Crop and Resize Images in Linux muo creative linux croptools phatch
You can install Phatch with:
sudo apt-get install phatch
After installing, you’ll need to launch Phatch from the menu, and click + to create a new batch process. Many options are available here, but to crop some files, begin by selecting Crop. Here, click Mode to change the option to Custom and you’ll be able to specify how many pixels from the Left, Right, Top, and Bottom edges of the images. By default this is measured in pixels (px) but if you prefer this can be changed to % or cm, mm, or even inch.
Click + again to select Save, and pay attention to the In: field, which displays the location of the cropped images.
When you’re ready, click the Execute button (the paper airplane) and browse for the images to be cropped. Phatch does the cropping at the directory level, so ensure your images have been gathered together in a single location. When you’re done, click Batch and wait for the files to be cropped.
You’ll find the cropped images in the destination file, as explained above. The default location for this is on the Linux desktop.

Edit Your Photos

We’ve been looking at lightweight image editing tasks so far, but if you’ve stumbled upon this page looking for something with a bit more power for editing photos, for instance, why not try Darktable or Shotwell? These are two great apps that can really bring out the best in your digital photos.
Darktable vs. Shotwell: Two Great Photo Editing Applications For Linux Darktable vs. Shotwell: Two Great Photo Editing Applications For Linux Until recently, Linux only had GIMP as an acceptable photo editing tool. That's changed, thanks to a couple new tools that provide impressive features: Darktable and Shotwell. Read More Our look at managing and editing your digital snaps, meanwhile, features many more apps. If you’re a photographer, meanwhile, your focus might be on editing RAW images, and these four tools can help you there.
GIMP is a great tool. So are Shutter and the various other photo editing apps. But if you want a quick way to simply resize or crop your images, and then export them, then there is no point wasting resources on large, feature-packed apps. You know what you need to do — use the right tools. You wouldn’t put a screw in with a hammer, would you?

Of course, our research brought these apps together. Perhaps you know of some other tools for effortlessly resizing or cropping images. If so, we’d love to hear about them, so tell us in the comments.

Source: https://www.makeuseof.com/tag/easily-crop-resize-images-linux/