April 26, 2013

Ubuntu 13.04 Download Links

Ubuntu 13.04 final has been released. Below are download links for many of the popular Ubuntu forks. Enjoy.


Ubuntu 13.04 - http://releases.ubuntu.com/13.04/

Ubuntu Gnome 13.04 - http://cdimage.ubuntu.com/ubuntu-gnome/releases/13.04/release/

What’s New-

  • Firefox has replaced GNOME Web (Epiphany) as the default browser.
  • The Ubuntu Software Center and Update Manager have replaced GNOME Software (gnome-packagekit).
  • LibreOffice 4.0 is available by default instead of Abiword and Gnumeric.


Xubuntu 13.04 - http://xubuntu.org/getxubuntu/

Lubuntu 13.04 - https://help.ubuntu.com/community/Lubuntu/GetLubuntu


How to fix multiple workspace issue in Ubuntu 12.04 & 12.10

I have been frustrated that my multiple workspaces feature has not been working under Ubuntu 12.04 and 12.10 using Gnome Shell with effects. Well there is a fix for this. Seems it is not enabled by default due to configuration in the latest linux kernel. The workspace settings are now controlled thru the Compiz Settings Manager.

First install the Compiz Settings Manager:

To install Compiz Config Setting Manager enter following command in Terminal:

sudo apt-get install compizconfig-settings-manager compiz-plugins-extra

In 'compizconfig-settings-manager,' this assumes you've installed it, which you'll need to, you'll have to select:

Category > General > General Options > Desktop Size

Then set "Number of Desktops" to "1."


Then right-click on Workspace-Switcher (lower right hand corner) and select preferences; and set 'columns' to the number of workspaces you want, and 'rows' to '1,' unless you want to stack them for some reason... After I did this Workspace-Switcher functioned normally.

-------------

Should be working ok now, there was an issue previously that was fixed right before or after release.
When you say "Gnome desktop" do you mean Classic or Classic (No effects)

The former uses compiz & the setting should be made in ccsm > General Options > Desktop size

The later uses metacity & can be set thru the WS switcher preferences & or in dconf-editor, path & key -
org.gnome.desktop.wm.preferences num-workspaces

Enjoy...

April 25, 2013

Tweaks/Things To Do After Install Of Ubuntu 13.04 Raring Ringtail


Things/Tweaks to do after Install of Ubuntu 13.04 Raring Ringtail

Ubuntu 13.04 Raring Ringtail has been released, Ubuntu team has done really good job on 13.04. This Ubuntu release is much better than last release. Unity is much faster, responsive and a lot of things is better in 13.04. So after a-lot of work today bring this article for you. After applying these tweaks you can get more better experience with new Ubuntu. After these tweaks we can say your Ubuntu is ready to use, Every tweak is tested by NoobsLab. So lets start tweak to your Ubuntu 13.04.


1: Tweak Tools:
Gnome Tweak Tool is well-known powerful tweak tool, With this tool you can manage your Ubuntu environment like: Change theme, icons, fonts, cursor and so on options.
Unity Tweak Tool is a configuration tool for the Unity Desktop, providing users access to features and configuration options not (obviously) accessible, and brings them all together in a polished & easy-to-use interface.
Install Tweak Tools with following commands:
  • sudo apt-get install unity-tweak-tool
  • sudo apt-get install gnome-tweak-tool
Also Checkout Ubuntu Tweak


2: Synaptic and Compiz (CCSM) with extra plugins:
Synaptic is a graphical package management program for apt. It provides the same features as the apt-get command line utility with a GUI front-end based on Gtk+.
CCSM, short for CompizConfig Settings Manager, is a configuration tool for Compiz Fusion. It is used to configure the many plugins included in Compiz and Compiz Fusion, as well as the use of various profiles and intergrating better with existing desktop settings.
To install Compiz Config Setting Manager enter following command in Terminal:
  • sudo apt-get install synaptic
  • sudo apt-get install compizconfig-settings-manager compiz-plugins-extra
Go to Dash and Search "CCSM" or "synaptic"


3: Enable Hibernate option:
Ubuntu has disabled hibernate option, So here is tweak to enable hibernate.
Open Terminal and enter following command:
  • sudo gedit /var/lib/polkit-1/localauthority/50-local.d/hibernate.pkla
copy and paste the following code in file:
[Re-enable Hibernate]
Identity=unix-user:*
Action=org.freedesktop.upower.hibernate
ResultActive=yes
Save file and Exit, then Restart and check.


4: Remove White Dots from Ubuntu 12.10 Login Screen
If you want to remove white dots from login screen of Ubuntu 13.04, So here is a easy tweak for you.
Enter following commands in Terminal:
  • sudo xhost +SI:localuser:lightdm
  • sudo su lightdm -s /bin/bash
  • gsettings set com.canonical.unity-greeter draw-grid false


5: Disable Guest Account:
Guest account is enable by default in Ubuntu, It means anybody can login with guest account in your Ubuntu. So here is tweak to disable guest account.
Open Terminal and enter following command to open file in text editor:
  • sudo gedit /etc/lightdm/lightdm.conf
Now add the following line at the end of file.
allow-guest=false
If you want to disable Remote Login, Then add following line at the end of file.
greeter-show-remote-login=false
Save and close file, Now Restart to see effect.


6: Improve Unity Performance, Remove Online Search Lenses:
If you don't like online search in Unity, You can disable it from Settings -> Privacy then Turn off online search.
Alternatively you can remove online search lenses from Unity, Following commands will remove Shopping, Music, Photos, Gwibber and Video lenses and make Unity much responsive:
  • sudo apt-get autoremove unity-lens-shopping
  • sudo apt-get autoremove unity-lens-music
  • sudo apt-get autoremove unity-lens-photos
  • sudo apt-get autoremove unity-lens-gwibber
  • sudo apt-get autoremove unity-lens-video
You will not see anymore online searches in dash.

Unity Record your activity, You can adjust your privacy by enable/disable these features.


7: Disable overlay Scrollbars:
You can disable overlay scrollbars, if you don't like that.
Enter following command in terminal to disable overlay scrollbar:
  • gsettings set com.canonical.desktop.interface scrollbar-mode normal
If you want to get back overlay bar, enter following command:
  • gsettings reset com.canonical.desktop.interface scrollbar-mode


8: Show username on panel:
UserName is disabled by default in Ubuntu 12.10, So here is tweak you can enable it very easily.
Enter following command in terminal:
  • gsettings set com.canonical.indicator.session show-real-name-on-panel true
To remove name from panel, Enter following command:
  • gsettings set com.canonical.indicator.session show-real-name-on-panel false


9: Disable System Crash Reports:
If you are experiencing something crashes in your Ubuntu, and you don't like to be notify with reports. You can disable them easily.
Enter following commands to disable crash reports:
  • sudo gedit /etc/default/apport
Now text file will open, In the last line you will see "enabled=1" change it to "enabled=0". Save and close file.
Now enter following command in terminal to stop apport service:
  • sudo service apport stop


10: Firewall for Ubuntu:
Linux don't need Anti-virus but Firewall is important for any kind of Operating System. UFW is installed by default in Ubuntu but it is command line and disable by default. You can install best firewall GUFW enable and manage it graphically.
Enter following command in terminal to install firewall:
  • sudo apt-get install gufw
After installation open Dash and Search "GUFW" to configure it.


11: Install Hardware Temperature Monitor:
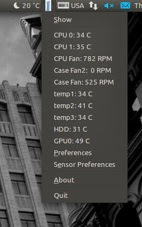
The Psensor Indicator is providing a quick access to sensor values and settings. When a sensor temperature is too much hot, a desktop notification bubble appears and the Application Indicator icon is changed to a red. Your pc must have sensors to use complete features.
ubuntu temperature
Enter following command in terminal:
  • sudo apt-get install lm-sensors hddtemp psensor


12: Move Minimize, Maximize, Close Buttons to Right:
If you are used to use these buttons on right side then this tweak is useful for you. You can move Minimize, Maximize, and Close buttons to the right side.
Enter following command to move buttons to right:
  • gsettings set org.gnome.desktop.wm.preferences button-layout ':minimize,maximize,close'


13: Open as Administrator Entry in Right Click Menu
This is really cool tweak for those who want to open file and folder with Administrator privileges, So now it is really easy to do.
To add "Open as Administrator" entry in right click menu, Enter following commands in Terminal:
  • wget http://dl.dropbox.com/u/53319850/NoobsLab.com/libnautilus-gksu.so
  • sudo cp libnautilus-gksu.so /usr/lib/nautilus/extensions-3.0/ && sudo rm libnautilus-gksu.so
After that enter following command:
  • nautilus -q


14: Enable Hardware Drivers:
Ubuntu works perfect with latest hardware, It is better to use drivers offered by Ubuntu. You can choose best drivers for your hardware from additional driver and can enable/disable from there easily.
Open Dash and Search for "Software & Updates" Here you can find "Additional Drivers" in the last Tab.


15: Install Adobe Flash Plugin:
By default firefox doesn't install flash player, So now you can install flash player.
ubuntu flash
Open Terminal and enter following commands:
  • sudo apt-get install flashplugin-installer


16: Install qBittorrent:
The qBittorrent project aims to provide a Free Software alternative to µtorrent. An advanced and multi-platform BitTorrent client with a nice Qt4 user interface as well as a Web UI for remote control and an integrated search engine. qBittorrent aims to meet the needs of most users while using as little CPU and memory as possible.
Enter following command to install qBittorrent:
  • sudo apt-get install qbittorrent


17: Install Plugins for Rhythmbox (Like Equalizer):
Rhythmbox is default Audio player in Ubuntu 13.04, You can install plugins for rhytmbox. Plugins are: Audio-read, Album-art-search, Countdown-playlist, plugin-cover-art-browser, Equalizer, Jump-to-Playing, Jump-to-Window, lyrics, micro-blogger, open-containing-foler, radio-browser, Random-album-player, Remember-the-rhythm, repeat-one-song, rhythm-web, send-first, small-window, stop-after, suspend, tab-guitar, tray-icon, web-menu, stream-ripper
Enter following commands to install plugins.
  • sudo add-apt-repository ppa:fossfreedom/rhythmbox-plugins
  • sudo apt-get update
  • sudo apt-get install rhythmbox-plugin-complete
After installation open Rhythmbox and Go to "Edit" -> "Plugins" and enable plugins.


18: Install Restricted Extras:
There are some Restricted extras in Ubuntu which can't be install while installation of Ubuntu by default but you can install these Restricted extras by yourself. Restricted mp3 playback and decoding, support for various formats, fonts, java, flash plugin, lame, dvd playback.
  • sudo apt-get install ubuntu-restricted-extras


19: Install Codecs and Enable DVD Playback:
If you are multimedia user and use Ubuntu for multimedia then these codecs are very useful for you. You can install them by single command.
  • sudo apt-get install gstreamer0.10-plugins-ugly gstreamer0.10-ffmpeg libxine1-ffmpeg gxine mencoder libdvdread4 totem-mozilla icedax tagtool easytag id3tool lame nautilus-script-audio-convert libmad0 mpg321
  • Following command for Enable DVD Playback:
  • sudo /usr/share/doc/libdvdread4/install-css.sh


20: Install Compression/Decompression tools:
You can compress and decompress 7z, zip, gzip, rar, xz, tar, bz2, xar, tar.gz, tar.bz, and many others.
Enter following command in terminal to install:
  • sudo apt-get install p7zip-rar p7zip-full unace unrar zip unzip sharutils rar uudeview mpack arj cabextract file-roller


21: To Reset Unity:
>> to reset the Unity:
  • sudo apt-get install dconf-tools
  • dconf reset -f /org/compiz/ 
  • setsid unity
  • unity --reset-icons
>> to reset Compiz:
  • gconftool-2 --recursive-unset /apps/compiz-1 unity --reset

Source: http://www.noobslab.com/2013/04/tweaksthings-to-do-after-install-of.html

April 21, 2013
Noise & BeatBox Music Players


I loaded the live version of Pear OS7 and discovered the included On Air music player. Found out it is based on the Noise and BeatBox music players included in the Elementary distro. Below is an article on how to get them. I installed them on Ubuntu 12.10 without any issues. It has a nice clean look and a 10-band equalizer (a must have for me). Below are reviews of the Noise Music Player, and a fork of it called the BeatBox Music player. Since BeatBox is no longer tied to the Elementary project, there seems to be more development going on with it. BeatBox has added Internet Radio and Podcast links, but I was unable to get these working yet.  They are very similar and great sounding little music players for linux. Banshee, Rhythmbox, and Audacious have more plugins available and seem more feature rich. Enjoy.

The Noise Music Player-

Elementary official audio player, Noise, released (PPA available)
Noise is fancy music player, branded as Elementary's official audio player, thus it carries various Elementary eyecandy pieces.
The look, similar to Beatbox's, is shaped around the exposed albums in big shadowed previews, previews helped by the right-side info panel, that adds extra informations related to the selected tracks, as well as similarities.


"Navigating" an album is as simple as clicking on it, action that triggers a reduced clickable playlist, from where further tracks from inside the "browsed" album can be selected and played.
The "usual" filters are available in the left panel, such as History, Favorite Songs, Never Played, etc.
The bottom bar houses, via monochrome icons, common actions, such as Add Playlist, Enable Shuffle, Enable Repeat, Hide/Show Info Panel and Equalizer.
The top-right "cog" icon brings easy access to import or rescan music libraries, as various Preferences (at the moment, a "minimalistic" set).
How do we install Noise 0.4?
Add the following official development PPA (Oneiric, Precise)
sudo add-apt-repository ppa:nemequ/sqlheavy

sudo add-apt-repository ppa:elementary-os/daily

sudo apt-get update
sudo apt-get install noise

Source: http://www.iloveubuntu.net/elementary-official-audio-player-noise-released-ppa-available

The BeatBox Music Player-


You can also check out other details about BeatBox 0.7 on their Official Announcement Page.
Download Source Tarballs of BeatBox 0.7 for Ubuntu & Debian

Install BeatBox Player 0.7 in Ubuntu 12.10/12.04/Linux Mint (New Release)

Umair 10/14/2012


Install BeatBox Player 0.7 in Ubuntu 12.10 Quantal/Ubuntu 12.04 Precise/Linux Mint 13

BeatBox is a Audio player for the linux operating system that is fast, simple, and beautiful. BeatBox is an easy to use, stable, fast and good looking music library organizer written in vala.

Features include:
  • Sound Menu support
  • Two Views – Album art and ‘list’
  • CD Playback
  • iPod Syncing
  • Auto-fetching of missing album art
  • Album art renderer in ‘List View’
  • Scrobble support
  • Equaliser

To install BeatBox in Ubuntu/Mint open Terminal (Press Ctrl+Alt+T) and copy the following commands in the Terminal:
  • sudo add-apt-repository ppa:sgringwe/beatbox
  • sudo apt-get update
  • sudo apt-get install beatbox
To add BeatBox in sound menu do following, Enter following command to install dconf-tools:
  • sudo apt-get install dconf-tools
Go to Dash open "Dconf-Editor" and see the following picture

beatbox

======================

elementary Music Player `Beatbox` 0.3 Released


elementary music player beatbox screenshot

Beatbox, the default music player in the upcoming elementary "Luna" release, has reached version 0.3 codename "Acolyte". The new version includes an improved album view, iPod sync, podcast and Internet radio support, among others.


Beatbox features a clean interface with 3 possible views, including a very cool album view, smart playlists, MPRIS v2 support (can make use of the Ubuntu sound menu or various GNOME Shell extensions) Last.fm integration (scrobbling, similar songs, etc.) and more.


Most important changes in Beatbox 0.3:
  • Better album view, shadows for album covers, native gtk, more integrated, new popup view.
  • iPod sync using libgpod.
  • Speed improvements to list and album view.
  • Full podcast support.
  • Internet radio support.
  • Import/export playlists.
  • Cleaner first run experience.
  • Now reads album artist, composer, disc number.
  • Lyric fetching
From now on, Beatbox will only get bug fixes and feature improvements (no new features) until it reaches version 1.0, which should be released in the same time as elementary OS Luna.


Some more BeatBox 0.3.0 screenshots:

elementary music player beatbox

beatbox music player

beatbox music player


Download BeatBox Music Player (includes Ubuntu .deb packages and source files) - BeatBox requires some dependencies which aren't available in the Ubuntu repositories: SQLHeavy (PPA here) and libranite0 which you can get either from the elementary daily PPA (make sure you read the PPA description before adding it!) or from the Eidete PPA (which should be safer than the elementary daily PPA).

Arch Linux
users can install the latest BeatBox from BZR using AUR.

Remember to report any bugs you may find @ Launchpad.

Source: http://www.webupd8.org/2012/02/elementary-music-player-beatbox-03.html

Beatbox Music Player Sees New Release on Ubuntu


Beatbox 0.4 on Ubuntu 12.04


Beatbox music player has been updated and made available for Ubuntu 12.04.
The former-elementary application, which hits version 0.4 with this release, gains stability, performance and bug fixes in addition to a number of significant new features.

Basics

As any music app should be Beatbox is simple to get started with, even prompting you on first run to import some music – a super intuitive gesture that will save you staring at a blank screen, or cause you to root through menus.
The importing my library was slow, and at times I thought the app had frozen, but in around the same time that it takes to boil an overly-full kettle twice my 15,000 track library was ready and waiting to be played.

Looks

One thing that is clear from the get-go is that the application has been designed solely to complement the elementary GTK theme.
For example, there are parts where colour of text used by the app drowns in Ubuntu’s orange highlights; there are no icons on either of the ‘view’ buttons, and the monochromatic symbols for menu unfolding, shuffle, repeat, etc are simplistic but not consistent in style with the rest of the system icon theme.


example of visual issues in beatbox


But if you can overlook the (likely temporary) cosmetic inconsistencies you’ll find some cracking features on offer…

Features

The search needs to be singled out as the standout feature in Beatbox. It suggests artists and albums as you type giving you a super quick way to play what you want with a minimum of fuss.


searching in beatbox is powerful, and easy
A sole click on an album cover in the ‘Album View’ presents you with a pop-over track-list from which to choose tracks to play, add to play-lists etc


popover in beatbox

I’ll be blunt: I don’t like the single-click approach. It breaks the expectation the rest of my desktop gives me (double-click to open something). Hopefully an option to set this as a double-click will appear in later versions.
Other features include: -
  • Sound Menu support
  • Two Views – Album art and ‘list’
  • CD Playback
  • iPod Syncing
  • Auto-fetching of missing album art
  • Album art renderer in ‘List View’
  • Scrobble support
  • Equaliser

Beatbox can Sync with iPods

Install Beatbox on Ubuntu 12.04

Like a lot of apps at the moment Beatbox is not yet available to install through the Ubuntu Software Center, but it can be installed by adding the official PPA – Personal Package Archive – to your systems’ Software Sources.
This can be done quickest by using the Terminal application and running the following commands: -
  • sudo add-apt-repository ppa:sgringwe/beatbox
  • sudo apt-get update && sudo apt-get install beatbox
Once Beatbox has fully installed you can launch it using the Dash.
If you’re particularly impressed with Beatbox you can ‘Flattr’ the developer @ flattr.com/thing/633135/BeatBox-

April 12, 2013

Pear OS 7 "Corella" Review

Pear OS 7 "Corella" Review: Simple, elegant and smooth Mac clone of Ubuntu 12.10

I have got good familiarity with Pear OS 6, having used it for more than 6 months. I really liked the launcher (and felt it is much intuitive and better than Gnome 3 launcher), and the social networking apps like G+, Facebook and Twitter. Pear OS 6 is based on the long term version of Ubuntu - Precise Pangolin. The latest release of Pear OS, Pear OS 7 is on the other hand based on Ubuntu 12.10, which has got 18 months of support. 


From Pear OS 7 http://mylinuxexplore.blogspot.in


Following the release note in Distrowatch on 4th April, I downloaded the 1.1 GB 64 bit version. As of now, there is no 32-bit version available for Pear OS 7. For Pear OS 6, I had a rough experience with the 64 bit version as the launcher broke immediately after the first update. So, I re-installed the more stable 32-bit version with pae kernel. So, I was interested to see if the stability improved for the 64 bit version in the 7th release.


I did a live boot followed by installation in my Asus K54C with 2.2 Ghz Core i3 processor and 2 GB RAM. Pear OS 7 booted up nicely on my laptop. It comes with Gnome 3.6, highly customized and a bit older Linux kernel, 3.5.0. However, the release note states that Linux kernels 3.7.10 and 3.8.5 with the corella-kernel repository. Now, I couldn't find the repository talked of, hence, I downloaded the latest Linux kernel 3.8.5 from the Ubuntu Raring Ringtail (forthcoming 13.04) repository. Process is quite simple, open a terminal and run the following commands:
$wget http://kernel.ubuntu.com/~kernel-ppa/mainline/v3.8.5-raring/linux-headers-3.8.5-030805-generic_3.8.5-030805.201303281651_amd64.deb
$wget http://kernel.ubuntu.com/~kernel-ppa/mainline/v3.8.5-raring/linux-headers-3.8.5-030805_3.8.5-030805.201303281651_all.deb
$wget http://kernel.ubuntu.com/~kernel-ppa/mainline/v3.8.5-raring/linux-image-3.8.5-030805-generic_3.8.5-030805.201303281651_amd64.deb
$wget http://kernel.ubuntu.com/~kernel-ppa/mainline/v3.8.5-raring/linux-image-extra-3.8.5-030805-generic_3.8.5-030805.201303281651_amd64.deb

You can run these codes together as well, just because my blogger template doesn't support so long a code, I had to break it into pieces.

Once all the required files are downloaded, install them by running the following command
$sudo dpkg -i *.deb
Once installed update the grub, to make the new Linuxx kernel visible when you reboot.
$sudo update-grub2


From Pear OS 7 http://mylinuxexplore.blogspot.in
Once rebooted, Pear OS 7 with Linux kernel 7 ran as smooth as ever. Post update, the launcher worked well and all the programs worked as expected.

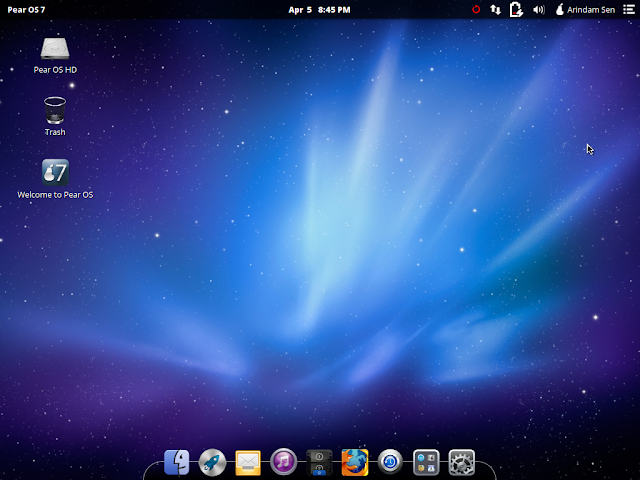
As mentioned, Pear OS 7 comes with a very attractive tweaked Gnome 3.6 desktop, known as  Pear Aurora. It resembles Mac OS X greatly with a similar looking wallpaper, a plank (simplest form of docky and is the underlying technology behind docky) at the bottom and a menu launcher. Additionally, it has got some cool wallpapers as well.
From Pear OS 7 http://mylinuxexplore.blogspot.in

Hardware detection of Pear OS is as good as Ubuntu and it could detect the touchpad, wifi and sound without requiring any manual intervention.

Applications
Pear OS 7 has an interesting collection of applications, particularly the multimedia section is pretty rich. 
  • Office: LibreOffice 4.0.2.1 Calc, Writer and Impress
  • Internet: Firefox 20, Empathy IM, Geary mail
  • Graphics: Shotwell photo manager
  • Multimedia: VLC2 multimedia player, On Air music player, Basero CD/DVD writer
  • Accessories: Calculator, Contacts, gedit editor, screenshot, terminal, Time Back

From Pear OS 7 http://mylinuxexplore.blogspot.in
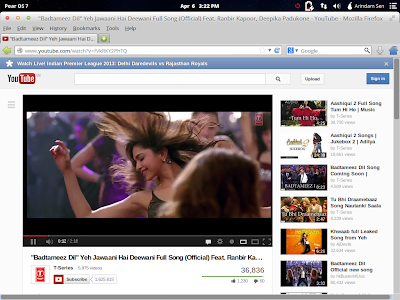
Multimedia codecs and Adobe flashplugin are in-built and I could watch my favorite youtube videos and movies right after live-boot and installation.


From Pear OS 7 http://mylinuxexplore.blogspot.in
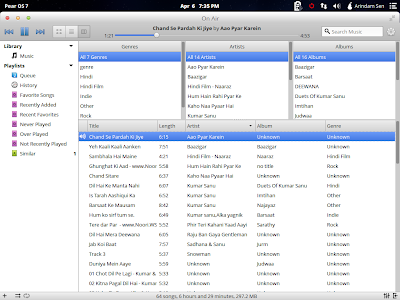
Pear OS 7 comes with a new music player "On Air". I found to be a simple music player and it automatically picks up files from the /home/music folder. There are no graphic equalizer present but works well as a basic lightweight music player.

From Pear OS 7 http://mylinuxexplore.blogspot.in

I didn't explore Time Back much in during my usage. It is claimed to a clone of Apple time machine and effective in backing up your valuable data. There are options for hourly backup of selected folders which can be retrieved when required.

From Pear OS 7 http://mylinuxexplore.blogspot.in
LibreOffice 4 is a good addition along with the lightweight Geary mail (I guess from the developers of Elementary OS). However, the graphics section left me a bit of disappointed with no photo editor. However, GIMP 2.8 can be downloaded from the Pear (or should I say Ubuntu?) repository. Overall, software collection is decent in Pear OS 7. Gnome Files is the default file manager.

Installation
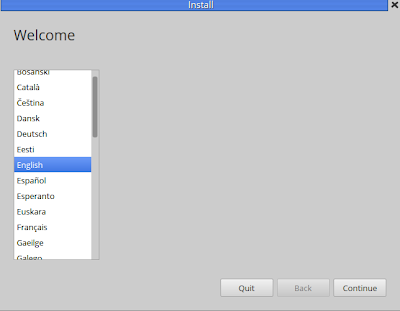
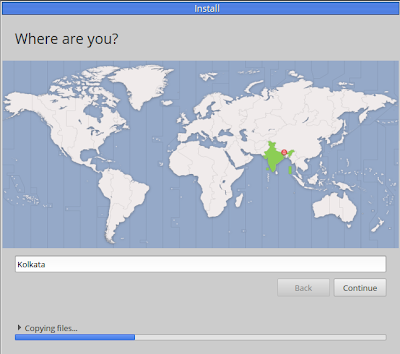
Installation is similar to Ubuntu and is quite simple.Questions revolve around geographic location, language and keyboard, location to install and finally, user ID creation with password. Simple and takes about 20 minutes of time, included downloading the multimedia codecs and latest Adobe flash.


From Pear OS 7 http://mylinuxexplore.blogspot.in
Repository
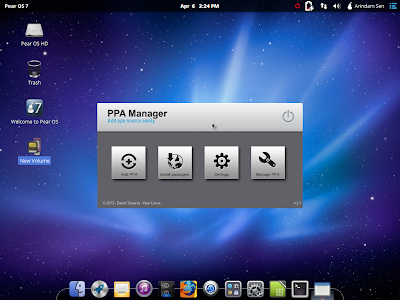
Pear OS derives its softwares from Ubuntu 12.10 (Quantal Quetzal) repositories and has all the latest that Ubuntu can offer. Softwares can be installed via PearOS Software Center (same as Ubuntu Software Center, renamed only) and Synaptic package manager. I could download and install my favorite browser Midori from the package list. 
From Pear OS 7 http://mylinuxexplore.blogspot.in

One thing I must mention here, I see notable changes in the Pear OS Software Center from the last edition. In Pear OS 6, software center shortcut used to be in the docky and would resemble a lot to Mac. Further, commonly downloaded applications used to be in the first page making it easy for the users. Though it was essentially Ubuntu Precise repository but it looked better than Ubuntu Software Center. I miss it in Pear OS 7.

What is so different in Pear OS 7 from Ubuntu 12.10?
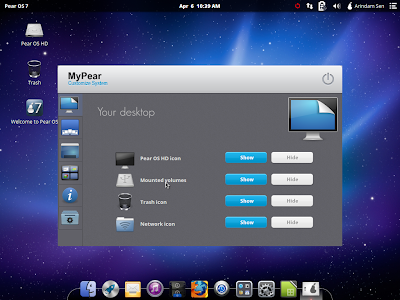
Welcome to Pear OS 7 icon on the desktop take you through the items I am talking of. 
In overall, the effects are subtle and worked well with me. However, Pear OS 7 doesn't have the high social integration as in Ubuntu 12.10 and that may limit its appeal to a certain section of users.

Performance
Now the best part of Pear OS 7. I installed and tried out the 64-bit version and it recorded a RAM usage of 315 MB and 1-10% CPU usage at steady state with system monitor running. For a 64-bit OS, it is really low and I found Pear OS to be very efficient in that aspect. Pear is very smooth to use and definitely smoother than Ubuntu 12.10.

Overall
Pear OS 7 looks professional and works really well. However, compared to Ubuntu 12.10 and even Pear OS 6, it has very little options for social network integration. I missed the Facebook, Twitter and G+ apps of Pear OS 6 in Pear 7. 

Pear OS 7, though, comes with some attractive propositions like system cleaner, backup option, etc. and a better performance over its LTS counterpart. I am not sure if the Pear OS 6 64 bit version is still plagued with the launcher bug or not. If the bug is still there, possibly Pear 7 is a good option for these users. One caution here, Pear OS is not upgradable and hence, re-installing is the only option post the 18 months of support period is over. 

Otherwise, it is fine distro worth exploring for users looking for a simple, elegant and smooth Ubuntu based operating system. Pear OS 7 is easy to use and should appeal to even Linux newbies. Further, almost every feature of the OS has been explained in an easy manner for the newbies and hardly I required to hit the terminal for my daily use. Pear OS 7 is definitely recommended, especially for Linux newbies.

 You can download the 64-bit from here.

Source: http://mylinuxexplore.blogspot.com/2013/04/pear-os-7-corella-review-simple-elegant.html