September 3, 2017

3 Graphical User Interface Applications using FFmpeg

FFmpeg is a freeware video and audio encoder. There are versions for Windows, Linux, and MacOS.

FFmpeg GUIs
A GUI is a graphical user interface that makes it easy for a user to work with FFmpeg. Since FFmpeg is open-source, various developers have built software to utilize it with simple GUIs.


Benefits to Using a GUI
Since FFmpeg is used through a command line interface (CLI), there is a relatively steep learning curve for users who are unfamiliar with this type of interface. Using a CLI requires that the user understand how to write commands with the proper language and syntax. Software that provides a GUI makes using FFmpeg as easy as clicking a few buttons and setting a few parameters.
Examples:

Limitations to Using a GUI
Using a GUI allows the user to jump right into FFmpeg, but it obfuscates what’s happening “under the hood.” Some users may want to know the FFmpeg command generated by using the GUI, and that is not always accessible. Also, GUIs are not always up to date with the latest version of FFmpeg.

Source: https://github.com/amiaopensource/ffmpeg-amia-wiki/wiki/3)-Graphical-User-Interface-Applications-using-FFmpeg

Other helpful links:
Source: https://www.youtube.com/watch?v=MPV7JXTWPWI

Windows - http://ffmpeg.zeranoe.com/builds/

Download FFMPEG: https://www.ffmpeg.org/download.html

Download PeaZip: http://www.peazip.org/ Full

FFMPEG Documentation: https://ffmpeg.org/ffmpeg.html

FFMPEG Filter Documentation: https://ffmpeg.org/ffmpeg-filters.html

All FFMPEG features: https://ffmpeg.org/documentation.html


How to Play DVDs and Blu-rays on Linux

Commercial DVDs and Blu-ray discs are encrypted. The Digital Rights Management (DRM) is designed to prevent you from ripping them, copying them, and watching them on unsupported players. You can get around this protection to watch DVDs and Blu-rays on Linux, but it’ll take some tweaking.
DVD discs work well, and all DVDs should work after you install a single library. Blu-rays are much more hit-and-miss, and only some will work–particularly older Blu-ray discs. Also, both of these require that you have the right disc drive in your PC–a DVD drive if you’re looking to just play DVDs, and a Blu-ray drive if you’re looking to play DVDs and Blu-ray discs.

How to Play DVDs on Linux with VLC

The free VLC media player can play DVDs on Linux, but it requires a special library known as libdvdcss. This library effectively breaks the CSS encryption on DVDs, allowing you to watch them. The status of this library is legally unclear–it’s potentially illegal under the DMCA in the USA–so Linux distributions don’t generally include it in their software repositories.
But this is actually the same method many Windows users use. Windows 8 and 10 no longer include DVD playback functionality, and the standard advice is to download and install VLC. The Windows builds of VLC have libdvdcss built-in, so you just need to download, install, and start watching. Linux is a tad more complicated.
NOTE: You can also buy a licensed copy of Fluendo DVD Player for $25 on Ubuntu’s Software Center, but most people won’t want to bother. You can get DVDs for free if you’re willing to take just a few extra steps.
On Ubuntu 12.04 to Ubuntu 15.04, you can install libdvdcss by opening a terminal window and running the following commands:


sudo apt-get install libdvdread4
sudo /usr/share/doc/libdvdread4/install-css.sh


On Ubuntu 15.10 and up, run the following command instead. Follow the instructions that appear in the terminal to install libdvdcss:


sudo apt-get install libdvd-pkg


For other Linux distributions, perform a web search for “install libdvdcss” and the name of your Linux distribution. You’ll find instructions and third-party repositories that should make the process easy.


You can then install VLC from the Software Center if it isn’t installed already. (Alternatively, you can run sudo apt-get install vlc to install it from the command line.)
Once installed, insert your DVD and launch VLC. Click the “Media” menu in VLC, select “Open Disc,” and select the “DVD” option. VLC should automatically find a DVD disc you’ve inserted and play it back. If that doesn’t work, you may need to specify the device path of your DVD drive here.
If it doesn’t appear to work, try restarting your computer. That should ensure VLC is correctly using libdvdcss.


How to Play (Some) Blu-rays on Linux with VLC

Blu-rays are a bit more complicated. While there are technically paid DVD players you can purchase for Linux, there’s no officially licensed way to play back Blu-rays on Linux.
The older your Blu-ray disc is, the more likely it will work. Newer Blu-ray discs use BD+ disc encryption, while older ones used the more easily bypassed AACS encryption. Newer Blu-ray discs also blacklist some of the known keys used to play older Blu-ray discs in this way. If you have a very new disc, you may not get it to play at all.
To install VLC and its Blu-ray support on Ubuntu, open a terminal window and run the following commands in order. You can copy and paste them into a terminal window using your mouse.


sudo apt-get install vlc libaacs0 libbluray-bdj libbluray1
mkdir -p ~/.config/aacs/
cd ~/.config/aacs/ && wget http://vlc-bluray.whoknowsmy.name/files/KEYDB.cfg
 
 
If you’re using another Linux distribution, you’ll want to install VLC and the appropriate libaacs0, libbluray-bdj, libbluray1 libraries. You can then run the second two commands to download the KEYDB.cfg file into the configuration directory.


You can now open VLC and attempt to open a Blu-ray disc like you would a DVD. Click the “Media” menu, select “Open Disc,” and select “Blu-ray.” Leave the “No disc menus” option checked.
If you see a message saying the disc isn’t decrypted and you need a key, or a message saying the AACS host certificate has been revoked, your Blu-ray disc is too new and isn’t supported.


How to Play Blu-rays on Linux with MakeMKV and VLC

If you need to play a wider variety of Blu-ray discs, there’s another method that people report more success with: you can use MakeMKV to decode the Blu-ray and VLC to play it as it’s being decoded.
MakeMKV isn’t an open-source tool. It’s proprietary software with a free 30-day trial, and will theoretically cost $50 to continue using after that. However, MakeMKV is free to use while in beta, and it’s been in beta for three years. You’ll just have to check this forum post every month and refresh the beta key to continue using MakeMKV, assuming it stays in beta.
Another forum post provides instructions for installing MakeMKV on Linux. However, Ubuntu users can install MakeMKV using the much easier apt-get command. Currently, the most up-to-date PPA we’ve found for this is the makemkv-beta PPA. To install MakeMKV from this repository, open a terminal and run the following commands:


sudo add-apt-repository ppa:heyarje/makemkv-beta
sudo apt-get update
sudo apt-get install makemkv-bin makemkv-oss
 
 
You’ll also need VLC installed, as described above. Once you have both programs, open the MakeMKV application from your menu, select your Blu-ray disc drive, and click the “Stream” icon on the toolbar. You’ll be given a local address.


Open VLC, click the “Media” menu, click “Open Network Stream,” and provide that address. It will look similar to the following address:


http://localhost:51000/stream/title0.ts


The main movie is usually either “title0” or “title1”–choose the one that looks larger in MakeMKV.


MakeMKV will decode the Blu-ray video and stream it to VLC. Despite the word “stream,” this all happens on your computer, no internet required. VLC plays the video, but MakeMKV is doing the heavy lifting in the background.

Playing Blu-ray discs is both unreliable and a hassle. Only people who have actual commercial Blu-ray discs in their hands will have to go through this trouble–if you’ve ripped the Blu-ray discs on another computer, or downloaded the ripped files, you should be able to play them in VLC just like any other video.
In an age where you can get Netflix to work on Linux just by downloading Chrome, or use a quick tweak to make Hulu or Amazon Instant Video work, this is a lot of work to play a legitimate disc. It’s possible, but you’re better off getting your media in other ways on Linux, or using another device to play Blu-rays if you must use those physical discs.

Source: https://www.howtogeek.com/240487/how-to-play-dvds-and-blu-rays-on-linux/

September 1, 2017

Google launches Chrome Enterprise subscription service for Chrome OS

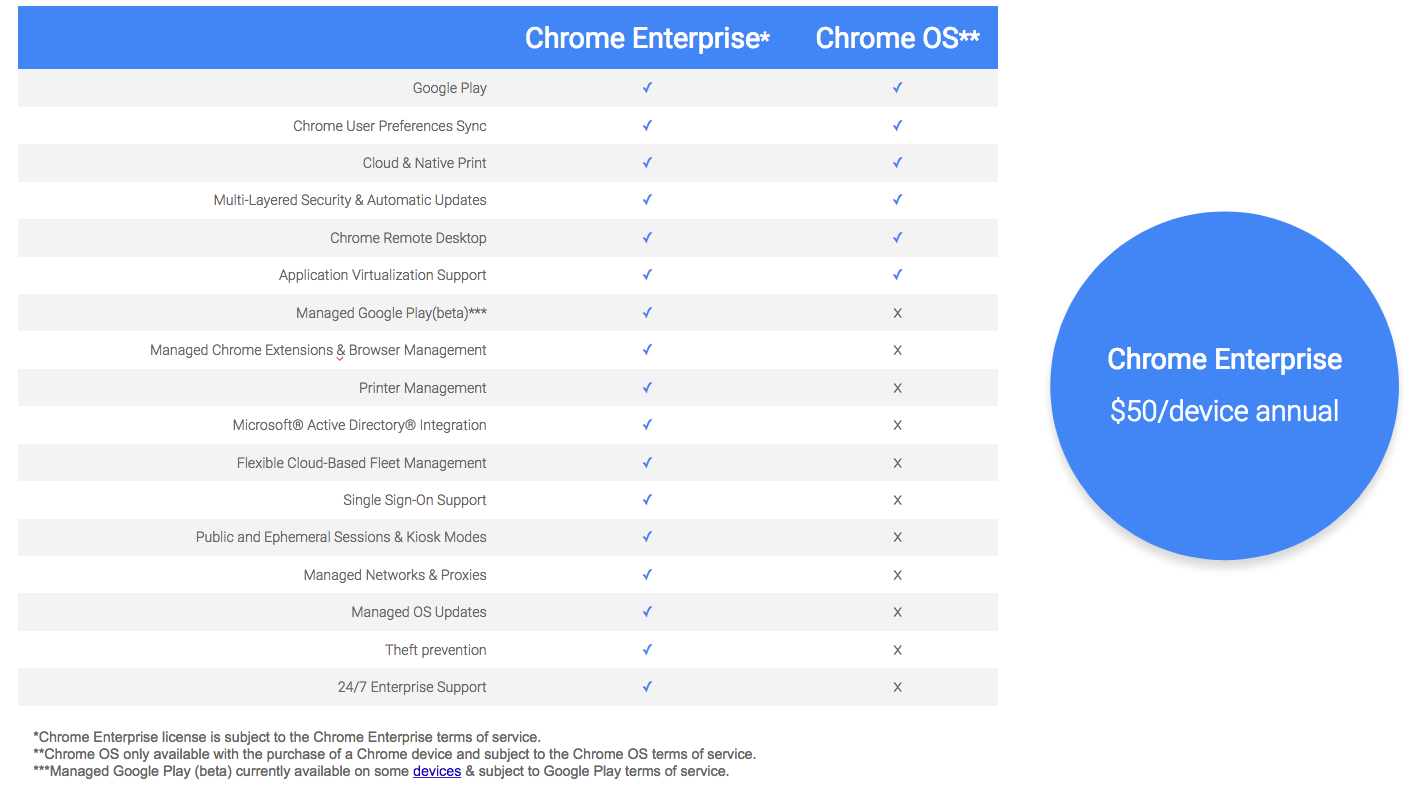
Google is launching a new enterprise service for large businesses that want to adopt Chrome OS devices. The new Chrome Enterprise subscription, which will cost $50 per device and year, is essentially a rebrand of Chrome Device Management, but with a number of additional capabilities. Even though the name would make you think this is about the Chrome browser, this program is actually all about Chrome OS. For Chrome users in the enterprise, Google already offers the Chrome Enterprise Bundle for IT, after all.
For enterprises, the main highlight here is that Chrome Enterprise is fully compatible with their existing on-premise Microsoft Active Directory infrastructure. Google senior director of product management for Android and Chrome for Business and Education Rajen Sheth told me that this has long been a stumbling block for many enterprises that were looking at adopting Chrome OS devices. With this update, enterprise users will be able to use their existing credentials to log into their Chrome OS devices and access their Google Cloud services — and IT admins will be able to manage their access to these devices and services.


It’s worth noting that Chrome OS admins could already enable other services that use the SAML standard to enable single sign-on for Chrome devices.


In addition, businesses also will now be able to manage their Chrome OS devices from the same enterprise mobility management solutions they already use, starting with VMware’s AirWatch. Support for similar services will launch in the future.
With this new licence, IT admins also will be able to set up a managed enterprise app store for their users. This feature is currently in beta and focuses on Chrome OS’s ability to run Android apps, which is currently available on many of the most popular Chrome devices in the enterprise.


Other benefits of the Chrome Enterprise subscription include 24/7 enterprise support, managed OS updates and printer management (you may laugh about this last one, but that’s something that still matters in many offices).
It’s no secret that Google is working hard to get more enterprises to adopt its various cloud-based services. Chromebooks have already found a lucrative niche in verticals like retail and education. To expand its market share, though, features like this new integration with AirWatch were sorely needed.

Source: https://techcrunch.com/2017/08/22/google-launches-chrome-enterprise-for-businesses-that-want-to-use-chrome-os/

7 Podcasts That A Linux User Should Follow


iPod is dead but podcasts are back in fashion. Look around yourself and you’ll find more and more people listening to podcasts in their niche. How about Linux? What are the best Linux podcasts that should be followed?
I asked this question on social media to know about the podcasts that Linux users are following. Based on the feedback, I present you some of the most loved Linux podcasts that you should be following as well if you are not doing that already.

Why podcasts?

Now you may argue if you really need to listen to podcasts. I understand your situation. You have your own set of favorite Linux blogs that you follow on a regular basis. Maybe you are a subscriber of one of the top Linux magazines. This way you stay updated with the latest happening in the Linux and open source world, know about various applications and cool tricks that you were unaware of.
Fair enough. But podcasts have their own advantage. You can listen to podcasts when you are driving or you can play it in the background while doing some work. You cannot do that with regular blog feed, can you?
I am not trying to convenience you to be a podcast fan :) Instead, if you are interested in podcasts, let me suggest you some Linux podcasts that you can listen to regularly to learn more about Linux and things around it.
If you are not a podcast fan, check this post to learn Linux online.

7 podcasts for Linux lovers

Before we see the list, let me tell you about Vocal, a podcast app for Linux. It was originally developed for elementary OS but it should be working for Ubuntu and Linux Mint as well.
Ready to see what are the podcasts that other Linux-ers are listening to these days? Here we go.


1. Linux Action Show


Linux Action Show Podcast


Linux Action Show claims to be the world’s number 1 Linux podcast. While I did not find a source that backs their claim, but Linux action Show (also known as LAS) is indeed a hugely popular Linux podcast.
It is hosted by Chris Fisher and it focuses on news, feedback and a featured subject such as a gadget review. You can listen to the podcast as well as watch the video, either on YouTube or on Jupiter Broadcasting website.
The one downside, as per me, is the long running time of the show. On an average, an episode of Linux Action Show runs for two hours which is a bit long for my taste.
Linux Action Show


2. Linux Voice


Linux Voice Podcast


Linux Voice is a magazine that was created after a successful crowdfunding campaign. It gives back 50% of the profit back to the Linux community. Normally, the magazines are up for purchase, either in digital or in print. But the digital copies are also made available under Creative Commons BY-SA license when they are a few months old.
Linux Voice magazine also has their own weekly podcast. They take readers’ opinion before each episode and then discuss their feedback on the topic in the next episode. Other topics are also included in the podcast.
Update: Linux Voice is no longer an independent magazine. It is part of the Linux Pro Magazine now.
You can get the RSS feed for the podcast from the link below and use it in a RSS feed reader such as Lifera or Feedly.
Linux Voice Podcast RSS


3. Going Linux


Going Linux Podcast


Going Linux is among the oldest Linux podcast. It is still being maintained and updated on a regular basis. Going Linux podcast provides listeners with practical, day-to-day advice on how to use Linux and its applications. The goal is to help make the Linux experience easy for the beginners. Something that It’s FOSS tends to do as well.
The best thing about Going Linux podcast is that its episodes are short, around 15-20 minutes. Perfect for my taste. The episodes are recorded professionally but at the same time it feels to be spontaneous and casual.
Going Linux


4. Late Night Linux


Late Night Linux podcast


Late Night Linux podcast has been born from the ashes of now dead Linux Luddites podcast.
In fact, it is run by some of the same voices behind Linux Luddite podcast.
Joe and Jesse from Linux Luddites have been joined by Ikey (of Solus Linux) and Felim (a seasoned sysadmin).
This biweekly podcast mainly focuses on the important news, Linux and Android applications, listeners’ feedback and reviews of OS, programs and gadgets.
The episodes normally last for one and half hour to two hours, on an average. So be prepared to have plenty of time on hand or listen to it in segments.
Good thing about these podcasts is that they clearly specify the segments of the podcast on their website. So you know which segment is at what time and you can skip to the desired section if you don’t want to listen to the entire episode.
Late Night Linux


5. Sunday Morning Linux Review


Sunday Morning Linux Review


As the name suggests, it’s a weekly podcast that mainly focus on Linux distribution and programs review. Hosted by Tony Bemus, Mary Tee and Tom Lawrence, Sunday Morning Linux Review also covers Linux and Open Source News along with the reviews.
Apart from listening to the podcasts, you can watch their videos on their YouTube channel. These videos are unedited and longer than the podcasts that last around one and a half hour.
Sunday Morning Linux Review


6. Linux Unplugged


Linux Unplugged


Linux Unplugged is another offering by Jupiter Broadcasting and is hosted by Chris, yes the same Chris of Linux Action Show fame. Unlike Linux Action Show, Linux Unplugged is more casual than Linux Action Show.
Linux Unplugged is more oriented towards users and listeners. When the podcast is live, guests and chat room members can interact directly with the show.
Linux Unplugged


7. The Linux Link Tech Show


Linux Link Tech Show Linux Podcast


The Linux Link Tech Show is a casual, discussion-oriented podcast where the host chat among themselves about Linux and the world around it. This is again a lengthy show with each episode runnig for around two hours.
Several guests also join the show from time to time so you get to listen to a variety of people.
The Linux Link Tech Show

Honorable mentions

Since it is a post about podcasts for Linux, I deliberately did not include Ubuntu Podcast and MintCast. It would be unfair to force distro specific podcasts to other Linux distributions users. But if you are an Ubuntu or Linux Mint user, do check these podcasts as well?

Your pick?

What Linux podcasts do you listen to? Was it included in the list here, if not, why not share it with rest of us?
On the same note, would you prefer to have an It’s FOSS podcast? Keep in mind that I am an Indian and thus have an accent :)

Source: https://itsfoss.com/linux-podcasts/

August 25, 2017

LuninuxOS 17.04 released

An older linux distro that received a new update is LuninuxOS 17.04. I recall trying this distro a couple years ago and it was themed to look like Mac OS. The current version is based on Ubuntu Gnome 17.04, and includes the Docky launcher, tweaks to Firefox 52.01, LibreOffice 5.3, Rhythmbox music player, and the Gnome Tweak Tool. It appears to be a polished looking distro with smooth themes just like its earlier version. It used about 1.9GB of memory. Below are my screen shots and where you can get it. Enjoy.


You can download it here: http://luninuxos.com/

Lunin

August 21, 2017

3 Ways You Can Use Android as a Desktop Operating System

Android is without a doubt the world’s favorite mobile operating system. But how does it fare on desktop and laptop computers?
You probably know that phones and tablets feature Google’s Android operating system. You might even know about the TV boxes powered by Android. Whenever you use these devices, Android feels smart and intuitive. No instruction manual is required.
Which is why it might come as a surprise to find Android can run on standard computers. But really, this should be no surprise. Touchscreen or otherwise, Android is user-friendly and familiar to so many people.
In mid-2017, developer Jide announced that arguably the most popular Android environment for desktops, Remix OS, was to end. Fortunately, other options are available for installing and running Android on a desktop PC. If you’re looking for the ultimate in Android-based productivity, it might be time to move away from your Samsung Galaxy Tab S3 or your Google Pixel C and consider installing one of these three Android distros on your computer. The Best Android Tablet Yet? Samsung Galaxy Tab S3 Review and Giveaway The Best Android Tablet Yet? Samsung Galaxy Tab S3 Review and Giveaway Taking aim at the iPad Pro, the Samsung Galaxy Tab S3 is the same weight, height, and price, but comes with a free stylus. It's the best Android tablet yet. Read More
But first… whatever happened to Remix OS?


1. (RIP) Remix OS

In July 2017, Chinese developer Jide announced (to much consternation) that Remix OS and the Remix hardware devices — various Mac Mini style computers and set-top boxes — would come to a halt, with immediate effect.
Following inquiries from various enterprise-level businesses, Jide has opted to move development from Remix OS and follow new opportunities.


remox os player desktop


This is a bit of a shame, as so many Android desktop projects in the past have failed. Jide’s Remix OS appeared to be a rare exception to the rule, but in the end, it was not. While keen observers may have seen the writing was on the wall for Remix OS when they stopped responding to support issues earlier in the year, overall the news has taken the community by surprise.
Although Remix OS can still be downloaded and installed, unless Jide releases the code, it has, sadly, had its day. How to Install Android on Your PC With Remix OS 3.0 How to Install Android on Your PC With Remix OS 3.0 Remix OS 3.0 lets users install Android on almost any hardware. Like Linux, Remix runs great on slow or older hardware, so if you have an old PC, bring it back to life with Remix... Read More
Happily, three Android-based desktop projects continue. But if it’s an Android gaming experience you’re looking for on your PC, grab a copy of Remix OS as soon as you can.


2. Android-x86 Project

Probably the most durable Android project for desktop computers, Android-x86 has been around since 2009. It’s a versatile system — I once used it to install Android on a Windows 8 tablet. You might even install it on a laptop. How to Install Android on Your Windows 8 Tablet How to Install Android on Your Windows 8 Tablet Windows 8 tablets are becoming more widely used, but the operating system – at least in its Modern mode – is light on the ground with particular apps. One way around this is to install... Read More
Although Android-x86 was involved in the development of Remix OS, it is generally assumed that the project will continue. After all, without Android-x86, none of the projects listed here would have gotten off the ground. Android-x86 is based on the AOSP (Android Open Source Project), with modifications that make it compatible for running on Intel-based processors and PC architectures. Such modifications include support for hardware acceleration.
The first release candidate for Android 7.1 Nougat was released on June 8, 2017.

android-x86 desktop


You can grab your copy over at the android-x86.org website. It is available in 32-bit and 64-bit options, and comes in ISO format, ready to be written to DVD or a USB flash stick for installation. While you’re there, look out for downloads prefixed with CM — these are CyanogenMod-based desktops.
Although dual-boot with Windows is supported (thanks to a UEFI manager), it’s worth trying Android-x86 out in live mode or as a virtual machine (using your preferred VM software). Setup can be slow, and you’ll notice that Android-x86 appears to be intended for touchscreen devices rather than standard desktops. Unlike the other examples here, there is no Start menu equivalent. Having said that, this version of Android works as expected, although you may find the presence of Google disconcerting if you’re looking for a purer, AOSP feel.


3. Phoenix OS

Intended for desktops and laptops with Intel Atom CPUs, Phoenix OS will nevertheless run on almost any PC built in the past five years. Utilizing the code from Android-x86 and the grub4dos boot management tool, Phoenix OS is particularly well-suited for dual-booting. However, the operating system can be installed on a USB storage device as well.


As with any new operating system for your PC, it’s worth testing Phoenix OS in a VM before installing to the hard drive. Either way, you’ll be presented with a full Android-style desktop, designed for productivity. As with Android-x86, there’s even a Windows-esque Start menu, where the most commonly used apps are listed. It’s even possible to access your Windows storage from within Phoenix OS!
Two versions are available. One is a standard ISO, available in 32-bit and 64-bit flavors and ready to be installed. The other is an executable, again available for both instruction sets, that can be run in Windows, making Phoenix OS an app.
It’s worth pointing out that if you are planning on using Phoenix OS on a desktop computer, it is not suited to Android gaming. For this, consider grabbing a copy of Remix OS while you still can.
A collection of download options for Phoenix OS can be found online at phoenixos.com/download, where you’ll also find a tablet version of Phoenix OS if you’re so inclined.


The Future: OpenThos

Still a work in process — so installation may prove time-consuming — OpenThos is capable of running Android and Linux apps in windowed mode. While this isn’t a straight Android operating system, it is based on Android-x86.
Writing to USB and booting live, or using OpenThos in a virtual machine, are among the options (as outlined on GitHub). Fortunately, you can download a disk image of OpenThos from FOSSHUB. The UEFI boot manager provides support for Windows, Linux, and macOS. This should make OpenThos suitable as a dual-boot operating system option.
Using OpenThos is a little different to the other Android desktops. While the same possibilities exist with regard to productivity, an extra dimension is introduced with the option to install Linux apps.


Can Android Cut It on the Desktop?

In a world with Google Chrome OS offering a Google-flavored desktop experience with support for Android apps, the question that must surely be asked is: Why install Android on a desktop when you can simply install Chrome OS? How to Run Google Chrome OS From a USB Drive How to Run Google Chrome OS From a USB Drive You don't need to buy a Chromebook to enjoy the features of Google's desktop operating system. In fact, all you need is a working computer and a USB Drive. This is how... Read More
 
chrome os desktop


Well, look at it this way: although precise figures are unknown, Chrome OS has 0.56 percent of the market based on desktop browser stats. Conversely, Android has 38.9 percent across all platforms, mobile and desktop.
In short, Android has the presence and popularity. It’s just missing that vital pivot in the minds of its users — the realization that, yes, it can be used as a desktop operating system. It has the apps, it has the games, and it has the familiarity.

But what do you think? Is Android good enough as a desktop operating system? Have you used any of these Android desktops? Tell us about it in the comments.

Source: http://www.makeuseof.com/tag/use-android-desktop-operating-system/

August 20, 2017

How to Scan Your Linux Computer for Viruses and Rootkits

Are you worried that your Linux computer may be infected with malware? Have you ever checked? While Linux systems tend to be less susceptible to malware than Windows, they can still be infected. Many times they’re less obviously compromised, too.
There are a handful of excellent open-source tools to help you check if your Linux system has been the victim of malware. While no software is perfect, these three have a solid reputation and can be trusted to find most known threats.
ClamAV is a standard anti-virus and will probably be the most familiar to you. There is actually a Windows version of ClamAV too.

Install ClamAV and ClamTK

ClamAV and its graphical front end are packaged separately. That’s because ClamAV can be run from the command line without the GUI, if you choose. Even still, the graphical interface ClamTK is easier for most people. The following is how to install it.
For Debian and Ubuntu-based distro:
sudo apt install clamav clamtk
You can also find clamav and clamtk in your distro’s package manager if you are not using Ubuntu based distro.
After both programs are installed, you have to update its virus database. Unlike everything else with ClamAV, that has to be done as root or with sudo.
There’s a chance that freshclam is being run as a daemon. To run it manually, stop the daemon with Systemd. Then, you can run it normally.
sudo systemctl stop clamav-freshclam
It’ll take some time, so just let ClamAV take care of things.

Run Your Scan

ClamTK Menu
Before you run your scan, click the “Settings” button and check off “Scan files beginning with a dot,” “Scan files larger than 20 MB,” and “Scan directories recursively.”
ClamTK Settings
Go back to the main menu and click “Scan A Directory.” Select the directory that you want to check. If you want to scan the whole computer, select “Filesystem.” You may need to rerun ClamTK from the command line with sudo in order for that to work.
ClamTK Scanning
After the scan completes, ClamTK will present you with any discovered threats and allow you to choose what to do with them. Deleting them is obviously best, but may destabilize the system. This comes down to a judgement call for you.
The next scan to install is Chkrootkit. It scans for a type of malware specific to Unix-like systems like Linux and Mac – the rootkit. As the name suggests, the aim of rootkits is to gain root access on the target system.
Chkrootkit scans system files for signs of malicious alterations and checks them against a database of known rootkits.
Chkrootkit is available in most distribution repositories. Install it with your package manager.
sudo apt install chkrootkit

Check For Rootkits

Chkrootkit scan
This one is very easy to run. Just run the command as root or with sudo.
It’ll run down a list of potential rootkits very quickly. It might pause for a while on some while it scans through files. You should see “nothing found” or “not infected” next to each one.
The program doesn’t give a final report when it finishes, so go back through and manually check that no results turned up.
You can also pipe the program into grep and look for INFECTED, but that won’t catch everything.

Known False Positives

There’s a strange bug with Chkrootkit that reports a false positive for Linux/Ebury – Operation Windigo. This is a long-known bug caused by the introduction of a -G flag into SSH. There are a couple of manual tests you can run to verify that it is a false positive.
First, run the following as root.
find /lib* -type f -name libns2.so
It should turn up nothing. Next, check that the malware isn’t using a Unix socket.
netstat -nap | grep "@/proc/udevd"
If neither command turns up any results, the system is clean.
There also appears to be a fairly new false positive for tcpd on Ubuntu. If it does return a positive result on your system, investigate further, but be aware that the result could be incorrect.
You also may encounter entries for wted. Those can be caused by corruption or logging errors on system crashes. Use last to check to see if the times line up with reboots or crashes. In those cases the results were probably caused by those events and not malicious activity.
Rkhunter is yet another tool for searching out rookits. It’s good to run both Chkrootkit on your system to ensure that nothing slipped through the cracks and to verify false positives.
Again, this one should be in your distribution’s repositories.
sudo apt install rkhunter

Run Your Scan

First, update rkhunter’s database.
rkhunter scan
Then, run your scan.
The program will stop after every section. You will probably see some warnings. Many arise because of sub-optimal configurations. When the scan finishes, it’ll tell you to take a look at its full activity log at /var/log/rkhunter.log. You can see the reason for every warning there.
It also gives you a complete summary of its scan results.
Hopefully, your system turned up clean. Be careful and verify any results you receive before doing anything drastic.
If something is legitimately wrong, weigh your options. If you have a rootkit, back up your files and format that drive. There’s really no other way.
Keep these programs updated and scan regularly. Security is always evolving and threats come and go. It’s up to you to stay up to date and vigilant.

Source: https://www.maketecheasier.com/scan-linux-for-viruses-and-rootkits/

August 19, 2017

How to Install and Use Another Desktop Environment on Linux

select-a-desktop-environment-on-linux


Each Linux distribution comes with a single default desktop environment chosen from the many different desktop environments available for Linux. But you don’t have to stick with the default.
Switching desktop environments is as simple as installing a software package and selecting your preferred environment on the login screen, known as a display manager. You don’t have to install an entirely different Linux distribution.

Desktop Environment Basics

Desktop environments include basically everything you see after you log into your user account on your Linux distribution’s sign-in screen. The desktop itself, desktop background, panels, menus, file manager, settings windows, and many other applications and utilities all come from a desktop environment. Even each window’s titlebar is provided by an application known as a window manager that comes with the desktop environment.


unity-desktop-environment-on-ubuntu-14.04


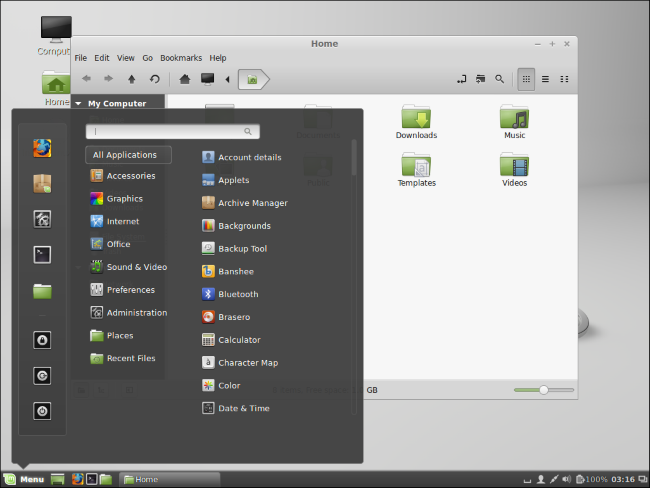
Different desktop environments have different strengths and weaknesses. Ubuntu’s default Unity desktop environment is designed to provide a single interface that will work well on computers, tablets, smartphones and TVs, while Linux Mint‘s Cinnamon desktop environment is designed to provide a more traditional Linux desktop experience. The LXDE desktop environment included with Lubuntu is designed to be fast and use little resources.


linux-mint-17-cinnamon-desktop

How to Install Another Desktop Environment

To install a different desktop environment, you’ll just need to open your Linux distribution’s package manager and install the appropriate package. This will be similar on al distributions, but we’ll use Ubuntu 14.04 and Linux Mint 17 as examples here.
For example, let’s say you wanted to install another desktop environment on Ubuntu. You’d open the Ubuntu Software Center, search for the name of the desktop environment’s package, select it, and click the Install button. To install Xfce, you’d search for xfce4. To install the full, customized Xubuntu desktop system, you’d search for xubuntu-desktop instead.
install-xfce4-on-ubuntu-14.04
Search for another desktop environment’s name to install it. For example, you might type lxde or lubuntu-desktop for LXDE/Lubuntu or kde-full or kubuntu-desktop for KDE/Kubuntu. Some desktop environments may not be provided in your Linux distribution’s repositories. The Cinnamon and MATE desktop environments included with Linux Mint aren’t available in Ubuntu’s repositories, so you’d have to use a PPA to install them on Ubuntu.
The process is basically the same on Linux Mint, but you’d search for the package in the Software Manager application instead.
install-desktop-environment-from-linux-mint-software-manager
Here’s how you’d install XFCE from the terminal on Ubuntu or Linux Mint:
sudo apt-get install xfce4
The above command would give you the standard XFCE desktop environment. However, you might want Xubuntu’s customized XFCE desktop environment instead:
sudo apt-get install xubuntu-desktop
install-alternate-desktop-environment-on-ubuntu-14.04
Enter your password after running the command. The package manager will want to install all the packages that make up the desktop environment — type y to confirm.
do-you-want-to-continue-apt-get
If you use another Linux distribution, head to your package manager and look for a desktop environments category or just search for the name of the desktop environment. You can also perform a quick web search to find out how to install the desktop environment on your Linux distribution. If it’s available in your Linux distribution’s software repositories, you should just need a single command.

How to Switch Between Desktop Environments

Log out of your Linux desktop after installing another desktop environment.
sign-out-of-ubuntu-14.04
When you see the login screen, click the Session menu and select your preferred desktop environment. You can adjust this option each time you log in to choose your preferred desktop environment.
On Ubuntu’s default login screen — known as a display manager — this menu can be accessed by clicking an icon next to your user name. The icon only appears if multiple desktop environments are available. On other display managers, you may need to click a “Session” menu or a similar icon. You’ll find the option somewhere on the screen.
select-desktop-environment-on-ubuntu-default-login-screen-or-display-manager
You’ll see a list of the desktop environments you have installed. Click one to select it and set it as your user account’s default desktop environment.
choose-ubuntu-desktop-environment-on-login-screen
Sign in and you’ll see the desktop environment you chose. All desktop environments have access to your home folder and files, so they can share data. They’re basically just different programs with their own individual settings.
xfce-desktop-environment-installed-on-ubuntu-14.04
Different desktop environments can interfere with each other. Fore example, Ubuntu 14.04 sets a default GTK theme that doesn’t work well with the XFCE desktop environment we installed as an example. XFCE’s panels look ugly and many icons are missing by default. To fix this, we clicked Applications Menu > Settings > Settings Manager > Appearance and select the Xfce-4.0 style and Tango icons.
This is the sort of problem you might run into when using multiple desktop environments — issues with a desktop environment looking ugly can generally be fixed by changing the theme. A Linux distribution’s alternate desktop environments generally aren’t quite as polished as its default desktop environment.
fix-ugly-xfce-theme-on-ubuntu-14.04
To switch desktop environments again, sign out and choose a different one on the login screen.

How to Uninstall a Desktop Environment

To remove the desktop environment, search for the same package you installed earlier and uninstall it. On Ubuntu, you can do this from the Ubuntu Software Center or with the sudo apt-get remove packagename command.
uninstall-xfce-desktop-environment-on-ubuntu-linux
To uninstall other applications the desktop environment pulled in, you’ll probably want to visit the terminal and run the following command on Ubuntu or other Debian-based Linux distributions:
sudo apt-get autoremove
The autoremove bit of the command instructs apt-get to automatically remove packages that were installed as dependencies for the desktop environment, so it will remove the additional packages the desktop environment pulled onto your system.
You should probably sign out of the desktop environment before doing this. You’ll see error messages as the desktop environment’s files vanish while it’s running.
clean-up-dependencies-with-apt-get-autoremove
Other Linux distributions may automatically remove the desktop environment’s associated programs when you uninstall it from their package managers, or you may have to run a command like sudo apt-get autoremove to clean up.


If you love a particular desktop environment, you may want to seek out a Linux distribution — or at least a different installation media for your Ubuntu or another Linux distribution of your choice — that uses it as its default desktop. For example, XFCE lovers will want to install Xubuntu instead of Ubuntu in the future, while people who prefer the Cinnamon desktop may want to install the Cinnamon version of Linux Mint.

Source: https://www.howtogeek.com/193129/how-to-install-and-use-another-desktop-environment-on-linux/

August 14, 2017

Firefox 55 Released with Big Performance Improvements

Mozilla Firefox 55 is now available to download.
The update ‘brings innovative functionality, improvements to core browser performance, and more proof that we’re committed to making Firefox better than ever,’ say Mozilla.
Among the new features is initial support for WebVR. Not only is this apparently ‘a thing’, but Firefox is the very first browser to add support for it. Newsletter
begging modal sign ups will soon be able to literally smack us in the face.
That’s not the only significant improvement to come baked in this release. A number of other improvements help pave the way for November’s dramatic arrival of Firefox 57.

Better, Faster, Stronger, Firefoxier

First up, if you read about the Mozilla dev who tested Firefox start-up time with 1691 open tabs — those benefits (smaller is faster in the graph below) are here, in this release, ready for you to abuse.
The improvements are part of a project called Quantum Flow and makes tabs browser start-up times over 30x faster than what they were in Firefox 51.


Precisely how pronounced those changes feel on your system will, naturally, vary. But readers who’ve toyed with the various Firefox beta and nightly builds over the past few weeks are adamant they can feel a difference. Once you’ve spent some time with this update do pop back and share your thoughts too.

Other Changes in Firefox 55

Not all of those who install Firefox 55 will get access to the new Firefox Screenshots feature. (It was called Page Shot during testing).


Mozilla is rolling out access to this snip-tastic feature as part of an A/B test.
Precisely how pronounced those changes feel on your system will, naturally, vary. But readers who’ve toyed with the various Firefox beta and nightly builds over the past few weeks are adamant they can feel a difference. Once you’ve spent some time with this update do pop back and share your thoughts too.

If you don’t see the icon don’t panic, as you can opt-in via Test Pilot. If you do see the new screenshot/scissors icon you are part of the cool club and can clip any part of any webpage you visit and quickly share it with others. Images are hosted on Mozilla servers for 14 days — so don’t clip anything you wouldn’t want your aunty to see!
You can now move the Firefox sidebar to the right. This optional pane that can display your History, Bookmarks, or Synced Tabs. It’s now easier to switch between these options too thanks to a new button menu.


As you type in the Firefox address bar you’ll now be offered some search suggestions (which the arrow above denotes).


These suggestions aren’t super intrusive (and are something Chrome users should be familiar with) but if you want to turn search suggestions off in Firefox 55 you can. Just head to Preferences > Search and uncheck the “provide search suggestions” and “show search suggestions in location bar results” options.


You’ll find a new Performance section listed under Preferences > General. From here you choose whether to ‘Use recommended performance settings’ (default) or dive in and manually enable/disable hardware acceleration(platform dependant, mind) and/or set a multi-process content limit.
Firefox 55 is available to download for Windows, macOS and Linux from the Mozilla website right now. If you’re an Ubuntu user running a supported release (14.04 LTS, 16.04 LTS, and 17.04) you will get this update automatically though the Software Updater at some point in the coming days.
But be aware that some of the performance improvements won’t be enable in the repo version by default because the Ubuntu Modifications add-on that Ubuntu pre-installs with the browser is not compatible with Mozilla Firefox’s multi-process mode.
Source: http://www.omgubuntu.co.uk/2017/08/firefox-55-released-whats-new

You can download Firefox for linux directly here:

https://www.mozilla.org/en-US/firefox/all/