April 10, 2016

How to Install Rhythmbox Plugins in Ubuntu

This quick tutorial is going to show you how to install a list of plugins for Ubuntu’s default music player Rhythmbox in Ubuntu 14.04 LTS and later.


The plugins currently include:
  • rhythmbox-plugin-artdisplay – display art covers as per v2.96 rhythmbox
  • rhythmbox-plugin-countdown-playlist – Countdown Playlist
  • rhythmbox-plugin-close-on-hide – really exit rhythmbox when click close button
  • rhythmbox-plugin-coverart-browser – Browse your cover-art albums in Rhythmbox
  • rhythmbox-plugin-desktopart – show cover art on desktop
  • rhythmbox-plugin-equalizer – rhythmbox sound equalizer
  • rhythmbox-plugin-fileorganizer – Intelligently move files to folders according to track tags
  • rhythmbox-plugin-fullscreen – This python plugin gives you a stylish full screen window
  • rhythmbox-plugin-hide – rhythmbox_hide
  • rhythmbox-plugin-jumptowindow – JumpToWindow
  • rhythmbox-plugin-llyrics – rhythmbox alternative lyrics plugin
  • rhythmbox-plugin-looper – Loop part of the song in Rhythmbox.
  • rhythmbox-plugin-opencontainingfolder – open containing folder
  • rhythmbox-plugin-parametriceq – parametric equalizer with up to 64 Bands
  • rhythmbox-plugin-playlist-import-export
  • rhythmbox-plugin-randomalbumplayer – Random Album Player
  • rhythmbox-plugin-rating-filters – Rating filters for the library browser.
  • rhythmbox-plugin-remembertherhythm – Remember the rhythm
All these plugins are developed by fossfreedom and available in his PPA. As some plugins were developed for old Rhythmbox 2.9x, it may or may not work on Ubuntu 14.04 with Rhythmbox 3.0.2.

Press Ctrl+Alt+T on keyboad to open the terminal. When it opens, run the
command below to add the plugins PPA:

sudo add-apt-repository ppa:fossfreedom/rhythmbox-plugins
After that, you can install each plugin after checking for updates. Or install all of them by:
sudo apt-get update; sudo apt-get install rhythmbox-plugin-complete
Once installed, open Rhythmbox and go to Tools -> Plugins. Enable plugins you want from the list.

Source: http://ubuntuhandbook.org/index.php/2014/07/install-rhythmbox-plugins-ubuntu-1404/

April 2, 2016

Where to download Chrome 32 bit since it has been discontinued by Google?


Many users have been looking for the last 32 bit build of Google Chrome browser. It is version 48. It came as part of Ubuntu Mate 15.10 recommended software from the Welcome Center. Below is a link where you can still find it.


http://mirror.ufs.ac.za/google-chrome/deb/pool/main/g/google-chrome-stable/


I am using Chromium, which is still being updated and is at version 49 currently. However, Chromium does not support the Adobe Flash Player and Google Chrome does. So that is one reason a lot of folks like it.


If you are looking for the open source Google Chrome equivalent called Chromium, in both 32 and 64 bit versions, they are available still. You can also find the Chrome "Canary" developer beta builds in both 32 and 64 bit versions for Windows and Linux there. You can find them below. Enjoy.

https://download-chromium.appspot.com/


And to install Chrome 64-Bit  via PPA try the following:

1. We use Google’s official Linux software repository (PPA) that will automatically install and configure settings needed to keep your chrome browser up-to-date.

Before installing repository, we need to download and install Google’s Linux package signing Key that will automatically configure your package manager to verify the integrity of packages before downloading and installing on the system.
On an Debian based systems (Ubuntu, Linux Mint, etc.), use the following command to download the key and then use ‘apt-key‘ to add it to the system.


$ wget -q -O - https://dl-ssl.google.com/linux/linux_signing_key.pub | sudo apt-key add -


2.
After adding the key, run the following command to add chrome repository to your system sources.


$ sudo sh -c 'echo "deb http://dl.google.com/linux/chrome/deb/ stable main" >> /etc/apt/sources.list.d/google.list'

3.
After adding chrome repository, you must do a system update to update the newly added chrome repository, using the following command.


$ sudo apt-get update


4. Now, here Google PPA provides three chrome versions (stable, beta and unstable), so install whatever version you prefer.
Install Chrome Stable Version
$ sudo apt-get install google-chrome-stable

Installing Google Chrome Browser Using .Deb Package

1. Go to Google Chrome download page and select your package or you can use following ‘wget‘ command to download and install the latest version.

Note: Google Chrome ends support for all 32-bit Linux distributions from March, 2016.

$ wget https://dl.google.com/linux/direct/google-chrome-stable_current_amd64.deb $ sudo dpkg -i google-chrome-stable_current_amd64.deb 

2. Once it’s installed, launch Google Chrome Browser with normal user.

$ google-chrome-stable


Source: http://www.tecmint.com/install-google-chrome-in-debian-ubuntu-linux-mint/ 

March 6, 2016

Record Streaming Audio with Audio Recorder

I just became aware of this great program for recording streaming audio. It comes bundled in Ubuntu Mate 16.04 Beta 1.


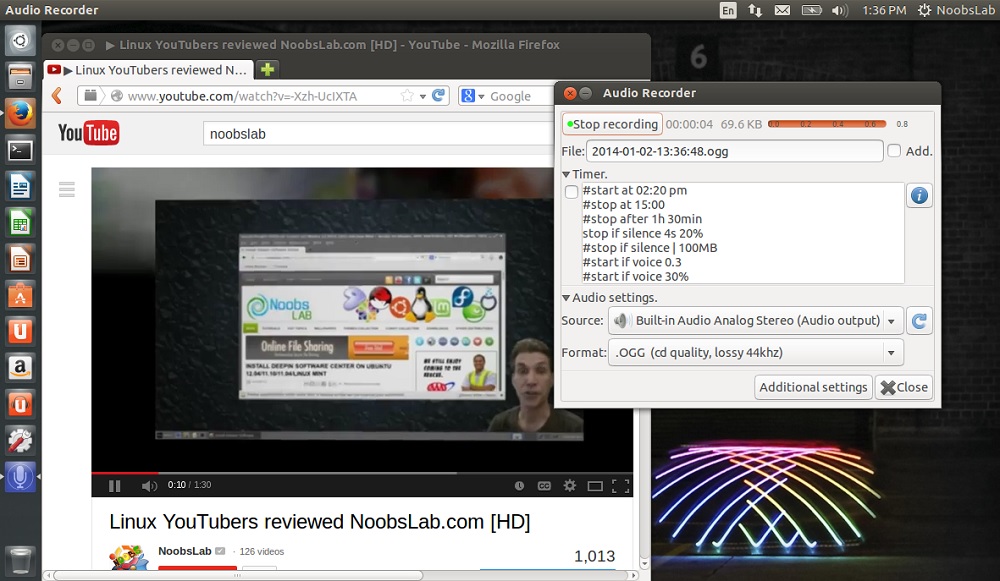
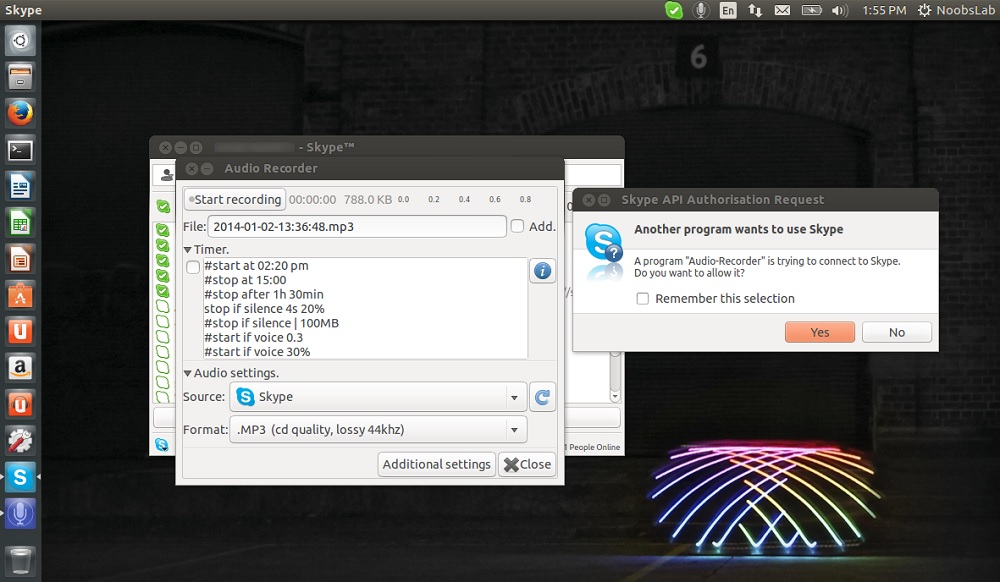
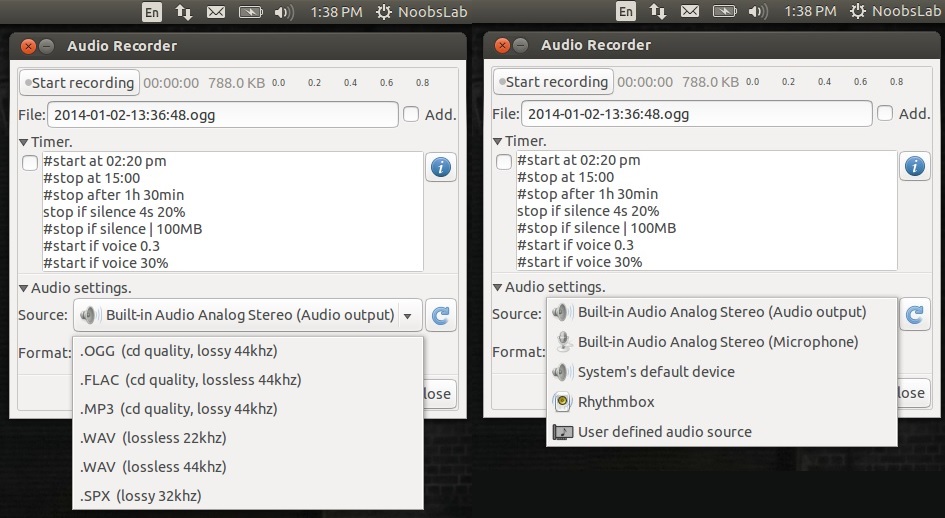
Audio Recorder is an amazing audio recording program, this small tool allows user to record audio from microphones, webcams, system sound card, media player or web browser & etc. It can save recording in various formats listed: Ogg, Mp3, Flac, Wav (22khz), Wav (44khz) and Spx.


It allows to use sound source system card, microphone, audio/video player, any application (like: Skype calls with any user interaction) and user defined program for recording. It also can be configured to stop recording if output file limit is reached to user requirement. Audio threshold is supported by this program, which can record audio on sound/voice and stop/pause when silence (user can set up threshold and delay as per requirements). Additionally you can setup an timer manually within the audio recorder program to schedule recordings and the program will start/stop/pause recording at given time. Panel indicator support for Ubuntu, from where user can easily access some options like: show/hide window, start/stop recording and open recording location.


audio recorder audio recorder

audio recorder audio recorder

To install Audio-Recorder in Ubuntu/Linux Mint open Terminal (Press Ctrl+Alt+T) and copy the following commands in the Terminal:


To Install Audio Recorder use the Terminal

sudo add-apt-repository ppa:audio-recorder/ppa
sudo apt-get -y update
sudo apt-get install --reinstall audio-recorder

And for Ubuntu 14.04 LTS do the following:

sudo add-apt-repository ppa:osmoma/audio-recorder
$ sudo apt-get update
$ sudo apt-get install audio-recorder


March 4, 2016

How To Fix The (Annoying) ‘Failed to Fetch’ Chrome apt Error

Google announced plans discontinue 32-bit Google Chrome for Linux this March, and, bang on cue, it has.


The search engine has pulled 32-bit Chrome builds from the official Chrome repo, which gets added to Ubuntu Software Sources when the app is first installed.
Some 64-bit Ubuntu systems caught in the cross-hairs of the deprecation are now throwing a small, yet very annoying, error when performing an apt update.
The ‘failed to fetch error that appears in the Terminal says:
“Failed to fetch http://dl.google.com/linux/chrome/deb/dists/stable/Release Unable to find expected entry ‘main/binary-i386/Packages’ in Release file (Wrong sources.list entry or malformed file)”
Are you seeing it?
If you are: do not panic. There is an easy to fix the ‘failed to fetch’ error and all it requires is 30 seconds and a few simple characters…
‘The fix takes just 30 seconds to perform, then no-more annoying error.’

Fix ‘Failed To Fetch’ Apt Error on Ubuntu

The tip comes to us by way of OMG! Ubuntu! reader Santiago Batista, who explains the situation in his e-mail to us:
“Since Google dropped support for 32-bit Chrome on Linux an error occurs when updating apt in 64-bit systems (with multi arch enabled).
“The solution,” he says, ”is to modify the sources.list file for Chrome.”
But how do you do that?
We can edit the sources.list in a number of different ways. Some of these take place at the command line, others through a GUI.
You may have your own preferred method, but for this walkthrough I will use Gedit.
1. Open a new Terminal window and run the following command (assuming you’re on the Stable Channel, if not, see the featured comment):
sudo gedit /etc/apt/sources.list.d/google-chrome.list
2. In the text file that opens edit the file so that the line reads:
deb [arch=amd64] http://dl.google.com/linux/chrome/deb/ stable main
The only addition you need to make is entering the [amd64] architecture after ‘deb’ but preceding the ‘http’. Do not edit or replace any other text in this file.
3. Hit Save. Close the Gedit window.
Now return to the Terminal and refresh your package list by running:
sudo apt-get update
The ‘failed to fetch’ APT error should no longer appear.

This post, How To Fix The (Annoying) ‘Failed to Fetch’ Chrome apt Error, was written by Joey-Elijah Sneddon and first appeared on OMG! Ubuntu!.

February 26, 2016

Ubuntu 16.04 Beta 1 Is Now Available to Download

The first Ubuntu 16.04 beta builds are now available to download.
Lubuntu, Ubuntu GNOME, Ubuntu MATE — oooh-argh — and Ubuntu Kylin are among the official Ubuntu flavors to stick their hands up for inclusion in this development milestone.
The regular version of Ubuntu, i.e. the one most of you are waiting for, only takes part in the second beta release.
Ubuntu 16.04 Beta 2  is set for a March 24 release date.
For this bout of beta level testing the following Ubuntu flavors take part:
  • Lubuntu
  • Xubuntu 
  • Ubuntu MATE
  • Ubuntu GNOME
  • Ubuntu Kylin
Not taking part is Kubuntu.


What’s New in Ubuntu 16.04 Beta 1?


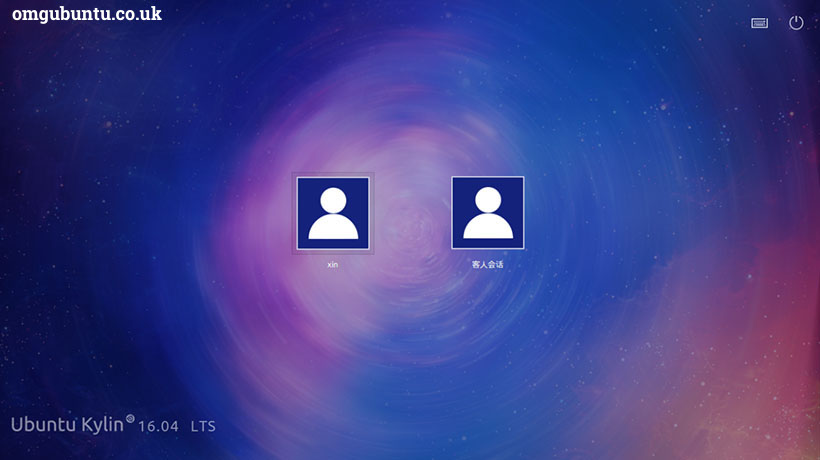
ubuntu kylin login screen


Ubuntu Kylin 16.04 Beta 1 
improves on its alpha releases with a new version of the Youker assistant, a brand-new login screen (kylin-greeter, pictured) and benefits from general improvements to both the look and feel of the Kylin branding and theme.


Xubuntu 16.04 Beta 1 features a modest set of changes.
Testers of the lightweight spin will find new versions of key apps and components, including new versions of the Xfce 4 desktop, whisker menu applet and Orage calendar, plus support for controlling the Parole media player from the sound applet.


Ubuntu GNOME 16.04 Beta 1 features a more sizeable set of changes thanks to it shipping with ‘most of GNOME 3.18’, including GNOME Shell 3.18 and the new GNOME Software utility.
In line with Ubuntu, GNOME Calendar and GNOME Logs are now pre-installed, GNOME Builder is available through the main archive and an ‘experimental Wayland session’ is available to install (but keep it mind it requires open-source GPU drivers).


Lubuntu 16.04 Beta 1 ships with a massive set of changes — just kidding!
As always, Lubuntu ships with no new features. It does offer a selection of small bug fixes and benefits from being based on the Linux kernel (v4.4, fact fans).
A PPC version is also available, making Lubuntu perfect for resurrecting an old iBook, PowerMac or iMac. You could even don a lab coat and call yourself iVictor Lubuntkenstein.


ubuntu-mate-boutique


Last (but never least) is Ubuntu MATE 16.04 Beta 1.
The retro revivalist once against delivers an impressive changelog for its latest development snapshot.
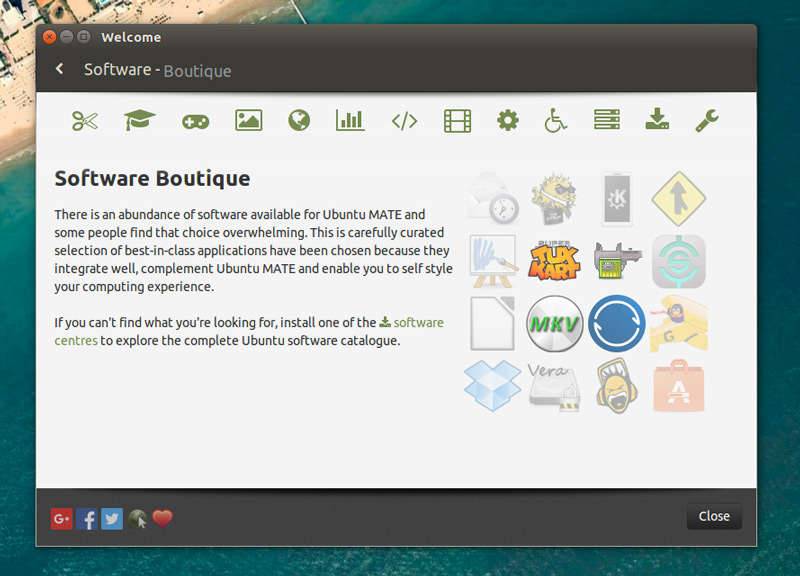
On offer is a brand new ‘Software Boutique’ (accessed through an updated version of Ubuntu MATE Welcome tool). The MATE desktop has been bumped to v1.12.1 and includes Caja 1.12.4.
Fans (both literal and figuratively) will be pleased to hear that the updated desktop sees reduced CPU usage ‘across the board’.
Also included is a Unity-style MATE panel layout is available to try. Head to MATE’s appearance settings and select the ‘Mutiny’ panel layout to take it for a spin.


February 18, 2016

Why You Need to Upgrade Ubuntu Every 9 Months

It’s that time again, when Canonical announce that support for one of its standard Ubuntu builds has come to an end. But what does this mean to the end user?
As of February 4th 2016, Ubuntu 15.04 Vivid Vervet will receive no future security notices, critical fixes, updated packages from the main archives, and instead will remain as it is, archived for posterity.
If any of this seems familiar to you, perhaps you’re a former Windows XP user. Microsoft has a long history of closing support for particular operating systems when they reach end of life, and Windows XP was famously given a reprieve to allow users time to move onto Windows 7 (and later to Windows 8).
But hold on. Windows XP was around for almost 10 years before Microsoft declared its time was up. Vivid Vervet was only released in April 2015, just nine months earlier. So what is going on?
Why an Upgrade Is Necessary
Just like Windows XP and other versions of Windows and Mac OS X, Ubuntu (and other Linux distros) has regular updates prepared for it by developers Canonical. These updates deal with all sorts of problems, from system security to software stability, and repair bugs in native and some third party apps.
muo-linux-ubuntu-upgrade-keyboard
But behind the scenes, while one group of coders is issuing fixes for system problems that you may not be aware of yet, another is baking these changes into a new, future version of Ubuntu. This is why the upgrade is necessary, in order for the operating system to evolve and focus be placed on maintaining the newer release.
Two Types of Ubuntu
Anyone new to Linux may not know this, but there are in fact two types of Ubuntu distro. First is the standard build, of which 15.04 Vivid Vervet and its successor 15.10 Wily Werewolf are both current examples. Such builds receive updates for just nine months, after which they’re put out to pasture and users are expected to upgrade to the next version.
Long Term Support releases, recognizable by the LTS acronym, are the versions of Linux Ubuntu that you should be aiming for if you want regular updates and support over a period longer than nine months. Ubuntu LTS occur every fourth release in even numbered years, and at the time of writing we’re looking forward to Ubuntu 16.04 LTS (Xenial Xerus), scheduled for April 2016. LTS releases are typically favored by power users and business.
As long as you know which version of Ubuntu you are using, the next step should be pretty simple.
Checking Your Ubuntu Version
You can check which version of Ubuntu your PC is running from the desktop. Simply open the System Settings either from the cog in the top-right corner, or by using the search function and select System Info (pre 12.04) or Details (12.04 and later).
muo-linux-ubuntu-upgrade-version
A Terminal command will also reveal the current version:
lsb_release -a
For a formal release name:
cat /etc/issue
or
cat /etc/issue.net
To see the Debian code name, use:
cat /etc/debian_version
Kernel info can be displayed with
cat /proc/version
muo-linux-ubuntu-upgrade-terminal-version
Now you know which version of Ubuntu you have installed on your computer, you can make an informed decision about what to do next.
Using an LTS version? As long as it is within the five-year lifespan of such a release, you should be safe to carry on with it. But keep an eye on notices from Canonical (perhaps follow @Canonical on Twitter) as they will give you an idea of what is going on.
However, if your version is not LTS, then you will need to prepare yourself for an upgrade. This might be a simple process, or it may need some system preparation first.
But Hey, Your Data Is Backed Up, Right?
Never upgrade a system without ensuring your vital data, your documents, music, photos, any projects, and even save games, are archived somewhere, backed up for easy restoration following disaster.
You might, for instance, be using Dropbox with Ubuntu, which will sync data to the cloud for efficient restoration later on. Other cloud solutions are compatible with Ubuntu.
Alternatively, you may prefer to keep regular backups of your Ubuntu data. This might be in the shape of a scheduled data backup, perhaps to an external HDD, or it might even be a complete disk image clone of your hard disk drive.
Whatever your preferred solution, restoring data efficiently should be the aim. If you don’t want to use regular backups, however, using a separate hard disk drive partition for all of your data needs is a good option. Note that this will not protect you from data loss following a device failure, however.
Upgrading from Ubuntu 15.04 Vivid Vervet
If you need to upgrade from 15.04 Vivid Vervet – or any other non-LTS release — then you should find that the process is pretty smooth. The correct path is from 15.04 Vivid Vervet to 15.10 Wily Werewolf, which was released in late 2015.
What this means is that you should be able to upgrade using the Software Updater (see our guide for any problems).
You can also issue the command to upgrade via the command line.
sudo do-release-upgrade
Once the upgrade is complete, you should find that everything is more or less as it was, but Ubuntu might look a little different, or offer a few new features. This isn’t always the case, however — as with Windows and Mac OS X, Linux distros don’t install perfectly every time. Perhaps a driver was missing, or there was an error with the upgrade.
In this situation, you would need to take matters into your own hands, and install the upgrade from scratch, downloading it from the Ubuntu website using a different PC and installing manually, perhaps from a USB flash device or DVD.
Ubuntu OS upgrades are as necessary as those for Windows and OS X. Don’t think that just because you moved to an open source operating system that you’re not subject to the whims and inconveniences of software developers – as long as you’re using a computer, you need it to be safe, secure and stable. That’s what the developers are for; that’s why we have upgrades.
Have you successfully upgraded from one Ubuntu version to another on a regular basis? Or do you prefer the LTS releases? Tell us in the comments

Source: http://www.makeuseof.com/tag/need-upgrade-ubuntu-every-9-months/

February 14, 2016

February Desktop

For this cold February, I'm using a nice snow scene wallpaper, along with the "My Elementary" icon set, and the Mint XF-17 Dark GTK2 theme. I am running Ubuntu MATE 15.10 with the Docky launcher, screenlets, the Firefox and Chromium browsers, Audacious and Clementine music players, and Deluge torrent client.


You can get the Mint XF-17 theme here:
http://gnome-look.org/content/show.php/Mint-X-SF?content=165536

You can get the snow mountains wallpaper here:
http://www.desktopwallpaperhd.net/wallpapers-mountain-desktop-36811.html

January 29, 2016

AT&T's latest Linux choice may profoundly shape Ubuntu

Like most mobile carriers across the globe, AT&T has embraced Linux — in fact, the Linux kernel powers the Android platform. But AT&T recently surprised a lot of people by turning its back on Microsoft and adopting Ubuntuas its cloud, enterprise, and application solution provider. In addition,Canonical (the company behind Ubuntu) will provide support for these platforms/solutions.

The reason why AT&T chose Ubuntu

AT&T is reinventing how it scales, and Ubuntu will be at the heart of this strategy. The reason the carrier chose Ubuntu was simple: innovation and performance in the realm of the cloud. Ubuntu is the leading platform for scale-out workloads and cloud, and this is exactly what AT&T needed in the never-ending war against mobile carriers.
Toby Ford, Assistant Vice President of Cloud Technology, Strategy and Planning at AT&T, said, "We're reinventing how we scale by becoming simpler and modular, similar to how applications have evolved in cloud data centers. Open source and OpenStack innovations represent a unique opportunity to meet these requirements, and Canonical's cloud and open source expertise make them a good choice for AT&T."
This should serve as a clear indicator as to what platform has become the clear winner in the race to the sky: Ubuntu (as it is the number one cloud platform on the market). In fact, 80% of large-scale OpenStack deployments run on top of Ubuntu. Ubuntu is also a large player in the Amazon and Microsoft cloud space. From this point on, when you think cloud, you should think Ubuntu.

More money, more desktop?

This deal will go a very long way to inject Canonical with some much-needed capital as the company pushes forward with its convergent desktop. But beyond that the deal will also, most likely, drive other enterprise companies to select Ubuntu as their cloud-of-choice platform.
Hopefully, this soon-to-be massive influx of business won't turn Ubuntu away from the platform that brought it to this place... Ubuntu Desktop. Yes, the cloud is the thing, but Canonical would be remiss if the company turned its back on the desktop. I don't see that happening, but I do see Canonical following in similar footsteps as Red Hat and SUSE. It would come as no surprise if Canonical spun off desktop development into its own entity so it could focus much of its efforts on the cloud.
It is also not beyond the realm of possibility that this deal could give Canonical a foot in the door to get its Ubuntu Phone on the AT&T network. This would be a major win for a niche mobile platform that has struggled to make serious headway. Having a major US carrier in its pocket could have profound secondary benefits for Canonical and Ubuntu.

An odd addition to the conclusion

Canonical recently made a deal with Oracle to provide enterprises with greater flexibility in deploying large-scale workloads with the help of Oracle Cloud. Certified Ubuntu images are now available in the Oracle Cloud Marketplace to provide Oracle enterprise customers with a true "grab and go" approach to the cloud.
Although this might seem an odd pairing of a Linux-based company to a company that many have seen as having the "anti-Midas touch" with all things open source, Canonical needs to have its cloud solution available to all markets, including the Oracle Cloud Marketplace.
No matter how you look at this deal, it is a major win for Canonical and Ubuntu. The 2016 year is already shaping up to be a massive win for the company that has done the most for Linux on the desktop.

Weigh in

Do you think this deal will have any effect for Ubuntu on the desktop or Ubuntu on the phone? Let us know in the comments.

Source: http://www.techrepublic.com/article/at-ts-latest-linux-choice-may-profoundly-shape-ubuntu/

January 22, 2016

Google Chrome Axes Support for ALL 32-bit Linux Distros

chrome drops linux 32 support


Google Chrome is to drop support for all 32-bit Linux distros from March, 2016. 

The change, which brings the platform in line with that of Mac OS X, will apply to all x86 Linux builds, regardless of distribution or version number. Users affected will still be able to use Chrome after the axe has fallen, but they will no longer receive any updates.
In a double-whammy, March will also see Google Chrome stop supporting Ubuntu 12.04 LTS (which will receive critical and security bug fixes from Canonical until mid 2017). ‘Ubuntu users  are advised to upgrade to a 64-bit version of Ubuntu 14.04 LTS or later’
From this March only 64-bit versions of Ubuntu 14.04 LTS (or later) will receive new versions of the browser from Google .

To run a supported version of Google Chrome Precise users are advised to upgrade to a 64-bit version of Ubuntu 14.04 LTS (or later).


Why Is Google Dropping Support?

The small Google Chrome Linux team can’t support all versions of Ubuntu and other Linux distributions indefinitely. With Linux already a small overall percentile of Chrome’s user base, and 32-bit users amongst that percentage even smaller, something had to give at some point.
The build infrastructure used to package Google Chrome is tasked with making hundreds of binaries each day, and human effort is required to test those binaries for release.
“To provide the best experience for the most-used Linux versions, we will end support for Google Chrome on 32-bit Linux, Ubuntu Precise (12.04), and Debian 7 (wheezy) in early March, 2016,” says Chromium engineer Dirk Pranke.

32-bit ChromiumIs Not Affected

‘Chromium is unaffected by the change. ‘
Many Linux users run Chromium, the open-source basis of Chrome, and so won’t be affected by this change. Google Chrome and Chrome OS builds for 32-bit ARM are similarly unaffected.
For browsers built on Chromium, like Opera, it will be up to them as to whether they continue to offer builds for 32-bit users.
Google says it will ‘keep support for 32-bit build configurations on Linux to support building Chromium’, which  we’re told it will do so for ‘some time to come’.
Do you use Google Chrome on a 32-bit version of Linux? Will you switch to another browser? Perhaps you think this decision is logical. Whatever your view on this decision you can share it in the comments below.
This post, Google Chrome Axes Support for ALL 32-bit Linux Distros, was written by Joey-Elijah Sneddon and first appeared on OMG! Ubuntu!.

January 21, 2016

How to Watch Hulu on Ubuntu and Other Linux Distributions


Hulu doesn’t work out-of-the-box on modern Linux distributions. While Netflix “just works” if you’re using Google Chrome, Hulu’s DRM has gotten old and clunky. You can get Hulu to work on Linux, but it’ll take a little tweaking.
It wasn’t always so hard. Back when Netflix was making life hard for Linux users, Hulu even offered a Linux desktop app. But that desktop app is now discontinued. Hulu relies on Adobe Flash, and Adobe Flash’s DRM code is falling apart on Linux.

You’ll Have to Use Firefox

Here’s the problem: Hulu relies on old Adobe Flash DRM code that requires a Linux library known as HAL. However, this old HAL software is fairly outdated and hasn’t been installed by default on modern Linux distributions for years. You’ll need to install compatibility packages that will allow this HAL-based DRM to function.

You’ll also have to use Mozilla Firefox to watch Hulu. The old HAL-based DRM only works in the older version of the Linux Flash plug-in Firefox offers. The newer PPAPI (Pepper API)-based Flash Player included in Google Chrome won’t work with Hulu’s old DRM code.
Yes, this means you’ll have to watch Netflix in Google Chrome and Hulu in Mozilla Firefox. Ain’t life grand?


Step One: Install Flash for Firefox

First, you’ll need to install the Flash Player plug-in for Firefox. If you haven’t installed Flash yet, you’ll see a message saying Hulu needs Flash installed when you try to watch it.
You can generally install Flash from your Linux distribution’s software repositories.  For example, on Ubuntu, open the Ubuntu Software Center and search for “flash”. Install the “Adobe Flash plug-in” software.
Be sure you install the Flash plugin designed “for Mozilla,” “for Firefox,” or the “NPAPI” version of the plug-in. The “PPAPI” or “for Chromium” version of Flash will only work with Chrome and Chromium-based browsers.


Step Two: Install the Old HAL Library


Once you have Firefox and the Flash plug-in for Firefox installed, you can head to Hulu’s website and try playing a video. However, you’ll probably see an error message when you do so. The error message says “There was a problem playing this protected content. (Error Code: 2203)”. Hulu will ask you to ensure the HAL package is installed, clear your flash cache, and reset license files.
Hulu links you to an Adobe page that recommends you install the package named “hal”, but this package is no longer even present for installation on modern versions of Ubuntu and other modern Linux distributions.


Rather than have you install a version of the full HAL package — from the “zombie HAL PPA” as its known in Ubuntu circles — we’ll direct you to a more lightweight solution.

Martin Wimpress, project lead for Ubuntu MATE, provides a “hal-flash” PPA that provides everything you need to play back DRM-protected Flash content without installing the entire HAL layer.

To install this software, you’ll need to add this PPA to your Ubuntu system (this should also work on Linux Mint and other Ubuntu-derived distributions). Open a Terminal from the dash and paste or type the following commands in order, pressing Enter after each. The first command adds the PPA, the second downloads information about the packages in it, and the third installs the HAL library.


sudo add-apt-repository ppa:flexiondotorg/hal-flash
sudo apt-get update
sudo apt-get install libhal1-flash


If you’re using another Linux distribution — that is, something other than Ubuntu, Linux Mint, or something derived from Ubuntu — you’ll need to hunt down a HAL package for Flash provided for your Linux distribution. It may be part of your Linux distribution’s package repositories, or it might be in a third-party repository like it is for Ubuntu.


Once that’s installed, visit Hulu in Firefox, try playing a video again, and it should now work instead of showing you a “protected content” error message.
If you continue seeing an error message, you may need to close Firefox and restart it. If that doesn’t work, try completely restarting your computer before continuing.


This has been a problem for many years now. The Adobe page says HAL needs to be installed on versions 10.x and up of Ubuntu — that refers to versions of Ubuntu released all the way back in 2010.

Adobe no longer wants to develop Flash on Linux. The real solution here won’t come when Adobe fixes its Flash DRM. Instead, Hulu needs to switch to modern HTML5-based video playback, like Netflix uses in Google Chrome. Until they do so, Linux playback will be a bit of a hassle.

Source: http://www.howtogeek.com/239682/how-to-watch-hulu-on-ubuntu-and-other-linux-distributions/

January 2, 2016

11 Must-Have Apps on Ubuntu Right After a Fresh Install


Here’s the situation: it’s your first time using Ubuntu, you’ve gone through as many newbie Linux tricks as you could find, but you’re still wondering what kind of software is out there for you to install. Maybe you’re even starting to feel a bit overwhelmed.
Don’t worry. Relax. Compared to Windows, Linux is a vast new world full of exciting possibilities — but there’s a lot of familiarity as well. Using free software, you can replicate many of the everyday tasks that you just can’t go without.
So if you’re looking at a fresh installation of Ubuntu and feeling a bit lost, here are the first few applications you should install. These will cover most of your needs, guaranteed.


1. Tweak Tools

By default, Ubuntu doesn’t provide a lot of flexibility when it comes to customizing your desktop experience. You can do things like change your wallpaper, use different fonts for your system, and install different window themes, but not much more than that.
If you want nitty-gritty access to some of the more advanced settings hidden beneath the hood of your system, you’ll want to install a tweak tool. The one you choose will depend on your desktop environment.


ubuntu-app-unity-tweak-tool


For Unity desktops: You should install Unity Tweak Tool, which is available in the Software Center. This will let you change the behavior of windows and settings beyond what Unity normally allows.


ubuntu-app-gnome-tweak-tool


For Gnome desktops: You should install Gnome Tweak Tool, which can also be found in the Software Center. Advanced tweaks include custom keyboard shortcuts, altered window behaviors, and fine-grain theme controls.


ubuntu-app-compiz-settings-manager


For Compiz desktops: Compiz isn’t a desktop environment per se, but rather a window manager that allows for 3D effects and animations. If you decide to use Compiz for window management, you should install Compiz Config Settings Manager from the Software Center.
Compiz is far more advanced than the other tweak tools above, which means it might be overwhelming at first. Be careful not to change things unless you know what they are, otherwise you may break something.


2. Synaptic Package Manager

Except for the tweak tools above, I’m convinced that there’s no tool more important for Ubuntu users than Synaptic Package Manager. Sure, the built-in Ubuntu Software Center is good enough to get the job done, but it has a few quirks and missing features.


ubuntu-app-synaptic-package-manager


On the other hand, Synaptic is objectively better. For starters, it isn’t as laggy when browsing through packages, and it’s way faster at returning search results. It can repair broken package dependencies, perform smart system upgrades, and has a friendlier interface.
Plus, it has a setting for automatically deleting packages after installation, which helps alleviate unnecessary disk space usage. Ubuntu Software Center doesn’t have this feature.
How to install: Synaptic Package Manager can be found in the Software Center.


 3. Google Chrome

I don’t want to get into a war over which browser is best on Linux. Chrome has its strong points, but there are also a lot of reasons to hate Chrome. And if I’m being honest, if I absolutely had a choice, I would break up with Chrome in an instant.
But on Linux, you need to have Chrome installed. Not that you have to use it as your primary browser — Opera is my browser of choice at the moment — but there are things Chrome can do that no other browser can (without a lot of tinkering and tweaking, at least).


ubuntu-app-chrome-web-browser


For example, if you want to watch Netflix on Linux, you pretty much have to use Chrome now. There are potential workarounds for other browsers like Firefox and Opera, but they’re a real headache to get working. Up-to-date Flash support is also only available in Chrome.
How to install: Chrome isn’t available in the Software Center, but installation is easy. Just go to the Chrome homepage, click Download, make sure you select the relevant .deb file, and double-click it after it’s downloaded to install. Once installed, it will auto-update when new versions are available.


4. Geary

There are several Linux desktop email clients to choose from, and the best one for you is the one you find most comfortable to use, but Geary gets my vote. It’s clean, fast, easy to use, and aesthetically pleasing.
The basic-but-functional interface makes it a “lowest common denominator” email client. You’ll understand how to use it as soon as you open it. As such, it’s the one I most recommend for Linux newbies and casual users.


ubuntu-app-geary-email-client


The only downside to Geary is that it lacks a lot of customization options. If you want to change the hotkeys, you can’t. If you want to disable “Mark as Read after X seconds”, you can’t. Little things that are completely subjective but might be frustrating all the same, so I don’t recommend Geary for power users.
How to install: Geary is not available in the Software Center. To install, open the Terminal and type in the following three commands:

sudo add-apt-repository ppa:yorba/ppa
sudo apt-get update
sudo apt-get install geary


5. VLC Media Player

Surprisingly enough, there are a lot of great media players on Linux: Bomi, SMPlayer, Miro, and the list goes on. But while it’s nice to have such a wide variety of options, there’s one player that consistently outranks its competition, and that player is VLC.


ubuntu-app-vlc-media-player


The biggest selling point of VLC is its commitment to the open source philosophy. Obviously it isn’t the only open source media player out there, but when you also consider just how feature-complete, polished, and downright useful it is, you’ll see that few others can compare.
There are so many hidden VLC features that you probably don’t know about. (Seriously, so many features.) At the very least, you should install it as a backup player because it always works.
How to install: VLC can be found in the Software Center.


6. Tomahawk

Fewer and fewer people are buying music these days. With the prevalence of services like Spotify and YouTube, we’re entering an age where streaming is preferable to ownership — and that’s most true for music. However, for those of us who still have MP3s, a proper music player is crucial.


ubuntu-app-tomahawk-music-player


Linux music players aren’t hard to come by, which means picking one is harder than you might think. Having given many of them a try over the years, I’m convinced that Tomahawk is the best. It’s clean, modern, and packed with features.
But the most killer feature comes by way of plugins: the ability to connect to streaming services like Spotify, YouTube, SoundCloud, Deezer, LastFM, and more. Tomahawk makes it so you can manage all of your music — owned or streamed — in one place.
How to install: Tomahawk is not available in the Software Center. To install, open the Terminal and type in the following three commands:
sudo add-apt-repository ppa:tomahawk/ppa
sudo apt-get update
sudo apt-get install tomahawk


7. Tixati

Here at MakeUseOf, we don’t condone the pirating of software or media. However, we do recognize that there are legitimate uses for torrenting, and when you find yourself needing to download one of those legal torrents, it’s best if you do so with a proper client.
Fortunately, the selection of modern torrent clients for Linux is wide and ever-improving. You’ve probably heard of Transmission, Deluge, and qBittorrent, but I really want to stress that Tixati is the absolute best client available right now.


ubuntu-app-tixati-torrent-client


Reasons to prefer Tixati over other torrenting clients include: tiny resource comsumption, fast downloads, simple and straightforward interface, and dozens of features like priorities, bandwidth sizing, and real-time bandwidth graphs. It even has a portable version.
How to install: Tixati isn’t available in the Software Center, but installation is easy. Just go to the Tixati homepage, click Download, navigate to the Linux section, and make sure you select the relevant .deb file. Double-click the downloaded file to install.


8. Sublime Text

One of the worst Linux myths is that only programmers should care about Linux. This myth does a disservice to the operating system because there’s a lot to like about Linux even if you’ve never seen or written a line of code in your life.


ubuntu-app-sublime-text-editor


That being said, it’s undeniable that Linux is great for programmers, and if you’re going to be doing any kind of programming or scripting at all, then you should really consider installing Sublime Text. It’s the best text editor out there and almost as good as an IDE.
How to install: Sublime Text is not available in the Software Center. To install, open the Terminal and type in the following three commands:

sudo add-apt-repository ppa:webupd8team/sublime-text-3
sudo apt-get update
sudo apt-get install sublime-text-installer


9. GIMP

A lot of programs have tried to replicate the power and flexibility of Photoshop, and while a lot of these programs can pass as viable alternatives to Photoshop on Linux, they all fall short in one way or another. The closest thing you’ll find is GIMP.


ubuntu-app-gimp-image-editor


But here’s the thing: GIMP may not be at the same level as Photoshop, it can still do a lot of the same things. If GIMP is missing a feature you need, you might even be able to extend its functionality with plugins. And best of all, GIMP is 100% free. Would you rather pay a subscription for Adobe Creative Cloud? Likely not.
If you think GIMP is overkill or too hard to learn, don’t worry. Just check out these websites with GIMP tutorials and these video tutorials for GIMP beginners to get started. It’s easier than you think.
How to install: GIMP can be found in the Software Center.


10. Dropbox

Of the cloud storage services available today, Dropbox is the easiest to set up on Linux. If you’ve never used Dropbox before, then you really should — it’s excellent for backing up files, not to mention the creative uses for Dropbox that you haven’t considered.
Dropbox integrates well into Linux, and once it’s set up, you never have to fiddle with it again if you don’t want to. Everything just works, and that kind of comfort is great for Linux newbies.


ubuntu-app-dropbox-cloud-storage


If you’re going to use Dropbox, take advantage of these ways to unlock more space as well as these time-saving Dropbox shortcuts. If security bothers you, take these steps towards safer cloud storage and avoid these bad security habits. Then you’ll have nothing to worry about.
How to install: Dropbox is available in the Software Center, but I’ve run into installation issues before, so I recommend going to the Dropbox download page instead and grabbing the .deb file relevant to your system. Double-click it to install once downloaded.


11. Steam

Linux is becoming a serious platform for gaming. It hasn’t gotten there yet, but it’s well on its way, and there’s a lot of evidence to show that Linux may catch up to Windows in just a few more years. One of the biggest milestones? The release of Steam for Linux.


ubuntu-app-steam-linux-gaming


Steam is one of the best ways to download games on Linux. The library of games is expansive, the community is massive, and the games themselves are pretty darn good. Not all of the games on Steam can be played just yet, but the number that can be played is growing day by day, and Steam itself is always improving too.
For now, you’ll have to deal with the fact that many games — such as these free MMORPGs that are native to Linux — will have to be played outside of Steam.
How to install: Steam can be found in the Software Center. However, you may run into problems after installation, in which case you should consult this troubleshooting page.


What Are Your Must-Have Apps?

I know we’ve only just touched the surface of what’s available on Linux, but if I had to pick 11 absolute essentials, these would be my pick. Linux newbies should instantly feel more comfortable with these apps installed on their systems.

Source: http://www.makeuseof.com/tag/11-must-apps-ubuntu-right-fresh-install/