August 21, 2015

A linux alternative for Windows users - Xubuntu 15.04

With the discovery of Microsoft tracking everything you do on Windows 10, there is a renewed interest in open source linux software. Google also does the same. To this effort, I setup the latest Xubuntu 15.04 as a Windows XP / 7 / 10 alternative. I am using the Radiance theme for a polished look from my previous post this month. Also installed the excellent newly released Clementine and Yarock music players with built-in Internet radio stations. Below are my results and a link where to download the latest Xubuntu. Open source works....!


You can also give Xubuntu a Windows 8/10 theme as well. See the link below to get it.


You can get the XFCE theme, XFCEight here:

http://xfce-look.org/content/show.php/Xfceight?content=158227


You can download Xubuntu 15.04 here: http://xubuntu.org/getxubuntu/

August 20, 2015

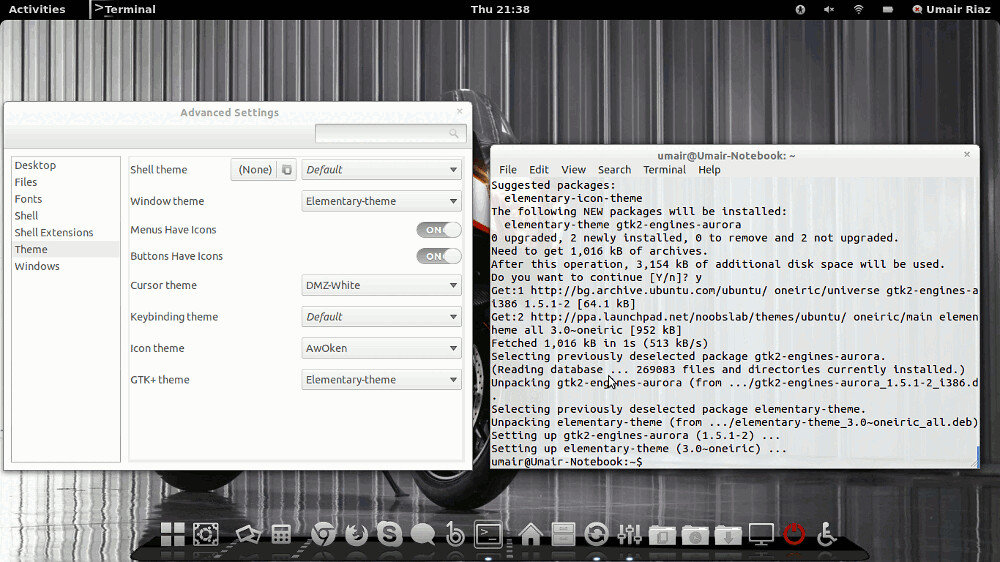
Install Elementary 3.0 Gtk 3 Theme on Ubuntu

Install Elementary 3.0 Gtk 3 Theme on Ubuntu 12.04 Precise/11.10 Oneiric/Linux Mint 12

elementary theme

Changes in Elementary Gtk theme 3.0 version:
  • GTK3 support, including :backdrop class, but there’s no dark theme yet
  • elementary now uses the Unico GTK3 engine
  • Granite support (which is used by many applications that will be default in the elementary OS Luna, such as BeatBox, etc.)
  • Dropped GTK2 classes for GTK3 apps so there’s no more support for applications like Nautilus elementary and others (so any application that has a GTK3 version doesn’t have support for GTK2 anymore)
  • The default placement is now close:maximize
  • The maximize button has been changed from the “+” (typically used to mean new) to two opposing arrows
  • And More.

To install Elementary Theme via Noobslab PPA on Ubuntu/Mint GTK3 open Terminal (Press Ctrl+Alt+T) and copy the following commands in the Terminal:
Enjoy

(Elementary OS) Noise Audio Player for Ubuntu/Linux Mint/other Ubuntu derivatives

Install Noise Audio Player in Ubuntu 13.04 Raring/Ubuntu 12.04 Precise/Linux Mint 15/13/other Ubuntu derivatives

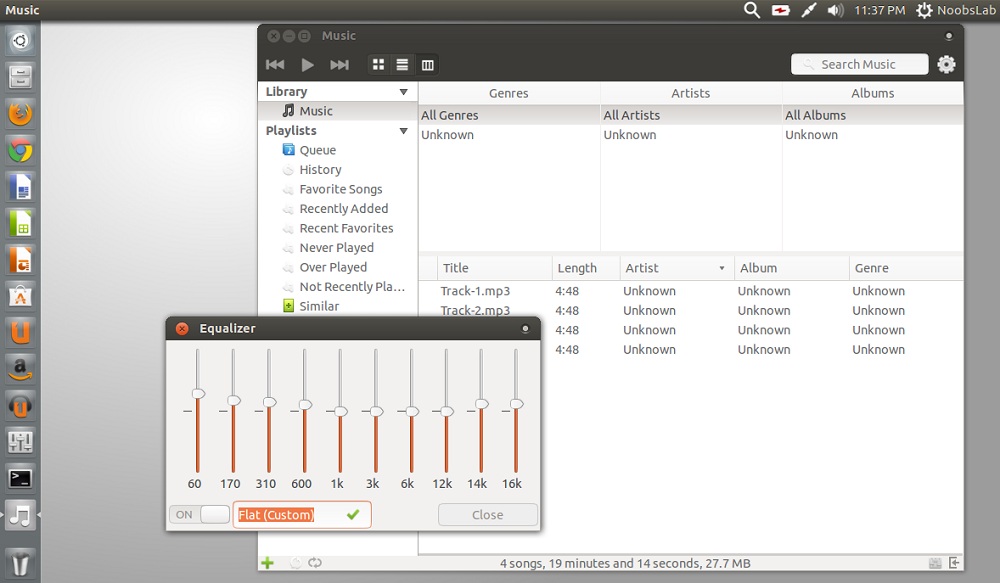
Noise is an official audio player in Elementary OS Luna. Noise is a fast and beautiful GTK3 audio player with a focus on music and libraries. It handles external devices, CDs, and album art. Noise utilizes Granite for a consistent and slick UI. It automatically find tracks and show them without any complication.
It exposes albums in big shadowed previews, display extra information to the selected tracks, also previews helped by the right-side panel. It has it's own offers Equalizer to adjust track tone. Also there are filters in the left pane, like favorite, never played, history, recently added, and similar. 
Noise also can handle external devices, such as: iPods, iOS devices and syncing music to Android devices. Additionally, it offers CD ripping, separate partitions, and more.

noise player

noise player
Note: It is not available for Ubuntu 12.10 Quantal/Linux Mint 14

To install Noise Player in Ubuntu/Linux Mint open Terminal (Press Ctrl+Alt+T) and copy the following commands in the Terminal:


That's it


Source: http://www.noobslab.com/2013/08/elementary-os-noise-audio-player-for.html


August 19, 2015

Qt Music Player `Yarock` 1.1.3 Released, Available In PPA


Yarock 1.1.3 was released recently with a new radio service: Radionomy (which has replaced Shoutcast), support for importing APE files in the playqueue, MP4 audio tag reading and more.

Yarock


Yarock is a Qt music player "designed to provide an easy and pretty music collection browser based on cover art".

The player provides multiple views such as artists, albums, tracks, genre, years and so on, all based on cover art and it includes features such as: music collection database (SQLite 3), playlists support (including smart playlists), can play radio streams, Mp3Gain tag support for volume normalization, Last.fm scrobbler, command line and Mpris interfaces, favorites support, automatically downloads cover art and more. Also, the player includes a radio browser which supports Tunein, Dribble and with this release, Radionomy.

Yarock Radionomy

Changes in Yarock 1.1.3:
  • new radionomy radio service (replace shoutcast)
  • added radio covers for all radio views
  • added symbolic link support for file system view
  • added MP4 audio files tag reading
  • added ape files import into playqueue
  • added browsing history support for stream link in radio views
  • many minor updates for the widgets/ui
  • fixed "lyrics.com" provider
  • fixed volume slider for phonon engine
  • fixed network redirection management
  • fixed now playing widget update
  • various other fixes and improvements
The complete changelog can be found HERE.

Also, since our last article about Yarock, the app has received support for an alternate audio engine: mpv, equalizer support for vlc audio engine as well as support for building the app with Qt5 (Qt4 is still supported).

Unfortunately, the PPA that used to provide Yarock for Ubuntu users (Sam Rog's PPA) was removed. To make it easier to install the latest Yarock in Ubuntu, I used Sam's initial packaging and I uploaded the latest Yarock 1.1.3 to the main WebUpd8 PPA. The package is built with Qt5 and Phonon and without the mpv audio engine (because mpv from the official Ubuntu repositories is very old).


Install Yarock in Ubuntu or Linux Mint via PPA

To install the latest Yarock in Ubuntu 15.04 or 14.04 / Linux Mint 17.2, 17.1 or 17 and derivatives, you can use the main WebUpd8 PPA. Add the PPA and install Yarock using the following commands:
sudo add-apt-repository ppa:nilarimogard/webupd8
sudo apt-get update
sudo apt-get install yarock


If you don't want to add the PPA, you can download the deb from HERE.

Arch Linux users can install Yarock (Qt5) via AUR.

For other Linux distributions, grab the source from Launchpad and build the app using the official instructions (note: the PPA listed there doesn't exist any more)

Source: http://www.webupd8.org/2015/08/qt-music-player-yarock-113-released.html

August 17, 2015

Ambiance & Radiance Colors Themes

Install Ambiance & Radiance Colors theme in Ubuntu 14.04 Trusty/12.04 Precise/Linux Mint 17/13/other related Ubuntu derivatives (GTK + Xfce + Lxde)


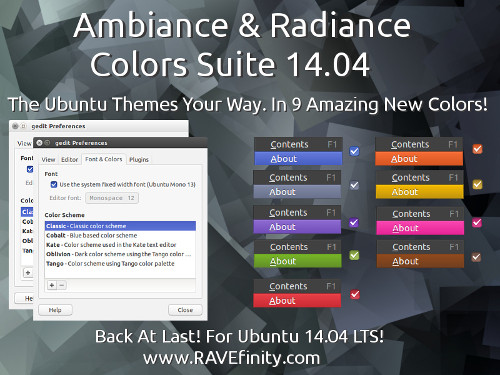
This suite is offered by RAVEfinity. Ambiance & Radiance Colors Suite is offers many colors of default Ubuntu themes (Ambiance & Radiance), a Unique and complete GTK 2 & 3 theme that brings you Ubuntu's Default Ambiance and Radiance Themes in 9 awesome new colors! Along With many other improvements. These themes can work under: Unity, Gnome Classic, Gnome 2 (Mate), XFCE ,LXDE & Openbox desktops.

Ambiance & Radiance-Xfce-LXDE brings you The Radiance theme (Ubuntu theme) but, completely ported to Xfce,LXDE and Openbox desktops. It is in fact quite likely, The most comprehensive and tested port of Radiance to Xfce,LXDE and Openbox. (It includes XFWM4 and Openbox window themes). Now you can easily have the beautiful and refined look and feel of the Radiance theme (Ubuntu Theme) on the XFCE,LXDE and Openbox desktops.


FS & zonColor icons used in screenshots or check icons collection. Also download black wallpapers.
You can use Unity Tweak Tool, Gnome-tweak-tool or Ubuntu-Tweak to change themes/icons.


To install Ambiance & Radiance Suite in Ubuntu/Linux Mint (Press Ctrl+Alt+T) and copy the following commands in the Terminal:


To install Ambiance & Radiance Colors for GTK, use this command:


To install Ambiance & Radiance for Xfce & Lxde, use these commands:


August 2, 2015

4 Linux Music Players That Deserve Your Attention Now

Finding a good music player for Linux is not an easy task. A few big name projects, like Amarok and Songbird, have come and gone throughout the years, but none of them have been stable enough to match the staying power of iTunes, Winamp, or any of the other music players available to non-Linux users.
Fortunately, the issue isn’t one of availability; there are dozens of music players out there in Linux land. The problem is finding the ones that are modern, feature-rich, performance-friendly, and easy to use.
I’ve done a bit of searching. Here are my findings.

Audacious

Not to be confused with Audacity, which is a well-known audio editor, Audacious is an audio player which has no relation to the former except for the fact that they’re both free, both open source, and both excellent.
This wonderful program actually got its start back in 2011 but was often overlooked in favor of big name alternatives in the past. Those giants have since fallen asleep and Audacious is the perfect tool to fill the vacuum that was left behind.


linux-music-players-audacious


Audacious is marked by low resource usage and a minimal interface. It’s not ugly by any means, but if you’re used to the kind of visual flash offered by modern media players, you may feel underwhelmed by this program’s simplicity.

It comes with plenty of advanced actions that are all tied to keyboard shortcuts, making it easy to do whatever you want without much effort at all. There’s also a surprising amount of customization available, considering just how simple it tries to be. As for the interface, it can be toggled between GTK Classic and Winamp.
But the best aspect of this music player has to be its plugin system, which allows for extensibility through third-party code. The community of Audacious developers isn’t all that big yet, but if you’re interested in hopping along, check out their plugin development forum.

Tomahawk

The way we use the web has changed so much in the past few years. Isn’t it about time that the way we manage our music has caught up? That’s the exact line of thinking that sparked – and continues to drive – the development of Tomahawk, a music player for the modern generation.
Music has recently shifted away from local playlists and shifted towards streamed services, which are popularly known as Internet radio. And if you’re like me, you don’t just stick to one or two of them; you listen to this one or that one depending on your mood, whether that means Soundcloud, Google Music, Spotify, Rdio, etc.


linux-music-players-tomahawk


And that’s exactly why Tomahawk is so awesome. Not only does it manage and play local music files like any traditional music player would, it also incorporates some of the more popular streaming services available today, thus allowing you to enjoy all of your music in one place.
The ability to connect to these various streaming sites is due to Tomahawk’s plugin system, so you can toggle those features on or off at will. Tomahawk will also watch your indicated music directories for any changes and update your library automatically.
As far as the interface, you’re either going to love it or hate it. It feels very modern, but modern in a way that’s reminiscent of the Modern style that’s been used by Windows since the Zune days. In general, though, the layout is very simple, easy to navigate, and the aesthetics are quite pleasing.

DeaDBeeF

Do not be put off by this program’s strange name! I almost overlooked DeaDBeeF because of its unconventional name but I’m glad I didn’t. Truly I wish for it to be rebranded because it’s such an awesome program and it’d be a shame if it never gained traction due to something as trivial as a name.
Long story short: if you prefer something lightweight like Foobar2000, you’ll probably love this one.


linux-music-players-deadbeef


DeaDBeeF is not meant to be a music library manager. Rather, much like stanard Foobar2000 affair, you just create separate playlists that you fill up with whichever music files you want for said playlists. That’s about as simple as it could be.
However, if the out-of-the-box functionality is too basic for you, you can always expand on it through plugins. DeaDBeeF comes with a lot of built-in plugins that are disabled by default, such as a LastFM scrobbler, a global hotkey manager, and even an alternative interface.
The only downside was that DeaDBeeF did not integrate into my native desktop environment, so I couldn’t control it using the volume panel. It wasn’t a big deal for me, but it may or may not prove irritating for you, so beware.

Nuvola Player

Nuvola Player is a bit of an outlier on this list. It completely foregoes the idea of local music storage and focuses entirely on cloud-based music streaming. In that sense, it’s like Tomahawk but more specialized.
The goal, as described by the developers, is to provide Linux users with a native application that interfaces with as many streaming services as possible in order to make the user experience as clean and straightforward as possible.


linux-music-players-nuvola-player


At first glance Nuvola feels like an extremely basic web browser that loads each service – e.g. Pandora, Rdio, Google Music, etc. – as an actual webpage. Indeed, my first thought was, “Why the heck would I use this when I can just load it in my already-open browser?”
As it turns out, because Nuvola ties in with the operating system, it can be controlled directly through the desktop environment when you want to skip songs or change volume. It also has native popup notifications on track change. It’s a very niche program, but a useful one if that niche describes you.
Out of the box, Nuvola supports Amazon Cloud Player, Bandcamp, Deezer, 8tracks, Google Play Music, Grooveshark, Grooveshark Mobile, Hype Machine, Jango, Logitech Media Server, Pandora, Rdio, Spotify, and This Is My Jam.

Which Music Player is Your Favorite?

In a past life, back when I was enamored with Foobar2000’s minimalism, I would have fallen for DeaDBeeF and its surprising similarities. These days, however, I need a little bit of eye candy in addition to functionality because I’m looking for a balanced user experience, which is why I think Tomahawk is the best.


Source: http://www.makeuseof.com/tag/4-linux-music-players-that-deserve-your-attention-now/


Other honorable mentions:

Banshee


Gmusic browser


July 14, 2015

How to Enable Google’s Chrome App Launcher on Linux

For those wanting more of the Chromium effect on their existing Linux desktops, you can add the Google App Launcher. See an article below on how to add it.


The Chrome App Launcher offers a super handy way to launch your favourite Chrome Apps, sift through your engorged collection of bookmarks and trigger a web search, all without having to open the browser itself.

It’s included out of the box on Chrome OS, and Windows and Mac have been able to add it for some time. On Linux the feature remains disabled by default, but getting it is easy. And we’ll show you how.

Enable Chrome App Launcher on Linux

It should be obvious, but you do need to be running the latest release of Google Chrome (any channel) to add the app launcher. Google provides Debian and RPM installers suitable for most Linux distributions. Head on over to this link to grab one.
The simplest method (assuming you’re running the latest Stable release) is to click the link below (or copy the URL into a new tab) and hit the ‘Get App Launcher’ button on the page. This will add the feature to your system.
Alternatively, if for whatever reason the above step doesn’t work, you can enable it manually. To do this, paste the following address into the omnibar and then hit return/enter:
chrome://flags/#enable-app-list
Click the blue link titled ‘enable’ that is listed underneath the “enable the app Launcher” heading. Finally, relaunch Chrome when prompted to do so.

Positioning the App Launcher

After the item has been ‘installed’ you’ll be able to add it to your application launcher or desktop panel by finding the launcher item in your desktop app menu, overlay or Dash. You can place it anywhere you like: at the top of the Unity Launcher, the far left of your Cinnamon desktop panel, or slap bang in the middle of your GNOME Shell dock.

Using the App Launcher

With the launcher item now added and in place on your desktop all that’s left is to click on it.
The apps list will open in rough proximity to its icon, though this isn’t always the case. For example, on Cinnamon the launcher often appears on the right screen, despite the App Launcher icon being clicked on the left. Given that the feature is yet to be enabled by default on Linux bugs should be expected.


chrome app list linux


If you find the positioning is really off, you may want to turn on the “Enable the experimental app launcher position” flag. This experiment positions the apps list in the centre of the screen.
 
 
chrome://flags/#enable-centered-app-list

Anatomy of the launcher

We mentioned in the introduction that the Chrome App Launcher is able to do a few handy things. And while those of you on Linux won’t get to take advantage of the “Ok Google” feature available in the Chrome OS launcher, you do get most of the other features.
Folders let you group your apps into custom directories, like ‘Google Apps’, ‘Media Apps’, etc. Enabling the ‘App Folder Sync’ flag allows you to keep these groupings between desktops and OSes.
Another flag Linux users can enable to achieve parity with Windows users is ‘App Info’. This flag appends an extra entry to the menu that appears when right-clicking on apps within the list. When selected a small overlay will appear in-launcher to give brief information on permissions the app in question has access to, shortcut app opening preferences (‘Window’, ‘In Tab’, etc.), and an uninstall button to save you having to use the Extensions page.
To help differentiate between Chrome Apps (those that can run offline, in their own window and integrate with your OS) and “glorified bookmarks”, look out for the shortcut badge on icons:
Web Apps and Chrome Apps


Web Apps (badged) and Chrome Apps (unbadged)
The search bar at the top of the list will return results from the web, your bookmarks, installed applications, and the Chrome Web Store.


Chrome App Launcher

Click on the menu icon to access some app launcher specific settings (including “supervised user” access) or send feedback on it to Google.

Removing the launcher

To remove the Chrome App Launcher simply right-click on (or tear off) the list shortcut from your panel or dock. If you enabled the launcher through a flag, you can also disable it.

Source: http://www.omgchrome.com/enable-chrome-app-launcher-linux/

June 27, 2015

First impressions of Chromixium OS 1.0

Chromixium OS is a recent addition to our database of open source operating systems. The project has an interesting goal: to mix the user interface style of a Chromebook with the power and flexibility of a full featured GNU/Linux distribution. The project's website sums up its characteristics as follows: "Chromixium combines the elegant simplicity of the Chromebook with the flexibility and stability of Ubuntu's Long Term Support release. Chromixium puts the web front and centre of the user experience. Web and Chrome apps work straight out of the browser to connect you to all your personal, work and education networks. Sign into Chromium to sync all your apps and bookmarks. When you are offline or when you need more power, you can install any number of applications for work or play, including LibreOffice, Skype, Steam and a whole lot more. Security updates are installed seamlessly and effortlessly in the background and will be supplied until 2019."

At the time of writing, Chromixium provides one build for 32-bit x86 machines. The ISO we download for the distribution is 800MB in size. Chromixium's one edition provides users with the Openbox window manager and some LXDE components for the distribution's desktop environment. Booting from the Chromixium live media brings us to a graphical login screen. The default password for the live user account is "user". Signing in brings up a desktop environment with a scenic background. At the bottom of the screen we find a transparent panel. This panel is home to quick-launch buttons, an application menu and the distribution's system tray. One of the quick-launch buttons opens the project's system installer.


Desktop and application menu
Chromixium 1.0 -- Default desktop and application menu
(full image size: 812kB, resolution: 1280x1024 pixels)

Chromixium's graphical system installer has a similar style to the installer used by its parent, Ubuntu, but there are a number of small differences. The installer begins by showing us the project's license agreement. We are then asked if we would like the installer to automatically partition our hard drive or if we would like to manually divide our hard disk. Taking the manual option, I found, launches the GParted partition manager. Using GParted, we can create the partitions we want and, when we close GParted's window, the installer moves on to the next step. The following screen asks us to create a user account for ourselves and then we can optionally enable the root account and create a password for the root user. The next screen asks us to assign mount points to the partitions we created earlier. We can also select the location of Chromixium's boot loader from this screen. There is a checkbox on the page which toggles "Transfer user settings" on/off. I enabled this option and nothing happened so I'm not sure if importing or transferring user settings has been implemented yet. The system installer then formats our disk and copies its files to our computer. When it is finished we are asked to select our time zone and then confirm our keyboard's layout through a series of menus. We then select our preferred language and reboot the computer.

Our local copy of Chromixium boots to a graphical login screen. Signing into the account we created at install time brings us back to the Openbox powered interface. Opening the distribution's application menu reveals an icon for launching the Chromium web browser. There are also icons for launching a minimal Chromium browser in order to access such Google services as Google Drive, YouTube, Google Docs and Web Store. The quick-launch buttons at the bottom of the screen provide access to these same services, plus there is a quick-launch button for opening the distribution's file manager.

Desktop and system settings
Chromixium 1.0 -- Desktop and system settings
(full image size: 1.1MB, resolution: 1280x1024 pixels)

At this point in my trial I was wondering where the usual collection of GNU/Linux applications might be found since they were not available in the visible application menu. I found that by right-clicking on the desktop I could bring up a context menu. This menu gives us access to the distribution's settings panel and an application menu. The application menu takes several seconds to load, but it does give us a classic menu tree of software, with applications sorted into categories. The applications provided in the default installation include the Chromium web browser with Adobe's Flash plugin, the Transmission bittorrent client, an image viewer and an application for retrieving data from an attached scanner. The Brasero disc burning software is included along with the Parole media player. We are given the GParted partition manager, a hardware/system information browser and an on-screen virtual keyboard. Network Manager is available to help us connect to the Internet. We find such small applications as a text editor, archive manager and calculator. The GNU Compiler Collection is installed for us too. In the background we find the Linux kernel, version 3.13.

Chromixium does not ship with multimedia codecs. However, attempting to open a media file brings up a window letting us know we are missing codecs. The system then offers to locate appropriate codecs for playing our files. During my trial Chromixium successfully found and installed the codecs I required, allowing me to play my media files. In the application menu there is a launcher for a program that will hunt down codecs and software for reading video DVDs from the Ubuntu software repositories.

Software management
Chromixium 1.0 -- Software management
(full image size: 510kB, resolution: 1280x1024 pixels)

The distribution provides users with two graphical package managers. The first offers a web-based interface and is called Ubuntu Apps Directory. Launching this package manager brings up a website which looks and acts in a very similar manner to the Ubuntu Software Centre. We can search for packages, browse through categories of software and click on packages to bring up a summary of the selected application. Unfortunately, I found whenever I clicked on the button to download and install a package the Apps Directory displayed an error saying the package could not be found. This made the Apps Directory entirely unhelpful. Luckily there is a second graphical package manager which runs as a native application. The Synaptic package manager is present to help us locate, install, update and remove packages on our system. Synaptic worked well for me and the native package manager worked quickly. My one complaint while using Synaptic to add software to my system was that freshly installed desktop software would not appear in either of the distribution's application menus. The user needs to log out and then sign back into their account before new software is added to the context application menu. During my trial a number of software updates were made available. I downloaded 33 updated packages, totalling 70MB in size. Each of these software updates installed cleanly. Chromixium pulls software from Ubuntu's repositories. There are a number of extra add-on repositories configured on the system, but they are not enabled by default. We can enable these extra repositories via Synaptic.

I tried running Chromixium on a desktop computer and in a VirtualBox virtual machine. In both environments the distribution functioned well. My screen was set to its maximum resolution in both environments and both networking and sound worked out of the box. I found the distribution's desktop was a bit sluggish, especially when accessing either application menu. Opening the main application menu took a few seconds and opening the context application menu (where the native applications are stored) took about four seconds. Launching programs tended to be unusually slow too when compared with other Ubuntu-based distributions. In either environment Chromixium required about 290MB of memory to log into the Openbox interface. This seems like a large amount of RAM for such a light graphical interface, almost twice what Debian running the MATE desktop used earlier this month.

Browsing the application menu
Chromixium 1.0 -- Browsing the application menu
(full image size: 931kB, resolution: 1280x1024 pixels)

Conclusions

I want to make it clear I do not own a Chromebook and, unless I'm mistaken, I've never used a Chromebook computer. I mention this because one of Chromixium's goals is to provide a Chromebook-like experience and, honestly, I have no idea whether it accomplishes this goal. Assuming, for a moment, that it does, I have to admit I'm entirely outside the target demographic for such a device. A computer which deals almost exclusively in on-line web services and web applications would not be useful to me. However, for a person who wants to use their computer almost exclusively for browsing the web, watching YouTube videos, checking e-mail and social networking sites, I can see how such a simplified user interface would be appealing. In a lot of ways I think Chromixium has similar design goals to Peppermint. Both projects have minimal interfaces, a focus on web apps and use local programs to round out their functionality.

My point is that people who are likely to enjoy Chromebooks and use their computers almost solely for accessing the web will probably find Chromixium quite useful. However, while it is technically possible to access more features and off-line software through Chromixium's application menu, the process is slow and awkward when compared with other desktop Linux distributions. Granted, Chromixium is still in its early stages, it just hit version 1.0, so the standalone features will probably improve in time. For now, I think Chromixium offers an interesting web-focused environment with the fallback option of using locally installed applications. The implementation has some rough edges at the moment, but I suspect it will get better in future releases. * * * * *
Hardware used in this review

My physical test equipment for this review was a desktop HP Pavilon p6 Series with the following specifications:
  • Processor: Dual-core 2.8GHz AMD A4-3420 APU
  • Storage: 500GB Hitachi hard drive
  • Memory: 6GB of RAM
  • Networking: Realtek RTL8111 wired network card
  • Display: AMD Radeon HD 6410D video card 

Source: http://distrowatch.com/weekly.php?issue=20150615#chromixium

June Desktop

Gave my desktop a Chromium look this month to go along with the Chromixium review. It is nice and bright for the summer and the soft gray colors work well. Below are links where to get them. Enjoy.


You can get the GTK3 theme here:

http://gnome-look.org/content/show.php/Windows+8+modern+UI+%28metro%29?content=157024


You can get the wallpaper here:

http://chromixium.org/sources/

and below:


April 2, 2015

The Most Useful Media Converter For Linux Just Got Better: Meet The New Handbrake

There are so many different codecs out in the world — some are extremely popular, and others are barely used. While you’re using Linux, you may come across all sorts of codecs, and you might want to use some codecs rather than others.
Thankfully, the cross-platform Handbrake utility has gotten a significant update that makes it even better at converting videos between various codecs. Let’s check out all of the exciting stuff in the newest Handbrake.


Support for More Codecs


handbrake_codecs

First of all, there’s lots of under-the-hood improvements in Handbrake. For instance, the utility can now use H.265 (which compresses video even better than the famous codec H.264) as well as VP8. If you don’t know much about these codecs, just know that they’re pretty modern codecs that a lot of videos will be encoded with. Transcoding videos into these codecs will save you space on your hard drive as well as keep you future proof for a good while. Besides support for more codecs, there are also a few changes on how other codecs are handled. For example, several backends that handle certain codecs have been swapped with other backends. This is done to improve license compatibility (to make everything follow the GPL) and to improve quality of the output media.


Improved Performance


In a future release, it’s also planned for Intel’s QuickSync functionality to be implemented to drastically improve transcoding times. In the meantime, you can still use AMD’s or Intel’s OpenCL functionality to somewhat improve performance via their respective GPUs. NVIDIA doesn’t support OpenCL in their GPUs at this time.


Modified Interface


handbrake_main

Handbrake’s graphical interface also got a nice spruce up. While nothing major, you’ll now be able to access just about all possible settings straight from the GUI, making it quicker and easier to do what you’re wanting to do.


Presets


There’s also support for presets. There are several presets that come with the program that set the settings to optimized values for what you want handbrake to output.
Once you’ve changed all the settings that you want, you can also save your own presets so you can quickly get back to those same settings at a later time. Of course, you can also delete presets you no longer need.


How to Install


The latest version, Handbrake 0.10, should be available in most distributions. Ubuntu users can install it via a PPA, which makes it quick and easy. To add the PPA, refresh your package lists, and install the latest version of Handbrake, just run these three commands:

sudo add-apt-repository ppa:stebbins/handbrake-releases
sudo apt-get update
sudo apt-get install -y handbrake-gtk


Once you’ve run these commands, you should have Handbrake installed and ready to go.


Arista Transcoder as an Alternative


arista_main

However, if you’re looking for a tool that has the greatest flexibility between codecs, you’d probably be better served with Arista Transcoder, as it can take advantage of the GStreamer framework to transcode videos. The GStreamer framework is plugin-based, and there are tons of plugins available that give it support for almost any codec under the sun. So, again, if you need to transcode to newer codecs, then Handbrake should be fine. Otherwise, if you need greater flexibility, try Arista Transcoder instead. Once you’ve installed Arista, you can just check your package manager for gstreamer packages — you’ll see plenty of plugins there. If you’re running a distribution like Fedora that doesn’t include “non-free” software, you may need to add third-party repositories (such as RPMFusion for Fedora) or make other similar tweaks to your system to make those packages available.


Handy Tools at Your Fingertips


Handbrake has always been an excellent tool available on Linux, and improvements like these will continue to come — all thanks to the fact that it’s open source. If you like Handbrake and want other great tools for Linux, don’t forget to check out some of the Best Linux Software out there!

Source: http://www.makeuseof.com/tag/useful-media-converter-linux-just-got-better-meet-new-handbrake/