January 30, 2017

ChaletOS 16 Review: The Easiest Way to Switch From Windows to Linux

Switching from Windows to Linux presents a challenge. Linux offers increased flexibility, customization, and security. But there’s a higher learning curve. Knowing certain tips and tricks aids the transition. Still, a simple Linux distribution benefits new users the most.

Switching from Windows to Linux presents a challenge. Linux offers increased flexibility, customization, and security. But there’s a higher learning curve. Knowing certain tips and tricks aids the transition. Still, a simple Linux distribution benefits new users the most. Tired of Windows? Switching to Linux Will Be Easy If You Know This Tired of Windows? Switching to Linux Will Be Easy If You Know This There are many reasons to migrate from Windows to Linux. For instance, Linux might offer a lightweight environment. If you're tired of Windows and want a change, switching to Linux should be easy. Read More

Enter ChaletOS 16. This operating system simplifies the foray into Linux. ChaletOS 16.04.2 provides the look and feel of Windows 7 with the power of a Linux endoskeleton. Learn why this distro is the easiest way to switch from Windows to Linux in this ChaletOS 16 review!

ChaletOS Background

ChaletOS embarks on a continuing mission to ease the switch from Windows to Linux. While ChaletOS 16 derives from Xubuntu, the user interface (UI) departs drastically. ChaletOS appears deceptively like Windows 7 or even Windows XP. According to the website, priorities for this distro are simplicity, aesthetics, and familiarity. At these, ChaletOS succeeds.

What’s New in ChaletOS 16

Chalet0S 16 UI


In April 2016, ChaletOS 16.04.2 debuted. This Long Term Service (LTS) iteration features a new Software Center and kernel. As the 16.04 implies, it’s based on the Ubuntu 16.04 Xenial Xerus. So ChaletOS benefits from the LTS Linux 4.4 kernel. The lightweight Ubuntu derivative Xubuntu serves as the foundation for ChaletOS so system requirements are pretty forgiving.

ChaletOS Environment

ChaletOS16 System Resources


Upon first firing up ChaletOS, you’re greeted by a decidedly Windows appearance. While Linux distributions like Elementary OS take after Windows, ChaletOS even has a start menu. Even its color scheme feels plucked from Microsoft. Yet despite similarities, ChaletOS 16 remains unique among Linux distros. It’s based on Xubutu and employs a version of Xfce. ChaletOS comes in two flavors: 32-bit and 64-bit. This should provide ample compatibility.

ChaletOS 16 Start Menu

ChaletOS 16 Start Menu


Similarities to Windows start with the, well, Start Menu. You’ll find the Start Menu in the bottom left corner of the screen. Windows 8 nixed this iconic feature. However, the 8.1 update brought it back. Opening up the Start Menu yields recognizable options. You’ll see links to Favorites, Search, Settings quick access, and a Recently Used tab. Navigation remains incredibly intuitive. Sure, a Start Menu is pretty simple. But when switching operating systems, small touches like a recognizable layout ease the transition.
Additionally, the Start Menu on ChaletOS 16 ensures you’ll be able to find what you’re looking for. Many common initial setup options are readily available. For instance the Application Center, Settings, and File Manager. So the Start Menu serves multiple purposes, providing a familiar atmosphere and aiding navigation.

Windows 7-Esque

ChaletOS 16 features an array of Windows 7 attributes. Aside from the Start Menu, you’ll find desktop icons, a system tray, and widgets. These are not necessarily unique among Linux distros. Yet it’s rare to find a Linux distro configured with these out of the box. There’s even a Windows 7 Silver Classic style that applies system-wide.
The Windows vibe radiates even in the default color scheme. You’ll notice the blue taskbar replete with pinned programs. Upon first booting into ChaletOS 16, I felt as though I’d plunged into Windows XP. As I quite enjoyed Windows XP, this was a pleasant surprise. In the bottom right corner, there’s even that “minimize everything and display the desktop” icon. Even the battery icon models itself after Windows.

ChaletOS Settings and Tweaks

ChaletOS 16 Conky


Regardless of your opinion on Windows, it’s really simple to customize. So too is ChaletOS 16. Largely, this comes a la Conky and the impressive Settings array. With Conky you can add widgets such as a clock. These vary from clocks to CPU use widgets. They remind me of the “Gadgets” from Windows 7.
Playing with these showed just how low my resource consumption stayed with ChaletOS. CPU and RAM usage remained pleasingly light. So much so that I might swap out my Ubuntu 16.04 install for ChaletOS 16. Moreover, there’s a lot of choice amidst the ease of customization. Alongside Conky is the Style Changer. As its name implies, this is a simple yet gorgeous means of altering the ChaletOS appearance. There’s everything from Canonical layouts to a Windows 7 derivative, and even Facebook styling.

ChaletOS 16 Apps

ChaletOS 16 Apps

Yet again, pre-installed apps prove why ChaletOS 16 makes a viable Windows alternative. Notably, ChaletOS arrives out of the box with loads of programs. Moreover, these are likely apps you’ll use especially if coming from Windows. Wine is standard which allows you to run many Windows programs on Linux or macOS. Additionally, for gaming the Wine frontend PlayOnLinux is a default app.

Common multimedia programs like VLC come installed as well. There’s also Firefox. Most likely if you’re switching from Windows, you’re used to straightforward program installation. Linux is a bit different. Although certain programs do feature a package installer, some distros are more command line heavy. ChaletOS 16 does include the Ubuntu Software Center as well as the Gnome Software Center.

If you’re adding new programs, the simplest means is via the Software Center. This eschews the terminal which can be tricky for newcomers. But this is where ChaletOS shines: you retain full command line access for APT installs. Though you can use ChaletOS without delving into the terminal, you have the flexibility to utilize it completely.

Why ChaletOS Makes Switching From Windows Easy

What makes ChaletOS the quintessential Linux replacement for Windows is its intuitiveness and familiarity. Booting into ChaletOS 16 presents a recognizable facade. There’s the Start Menu, desktop icons, and taskbar. Navigating this Linux distro and tweaking settings relies on Windows-like menus. Conky and the Style Changer are similar to the Settings in Windows.
By including Wine and PlayOnLinux, ChaletOS is ready for Windows program installation. Therefore Windows users retain maximum compatibility. You can even get along fine sans-command line. But if you’re going to use a Linux distro, you absolutely should learn the command line.
Overall, ChaletOS 16 is simple for Linux first timers but intuitive to customize for Linux pros as well.

Final ChaletOS Review Thoughts

While evaluating ChaletOS 16, I kept forgetting that I was using a Linux distribution. Make no mistake, you won’t confuse ChaletOS with Windows 10. Rather, it’s a Windows 7 interface. I enjoyed the layout a lot. After suffering through the agony of Windows Vista, Windows 7 arrived as a savior.
It’s pleasant to revisit a Windows 7 or even XP environment through the ChaletOS 16 medium. While I’m familiar with the command line, it’s simple to install most programs with the Software Center. Possibly my favorite aspects are the inclusion of Wine, and the low resource consumption. Despite having a Windows machine as well, it’s great to switch seamlessly between devices and continue using Windows programs. This is even more necessary if you’re switching completely from Windows to Linux.
Ultimately, it’s the familiar landscape, simplicity, and default inclusions that hone ChaletOS 16 as the perfect Windows replacement. While Elementary OS remains a solid pick, something about the mirror image of Windows 7 just eases the transition. If you’re debating the jump to Linux, you’ve got plenty of reasons to switch. But you should probably know these seven differences first. ChaletOS 16 is just one more incentive to dive into Linux.

Source: http://www.makeuseof.com/tag/chaletos-16-switch-windows-linux/
January 14, 2017

Want to burn all kind of discs (Blu-ray, DVD, CD, etc)? Here are burners for Ubuntu/Linux Mint

Install Silicon Empire and K3b Burner in Ubuntu/Linux Mint/other Ubuntu derivatives

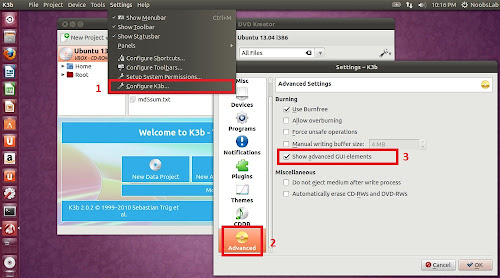
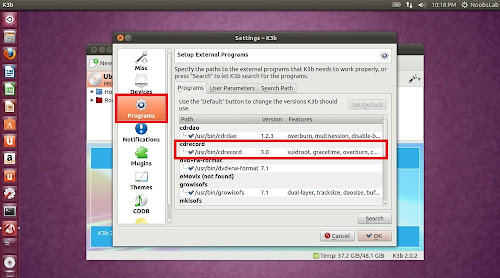
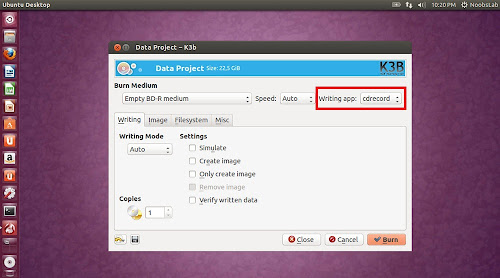
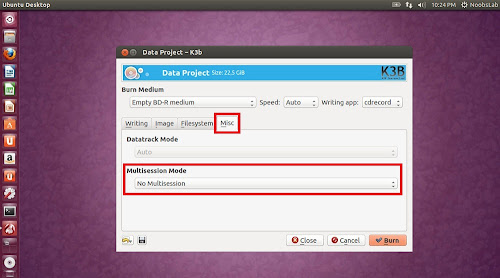
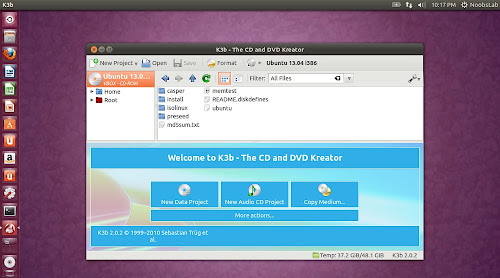
There are applications available for Linux which can burn Blu-ray discs. Ubuntu has installed Brasero burner by default but I don't know if that burns Blu-ray discs. K3b and Silicon Empire burners works fine for me in this case, these two burners does everything what you expect for Nero.


1) Silicon Empire Burner

Silicon Empire is set of tools to Burn, Copy, Backup, Manage and so on... your optical discs like CDs, DVDs and Blu-Rays. When you start working with silicon Empire Just feels everything done easily and quickly with high quality. You Burn, Copy, Mount and so on... your discs in few clicks and short time.


silicon empire


Features:

  • Cdrtools Burn Engine: Highly portable CD/DVD/BluRay command line recording software.
  • MySQL Database: The world’s most popular open source database system.
  • Qt4 Cross Platform: Cross Platform application framework that is widely used for developing application software.
  • Hardware Abstract Layer: Use HAL (Hardware Abstract Layer) to found and detects hardware devices.
  • Image Mounter: Mount/Unmount Discs Images with help of fuseiso technology. It’s fast, easy and high quality mounting.
  • Multimedia System: They are Applications that allow you to play your favorite musics ,see your pictures and in future play your videos.
  • Animated User Interface: Silicon has beautiful User Interface. It’s use many animations effects to make silicon User Interface The more beautiful.
  • Themes, Icons, Plugins, Colors: It’s high customizable. You can make customize silicon with Style themes that make with css, Icon theme or color themes.
  • Drag & Drop: Support Drag & Drop functions in the main menu and most of the applications.
  • Multi Task and Application Manager: This is a technology that runs and manage number of Special Applications (Not Process) on the silicon Empire.
  • Burn and Copy Optical Discs: Silicon Empire Can Burn and Copy Optical Discs with help of the cdr-tools engine. Because The Disc Burner of the silicon Empire builds on the low level layers , silicon can Manage and Queuing overlapping burn or copy processes.

To install Silicon Empire in Ubuntu 12.04/Linux Mint 13 open Terminal (Press Ctrl+Alt+T) and copy the following commands in the Terminal:

January 13, 2017

Convert Audio / Video Files with Selene Media Encoder


Selene is a GTK3/Vala media converter tool developed by Tony George (who's also behind Conky Manager), which "aims to provide a simple GUI for converting files to popular formats along with powerful command-line options for automated/unattended encoding".

Selene Media Encoder


Besides supporting most popular audio/video formats, Selene supports 2 types of presets: JSON presets (which determine the audio/video format, codecs, bitrate, quality and so on) as well as Bash script presets which can be used for converting files using any command line utility, useful for integrating tools that aren't directly supported by Selene, as well as for automated / unattended encoding.

It's also important to note that Selene can also crop / resize / resample videos or embed subtitles.

The application is under constant development, with the latest version (2.4) being released about 10 days ago with SOX Audio Processing support, an option to check for missing encoders (see screenshot below) and bug fixes.

Selene Media Encoder
Selene - encoders status

Selene Media Encoder
Selene Presets - filter options


Selene Media Encoder features:
  • Encode videos to MKV/MP4/OGV/WEBM formats;
  • Encode music to MP3/AAC/OGG/OPUS/FLAC/WAV formats;
  • Option to pause/resume encoding;
  • Option to run in background and shutdown PC after encoding;
  • Option for SOX Audio Processing;
  • Customizable presets;
  • Preview file before converting;
  • Bash scripts can be written to control the encoding process;
  • Command line interface for unattended/automated encoding (run "selene --help" for a list of available commands);
  • Support for copying audio tags (Artist, Album, etc) to the the output file;
  • Option to check for missing encoders.
Update January 26th, 2015: Selene has received VP9 and H.265/HEVC encoding support. Note that You need to have ffmpeg/avconv compiled with VP8/VP9 support to be able to use the new VP9 encoder (Ubuntu 14.04 and above should have this enabled by default).


Install Selene Media Encoder in Ubuntu or Linux Mint


Ubuntu / Linux Mint (and derivatives) users can install the latest Selene Media Encoder by using its official PPA. Add the PPA and install Selene using the following commands:
sudo apt-add-repository ppa:teejee2008/ppa
sudo apt-get update
sudo apt-get install selene
If you don't want to add the PPA or you're using Debian, etc., grab the Selene Media Encoder deb from HERE.

For encoding AAC/MP4 format, Selene needs NeroAAC encoder which you can install by using the following commands:
cd /tmp
wget http://ftp6.nero.com/tools/NeroAACCodec-1.5.1.zip
unzip -j NeroAACCodec-1.5.1.zip linux/neroAacEnc
sudo install -m 0755 neroAacEnc /usr/bin
sudo apt-get install gpac

Arch Linux users can install Selene via AUR.

Other Linux distributions: grab the Selene source code via Launchpad (BZR).

For more information, usage, how to use bash scripts for encoding and more, see Selene's homepage.

Source: http://www.webupd8.org/2014/06/convert-audio-video-files-with-selene.html

January 12, 2017

How to Play DVDs and Blu-rays on Linux

Commercial DVDs and Blu-ray discs are encrypted. The Digital Rights Management (DRM) is designed to prevent you from ripping them, copying them, and watching them on unsupported players. You can get around this protection to watch DVDs and Blu-rays on Linux, but it’ll take some tweaking.
DVD discs work well, and all DVDs should work after you install a single library. Blu-rays are much more hit-and-miss, and only some will work–particularly older Blu-ray discs. Also, both of these require that you have the right disc drive in your PC–a DVD drive if you’re looking to just play DVDs, and a Blu-ray drive if you’re looking to play DVDs and Blu-ray discs.

How to play DVD on Linux with VLC

The free VLC media player can play DVDs on Linux, but it requires a special library known as libdvdcss. This library effectively breaks the CSS encryption on DVDs, allowing you to watch them. The status of this library is legally unclear–it’s potentially illegal under the DMCA in the USA–so Linux distributions don’t generally include it in their software repositories.
But this is actually the same method many Windows users use. Windows 8 and 10 no longer include DVD playback functionality, and the standard advice is to download and install VLC. The Windows builds of VLC have libdvdcss built-in, so you just need to download, install, and start watching. Linux is a tad more complicated.
NOTE: You can also buy a licensed copy of Fluendo DVD Player for $25 on Ubuntu’s Software Center, but most people won’t want to bother. You can get DVDs for free if you’re willing to take just a few extra steps.
On Ubuntu 12.04 to Ubuntu 15.04, you can install libdvdcss by opening a terminal window and running the following commands:
sudo apt-get install libdvdread4
sudo /usr/share/doc/libdvdread4/install-css.sh
On Ubuntu 15.10 and up, run the following command instead. Follow the instructions that appear in the terminal to install libdvdcss:
sudo apt-get install libdvd-pkg
For other Linux distributions, perform a web search for “install libdvdcss” and the name of your Linux distribution. You’ll find instructions and third-party repositories that should make the process easy.

You can then install VLC from the Software Center if it isn’t installed already. (Alternatively, you can run sudo apt-get install vlc to install it from the command line.)
Once installed, insert your DVD and launch VLC. Click the “Media” menu in VLC, select “Open Disc,” and select the “DVD” option. VLC should automatically find a DVD disc you’ve inserted and play it back. If that doesn’t work, you may need to specify the device path of your DVD drive here.
If it doesn’t appear to work, try restarting your computer. That should ensure VLC is correctly using libdvdcss.

How to Play (Some) Blu-rays on Linux with VLC

Blu-rays are a bit more complicated. While there are technically paid DVD players you can purchase for Linux, there’s no officially licensed way to play back Blu-rays on Linux.
The older your Blu-ray disc is, the more likely it will work. Newer Blu-ray discs use BD+ disc encryption, while older ones used the more easily bypassed AACS encryption. Newer Blu-ray discs also blacklist some of the known keys used to play older Blu-ray discs in this way. If you have a very new disc, you may not get it to play at all.
To install VLC and its Blu-ray support on Ubuntu, open a terminal window and run the following commands in order. You can copy and paste them into a terminal window using your mouse.
sudo apt-get install vlc libaacs0 libbluray-bdj libbluray1
mkdir -p ~/.config/aacs/
cd ~/.config/aacs/ && wget http://vlc-bluray.whoknowsmy.name/files/KEYDB.cfg
If you’re using another Linux distribution, you’ll want to install VLC and the appropriate libaacs0, libbluray-bdj, libbluray1 libraries. You can then run the second two commands to download the KEYDB.cfg file into the configuration directory.

You can now open VLC and attempt to open a Blu-ray disc like you would a DVD. Click the “Media” menu, select “Open Disc,” and select “Blu-ray.” Leave the “No disc menus” option checked.
If you see a message saying the disc isn’t decrypted and you need a key, or a message saying the AACS host certificate has been revoked, your Blu-ray disc is too new and isn’t supported.

How to Play Blu-rays on Linux with MakeMKV and VLC

If you need to play a wider variety of Blu-ray discs, there’s another method that people report more success with: you can use MakeMKV to decode the Blu-ray and VLC to play it as it’s being decoded.
MakeMKV isn’t an open-source tool. It’s proprietary software with a free 30-day trial, and will theoretically cost $50 to continue using after that. However, MakeMKV is free to use while in beta, and it’s been in beta for three years. You’ll just have to check this forum post every month and refresh the beta key to continue using MakeMKV, assuming it stays in beta.
Another forum post provides instructions for installing MakeMKV on Linux. However, Ubuntu users can install MakeMKV using the much easier apt-get command. Currently, the most up-to-date PPA we’ve found for this is the makemkv-beta PPA. To install MakeMKV from this repository, open a terminal and run the following commands:
sudo add-apt-repository ppa:heyarje/makemkv-beta
sudo apt-get update
sudo apt-get install makemkv-bin makemkv-oss
You’ll also need VLC installed, as described above. Once you have both programs, open the MakeMKV application from your menu, select your Blu-ray disc drive, and click the “Stream” icon on the toolbar. You’ll be given a local address.

Open VLC, click the “Media” menu, click “Open Network Stream,” and provide that address. It will look similar to the following address:
http://localhost:51000/stream/title0.ts
The main movie is usually either “title0” or “title1”–choose the one that looks larger in MakeMKV.

MakeMKV will decode the Blu-ray video and stream it to VLC. Despite the word “stream,” this all happens on your computer, no internet required. VLC plays the video, but MakeMKV is doing the heavy lifting in the background.

Playing Blu-ray discs is both unreliable and a hassle. Only people who have actual commercial Blu-ray discs in their hands will have to go through this trouble–if you’ve ripped the Blu-ray discs on another computer, or downloaded the ripped files, you should be able to play them in VLC just like any other video.
In an age where you can get Netflix to work on Linux just by downloading Chrome, or use a quick tweak to make Hulu or Amazon Instant Video work, this is a lot of work to play a legitimate disc. It’s possible, but you’re better off getting your media in other ways on Linux, or using another device to play Blu-rays if you must use those physical discs.
Image Credit: Andrew Booth on Flickr

Source: http://www.howtogeek.com/240487/how-to-play-dvds-and-blu-rays-on-linux/